Pages

Wednesday, August 31, 2016

Club Challenge Butterfly Card Using More NBUS


Our challenge this month for our local stamp club was to use butterflies and embossing and a suggested sketch. It was not a hard challenge for me at all because I love butterflies and use embossing folders often. My current favorite brand of embossing folders is We R Memory Keepers and this is a floral one I had not used before. I had some scraps of watercolor paper colored with Magenta Nuance pastels and used them to create some butterflies with my new Tim Holtz Sizzix butterfly die. I added a punched butterfly colored with the gorgeous Nuvo Amethyst Purple Glimmer Paste and added a lovely sentiment from the Tonic Studios Flip Set of the same name. My last step on the front was to add some Nuvo Crushed Grape Crystal Drops. I couldn't stop playing with this pretty purple Glimmer Paste so I added a sparkly Butterfly Sprig (from Tonic of course) to the inside of the card. Here are some pictures of all that sparkle- although it is so much better IRL): 


I am entering this in the NBUS challenge at Darnell's blog here and the Anything Goes challenge at Simon Says Stamp Wednesday Challenge.

Tuesday, August 30, 2016

Beautiful Backgrounds Class Cards for Let's Create


I am loving this last card I designed for the Beautiful Backgrounds (With Dies) class I am teaching at Let's Create in Wisconsin Rapids on Friday October 21st at 5:00 and Saturday October 22nd at 10:30. I made a night sky with Color Burst and a masked then stamped moon with a new stamp set by Altenew. The fairy die and stencil are by Tonic Studios and I applied the gorgeous gold Glimmer Paste coming out soon from Nuvo through the stencil. Here is a close up look at the brilliant glimmer: 


We had lots of fun this last weekend at the Embossing Techniques class I taught at Let's Create. Here are some pictures from that class: 


If you are local, I hope you can join us October 20th or 21st at Let's Create for my last special class this year. You will learn how to make some unique backgrounds including Faux Leather, Faux Woodgrain, and Color Burst with Cling Wrap in addition to the card above with Color Burst and Glimmer Paste. Here is a peak at the other three cards you would make in the Beautiful Backgrounds (With Dies) Class: 


Monday, August 29, 2016

Triple Stencils and new Nuvo Glimmer Paste Star Card

I have been playing with my new Nuvo Glimmer Pastes for an article I am writing and wondered what would happen if I used two stencils together with the glittery paste? I created a stencil out of acetate with Tonic Studio's Moonglade Wish Semi-Die and then put my Memory Box Diamond stencil under it over a white cardstock piece. I spread the Blue Topaz Glimmer Paste evenly with a plastic craft knife and let it dry, then cut it out with the outside die from the same set. I love how it turned out! These beautiful Glimmer Pastes in 12 gorgeous colors will be available for purchase in the USA after September 15th. Here's a close up of the double stencil glimmer: 

I used my Clarity Stencil Brush to apply white pigment ink on the navy card base through a stars stencil by Memory Box and added the perfect sentiment from Tonic's die set of the same name to complete the card. 

I am entering this card in the NBUS challenge at Darnell's blog here. The Memory Box stencils and the Blue Topaz Glimmer Paste were NBUS.

Sunday, August 28, 2016

Peaceful Christmas Card with Nuvo Glimmer Pastes


Did I mention I was in love with the new Nuvo Glimmer Pastes available soon from Tonic Studios? I tried the Moonstone white glimmer paste for a snowy look through a Hero Arts stencil for this peaceful Christmas card. Then I created a round mask and applied the Golden Crystal Glimmer Paste for a beautiful moon. I die cut and applied Tim Holtz's "peace on earth" for the perfect Christmas wish. 

I am entering this in the NBUS challenge here at Darnell's blog. The Hero Arts stencil and the Moonstone Glimmer Paste were NBUS.

Friday, August 26, 2016

Have a Kitty Cat Birthday with Crackerbox Palace Stamps


It’s Crackerbox Palace Friday and I am sharing a birthday card I made with some Crackerbox Palace stamps and Clarity Stencil Brushes. I am loving the subtle soft look that is so easy to achieve with the Clarity brushes and ink. I inked orange ink through a fern stencil onto the orange card base for a tone on tone look. Then I stamped and paper pieced the sleeping kitty and stamped the perfect sentiment from Crackerbox Palace. This is going to be my husband’s birthday card from me and our kitty Lucky.  He always says he wants to be reincarnated as a cat in a loving home like ours. What a life- eat, sleep, play, repeat.

I am entering this card in the birthday challenge at Live Love Cards.

Thursday, August 25, 2016

Best Friends Embossed Card with Tonic Studios Dies


It's my turn to post a project on Blog Tonic USA and here, and I am sharing a fun card I created for my BFF who loves teddy bears. Did you know that all of Tonic Studio’s dies can be embossed after you cut them for extra dimension and detail? I did that extra embossing step to the sweet Cuddly Bears best friends after I die cut them out of pink, light and dark brown cardstock.  I also embossed the white center and two corners of the card front with embossing folders. I decorated the other two corners with Tonic’s beautiful Tangled Trellis Mini Indulgence die. The Cuddly Bears die is part of a sweet line of Baby Rococo dies, but I decided they could be used for a friend’s card too. Here is a picture of the inside where I attached the Miniature Moments Best Friends die:


If you love die cuts and crafty project inspiration and chances to win great Tonic Studios prizes, you will want to join the new Tonic Fanatics Facebook group!  Here is a link to the group or search Tonic Fanatics USA on Facebook and join up today!

Tonic Studios and Nuvo Products Used: Cuddly Bears Rococo, Best Friends Miniature Moments and Tangle Trellis Mini Indulgence Dies, Tonic Tangerine Die Machine, Tonic Advantage V Blade Trimmer, Tonic Funky Glue Pen; Other:  We R Memory Keepers and Sizzix Embossing Folders       

I am entering this card in the "Hip to be Square" challenge at Simon Says Stamp Wednesday Challenge.
   

Wednesday, August 24, 2016

Awesome, Sweet and Cool Shaker Card with Tonic Studios Dies


It's my turn to post a project on Blog Tonic USA and here, and I am so happy to be sharing a shaker card I made recently for a teenage guitar lover. I love the whole Miniature Moments line of sentiment dies available on the Tonic Studios USA website here! These sentiment dies have such a great mix of fonts and sizes. I die cut “Awesome, Sweet and Cool” many times out of white cardstock and attached them around the negative space created by die cutting the Rococo Electric Guitar out of a white square card front. I sponged on four colors of Distress Ink and attached a piece of acetate to the back of the guitar opening. I attached two layers of skinny mounting tape all around the back of the guitar opening and dumped in a bunch of beads and sequins. Then I attached the completed card front to a square card base. Shaker cards are so fun because they are interactive! Here is a picture of the shaker elements all shook up:


On the inside of the card, I attached the die cut electric guitar and “You’re a Star” as shown here:


 If you love die cuts and crafty project inspiration and chances to win great Tonic Studios prizes, you will want to join the new Tonic Fanatics Facebook group!  Here is a link to the group or search Tonic Fanatics USA on Facebook and join up today!

Tonic Studios and Nuvo Products Used: Miniature Moments “Awesome, Sweet & Cool”, Rococo Electric Guitar and “You’re A Star” from Everyday Sentiments Two Dies, Tonic Tangerine Die Machine, Tonic Advantage V Blade Trimmer, Tonic Funky Glue Pen; Other: sponges, Distress Inks, beads, sequins, mounting tape      

 I am entering this card in the "Hip to be Square" challenge at Simon Says Stamp Wednesday Challenge.    

Tuesday, August 23, 2016

Beautiful Fall Day Card with New Dies and Nuvo Glimmer Pastes


I love making fall cards and when I saw the new Poppy Stamps Carved Diamond Pumpkin and Leafy Breeze border dies recently released, there was no resisting them! I die cut them both out of a square orange card front and created a shaker of punched leaves and fall colored sequins behind the pumpkin. I colored under the Leafy Breeze border die with red and gold Glimmer Paste from Nuvo (available soon from Tonic Studios). I also colored the Darice Maple Leaf with the sparkly red Glimmer Paste. It is just gorgeous IRL! Here is a close up of the sparkle and one of the shaker elements all shook up:


The "Have a Beautiful Day" sentiment is a Tonic Studios die from the Sew Pretty Frame Set of the same name. 

I am entering this card in the Make for the Border challenge at Simon Says Stamp Wednesday Challenge.

**Also wanted to share some fun news. I have been given the honor of being chosen as this week's Crafter of the Week at Create and Craft. Here is a link to the blog post. I have never seen such a big picture of me and wish it was smaller... but I am thrilled nonetheless.**

Monday, August 22, 2016

Die-Versions Offset Butterfly Wedding Card


Happy Monday everyone! It's my turn to post a card on Die-Version's blog and mine, and I am sharing this pretty wedding card I made with Die-Version’s dies. I started this card by cutting the Whispers Big Butterfly die out of the side of a white card front and also out of another piece of white cardstock. I colored the beautiful butterfly piece with Nuvo’s blue, pink and green Embellishment Mousse and popped it back into the negative die shape on the side of the card. I put acetate behind the openings, but if I did again I would probably skip that step. I attached the die cut card front to a yellow card base after die cutting Die-Versions Mr. & Mrs. Sweet Wordlets out of the center. I die cut and attached two Whispers Oriental Fans to the corners and added some pastel sequins to complete the card.

**Remember you can get a 15% discount on any of Die-Version’s great dies by simply using my discount code karen15 when you check out at the Die-Versions website.**

Sunday, August 21, 2016

I am in Love with the new Nuvo Glimmer Pastes!


Oh my gosh- I just received a surprise box from Tonic Studios and inside were 12 brand new colors of Glimmer Paste which will be available soon here in the states. It is a super sparkly version of Nuvo's Embellishment Paste, so it is similar to stencil paste. But these colors are so vibrant and glittery! It is a lighter consistency than traditional stencil paste so it dries faster. I will be showing you many cards using the different colors and ways you can use the Glimmer Pastes here on my blog. Today I am sharing a card I made with the Nuvo Silver Gem Glimmer Paste and Tonic's Christmas Angel. I die cut her and then used my finger tool to cover her with the silver Glimmer Paste. Here is a close up (but IRL she is even more gorgeous!)


I decided to make a sympathy card with her, but of course she would be beautiful on a Christmas card as well. I used the Top Note Trellis die set to cut a white card base and the navy card front. I popped up the middle and attached the silver angel and also Tonic's Heartfelt Sympathy Miniature Moments die cut out of Tonic's silver mirror paper. 

Saturday, August 20, 2016

Anything Goes 4 Kids at Send a Smile 4 Kids!


It’s Saturday and time for another fun challenge at Send a Smile 4 Kids! This time our challenge is: Anything Goes 4 Kids!  Create and link any card appropriate for a child and you could win one of our great prizes.

We have two very generous sponsors for this challenge: Cracker Box Palace is giving their winner three digital stamps of their choosing from Crackerbox Palace’s website! And the winner from Dies R Us receives a $15 gift certificate! TEAM S.A.S will also be choosing their favorite cards for our top three and the winners will receive a blog badge and an opportunity to be a guest design team member on a future challenge.

If you follow my blog, you know one of my favorite stamp companies is Crackerbox Palace. I made this fun kid’s card with Crackerbox Palace’s Fish Splash and Birthday Splash stamps. I created a bubbly background with an embossing folder from Sizzix and two shades of blue cardstock. I popped the fish and sentiment squares up on mounting tape to raise them.

Thursday, August 18, 2016

Can you help my Son celebrate his Birthday?

Different post today. My son's birthday is coming up soon and this is what he is asking for: 


I am hoping for your help in a cause of mine. Many of us have no idea what it's like to be thirsty. We have plenty of water to drink -- even the water in our toilets is clean (though we encourage Ludo not to drink it)! (Ludo is their sweet puppy.)
But many people around the world don’t have that luxury. Every day, about 1,400 children die from diseases caused by unsafe water and poor sanitation, sometimes water that they walked hours just to get. But it doesn’t have to be that way. There are simple solutions like drilled wells, spring protections and BioSand filters that help provide clean water to communities around the world.  That is where charity: water comes in.
I started this fundraising campaign to help charity: water build these types of projects around the world, and I'm looking for anyone who can help me.  I am donating my 36th birthday (coming up in a couple months so starting now!) to the cause because I already have anything I need and there are people that don't even have clean, safe water to drink. 
This is where you come in.  Please donate to my campaign -- anything you can give is a huge help.  I am hoping that you can donate $36 for my 36th birthday - if you can donate more that is amazing, but any amount will help.  The link to my campaign is provided below.
100% of the money will be used to build clean water projects (literally 100%, they have other donors that pay for all corporate cost and overhead - every dollar donated will go to a project), and when they’re complete, charity: water will send us photos and GPS coordinates so we can see the exact community we helped.  And you will of course receive a receipt for tax deduction purposes. 
I set up the campaign goal for $4,000, which would be 100 people donating $36 plus our initial funding. I would love to beat that.  $10,000 would be enough to fully fund a project and bring clean water to a community.  But every dollar helps.   We have 45 days for the campaign so hoping to act quick.  Please share this with anyone else that you think would be interested in bringing clean water to people around the world, post to social media with the links on the site, or anything else that can help raise awareness for the cause. 
Thank you for your generous contribution to our cause (or at least reading all the way down to this part of the email)!  Please read more on the charity: water website and watch videos of children drinking clean water for the first time.  Their lives are truly changed by something that we can help provide. 
This is the link to my campaign.  Even if you cannot contribute, I encourage you to visit the site and see the amazing work that charity: water is doing.  
 Can I say how proud I am of my son:) Here are some pictures from our recent weekend visit with Brian, his wife Kristy and my super cute grandson Evan:


It was my big grandson's birthday celebration and Brian took us all to the Museum of Science and Industry as Nate's gift. 

Can you help with this great cause? Any amount would be so appreciated and 100% will go to getting life saving water to those who need it. Thanks!

Wednesday, August 17, 2016

Tonic Studios Kensington Purse and Display Box


I have a goal of posting a new card or project every day on my blog unless visiting family or on vacation. But lately, I have just been unable to meet that goal. I just have had no extra time to play and make extra cards to keep blogging that frequently. I am busy cutting for classes, designing and blogging for design teams and writing articles for Scrap and Stamp Arts. All fun stuff- but hopefully soon I will have time to play with all my NBUS (Never Before Used Schtuff) and share with you here. 

And I just got back from visiting my two favorite grandsons and their parents. Take a look at my sweeties:

I am a huge fan of Tonic Studio's Kensington Purse Die Set and loved the presentation box out of acetate I learned how to make on this video. Carolyn Shellard from the UK makes and sells hundreds of these purses in their special boxes and I was so inspired to try one myself that I ordered the acetate in the weight and size she suggests. I will admit- I found it hard to even get one to fit together and stay together- but I also have not had time to really perfect the technique. I made this purse and decorated the top and bottom of the box with a lovely dp from Ken Oliver. The bow on the top of the box is also a Tonic Studios die and the chain "For You" is from Impression Obsession. Here is a look at the other side of the purse in and out of the presentation box:


The little bow is a die from Sue Wilson. I added some pretty blue gems to complete the project.

Monday, August 15, 2016

Summery Christmas Card Challenge

Recently I was introduced to Paperless Post, a card company who is running an interesting challenge. They were looking for designers to create Christmas cards with a summer theme. I checked out their new Christmas cards on line here and even though I only make my own cards for Christmas and other holidays, I decided to accept their challenge. If you are too busy to make your own holiday cards, you should check out the on line and other card options at Paperless Post here.

A friend and member of my Send a Smile 4 Kids design team lives in Australia and she says it is very hot there at Christmas time and her Santa wears shorts. I started picturing Santa on a warm beach and came up with this textured "Warm Wishes" card: 


I cut a blue A2 sized card base and applied Tonic Studio's Nuvo Lemon Sorbet Embellishment Mousse through a Memory Box stencil for the sunshine. I die cut Memory Box's "warm wishes" border out of two sided tape paper by Sookang and then dumped Summer Mudd Puddles sand over it for the sandy beach. I die cut a yellow beach chair and the red flip flops with a die from Impression Obsession. I stamped the Santa hat out of a red and white scrap with a Paper Smooches stamp and paper pieced them together. The floral Christmas trees were created with stamps by Kitchen Sink Stamps.

I had fun challenging myself to try a different type of Christmas card. When it is cold and snowy this December in Wisconsin, I will pick a special friend to send these "Warm Wishes" to.

But it is still summer now, so I am entering this card in the Summer Fun challenge at Simon Says Stamp Monday Challenge.

Wednesday, August 10, 2016

Sweet Baby Congrats Z-Fold Tonic Studios Card


It's my turn to post a project on Blog Tonic USA and here, and I am sharing a fun fold card featuring the Rococo Petites baby dies and Miniature Moments sentiment dies. I created a modified z-fold card with a piece of patterned cardstock cut 11 x 4 ¼” and a white piece 1” x 11”. Both pieces were scored at 2 ¾” and 5 ½” and folded. The white one inch piece is attached to the left and right sides of the card base. I die cut “Congratulations”, “Sweet” and the Nursery Mobile out of blue cardstock and attached them to the top white strip. The mobile was attached with tape to the back of the strip and I added some fun duck brads to the strip as well. I die cut and embossed the sweet Rubber Ducky out of yellow, orange and blue cardstock scraps and inserted the orange and blue wing, eye etc. back into the die cut ducky.


The Baby Balloons die was used to die cut a piece of two sided tape sheet and then I applied Sapphire Blue Nuvo glitter to the words in the balloons. I removed the rest of the 2 sided tape and dumped Glitter Diamond White Nuvo glitter on the balloons and ties. I colored the glittered balloons and ties with Nuvo Creative alcohol pens from the Fragrant Orange and Sunshine Yellow collections. Did you know Tonic Studios is selling alcohol markers similar to Copic markers? They blend and color beautifully and they are sold in packs of 3 (light, medium and dark shades of each color) for only $5.99! That’s right- all the shades of each color you need for only $5.99 for three alcohol markers!

Here are a couple more views of this baby z-fold card:  


On the inside piece I added a die cut pacifier (or as our friends in the U.K. call it, a “dummy”) that I heat embossed with a mixture of Nuvo embossing powders. I cut out the pacifier in white cardstock and applied Versamark ink all over it. I mixed Nuvo’s pink, purple and gold glitter embossing powders together in a small container, then dumped the mix on the sticky pacifier piece. I used my heat gun to melt the embossing powder mix and I ended up with a sparkly purple and pink “dummy” or pacifier. This card folds down and fits into a standard A2 envelope for mailing.


Tonic Studios and Nuvo Products Used: Miniature Moments “Awesome, Sweet & Cool” and “Congratulations” dies, Rococo Petites Rubber Ducky, Baby Balloons, Nursery Mobile and Newborn Dummy dies, Nuvo Pure Sheen Glitter Diamond and Sapphire Blue glitters, Nuvo Creative Pen Collections Fragrant Orange and Sunshine Yellow, Nuvo Purple Haze, Ballerina Pink and Gold Enchantment Embossing Powders, Tonic Tangerine Die Machine, Tonic Advantage V Blade Trimmer, Tonic Funky Glue Pen; Other: duck brads, patterned cardstock, small hole punch, Versamark ink, heat gun

I am entering this card in the baby challenge at Dies R Us.

Monday, August 8, 2016

Masculine Thanks Card with Die-Versions Dies


Happy Monday everyone! It's my turn to post a card on Die-Version's blog and mine, and I am sharing this  masculine thank you card featuring some favorite Die-Version’s dies. I created the background by sprinkling three colors of Lindy’s Magicals powders from the Autumn set onto watercolor paper and spritzing it with water to release the lovely colors. I die cut Die-Versions Rope Background and applied Nuvo Black Ash Mousse for realistic rope like color. I attached that when dry to the card front. Then I die cut and attached Die-Versions Sweet Petites Father and Son silhouette and “Thanks”.

**Remember you can get a 15% discount on any of Die-Version’s great dies by simply using my discount code karen15 when you check out at the Die-Versions website.**

I am entering this card in the Anything Goes challenge at Scrapy Land.

Saturday, August 6, 2016

For the Girls Challenge at Send a Smile 4 Kids


It’s Saturday and time for another fun challenge at Send a Smile 4 Kids! This time our challenge is: For the Girls! Create and link any card appropriate for a girl and you could win one of our great prizes.

We have two very generous sponsors for this challenge: All Dressed Up is giving their winner two digital stamps of their choosing! And the winner from Repeat Impressions receives a $15 gift certificate! TEAM S.A.S will also be choosing their favorite cards for our top three and the winners will receive a blog badge and an opportunity to be a guest design team member on a future challenge.

I printed, colored and paper pieced the sweet digital stamp from All Dressed Up called "Cuddle". I framed her and created the circular card with the Trellis Circle Base Die set from Tonic Studios. 

I am entering this card in the Anything Goes challenge at Scrapy Land. 

Friday, August 5, 2016

Brusho Rose Hello


I was playing with my Brushos and some dies and came up with this card recently. I deliberately aimed lighter colors in the center and darker on the edges of a piece of watercolor paper and then when it was dry, I stamped a rose from Penny Black. I framed the rose with a stitched die from Lawn Fawn and added a die cut Hello from Paper Smooches.

I am entering this card in the Anything Goes challenge at Scrapy Land and the Fabulous Florals challenge at Simon Says Stamp Wed. Challenge.

Thursday, August 4, 2016

Masculine Congrats Card with Tonic Dies


I decided to make a wedding card for two men and cut the "s" off Tonic Studios Mr. and Mrs. heart die. One of the reasons I love Tonic Studios dies so much is that they are so very versatile. With this die, you can chose to cut the heart alone, or the Mr. and Mrs. without the heart edge (as I did here), or you can cut them together as on the heart on the right. I tried a technique I learned about in a class on line to make a tarnished silver look with embossing powders. I did not achieve the look like the instructor did, but I still like the result. I applied Versamark ink all over the heart that I die cut out of chipboard. I applied Nuvo silver embossing powder and heat set it. Then I added some thick clear embossing powder (from Ranger) and some black Nuvo embossing powder in spots (after applying another layer of Versamark in random areas) and melted the black and thick embossing powder to achieve the look you see. I also tried the embossing technique on the Mr. and Mrs. heart but on that one I did not use any black. I created a square top folding white cardstock card base and used a straight edge mask, my Clarity stencil brush and Weathered Wood Distress Ink to achieve the soft grey lined background. I die cut and attached Tonic's Congrats from the Miniature Moments sentiments line to complete the card.

I am entering this in the Anything Goes challenge at Scrapy Land.

Wednesday, August 3, 2016

Best Wishes with Lindy's Magicals and Tonic's Butterfly Header Die


This colorful card is the last in my series of cards featuring Tonic Studio's Garden Terrace header dies and their Miniature Moments sentiment dies. My assignment for Scrap and Stamp Arts was to show different ways to use the same dies. Let's face it- die cuts can be expensive, so when you make the investment, it is good to know different ways to use the dies. This time I started with a beautiful background created with Lindy's Magicals watercolor powders from their Fall Collection. I chose Cat-tail Copper, Tibetan Poppy Teal and Autumn Maple Crimson and sprinkled them on a piece of watercolor paper. I spritzed with water to release the gorgeous colors and then let it dry. I die cut the butterfly header from Tonic's Garden Terrace Header set and deliberately left all the pieces in the butterflies at the top. I held them in place with small pieces of regular tape. I die cut the same die in the bottom of the card front letting the white of the card base show through the die cut holes. These dies all have a separate edge that can be used with the die (as on the top) or not used (as on the bottom) for two distinct looks. I added the Miniature Moments "Best Wishes" sentiment in the center of this colorful CAS card. Links to the Tonic header and sentiment dies I have used in this series of 5 cards can be found by scrolling down on my blog to the other cards I created in this series.

Tuesday, August 2, 2016

Another card with Tonic Header and Sentiment Dies


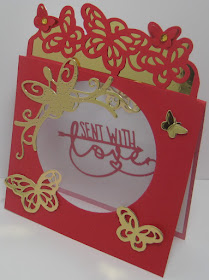
Today I am sharing another card I made with Tonic Studios Garden Terrace header dies for an article I am preparing for Scrap and Stamp Arts on different ways to use our dies. This time I cut a solid background for the header die and also cut apart the butterflies from the header die to use on my card. The butterfly header from the Garden Terrace set is just lovely and I die cut it out of the top of a red square card base. I also cut the outline only of the butterflies out of Tonic's gold mirror card and attached it behind the red butterflies. I die cut one of Tonic's circle dies out of the front of the card base and attached acetate behind the circular hole. I die cut the butterfly header die in Tonic's gold mirror card and then cut the pieces apart for accents on the front and in the inside of the card. I also die cut the beautiful butterfly Sew Pretty Corner die and attached that to the front of the card. On the inside of the card I attached a couple more gold butterflies and the gorgeous Miniature Moments "Send With Love". Links to both of these sets and more ideas on how to use these dies can be found if you scroll down here on my blog for the last three day's blog posts. 

Here are a couple more pictures showing my card from the side with the acetate opening: 


Monday, August 1, 2016

Heartfelt Sympathy Garden Terrace Header Card


Don't see a header die in this card? I used the third die in the Garden Terrace Header set from Tonic Studios  to make a stencil and brushed Fossilized Amber Distress Ink with my Clarity Stencil Brushes for the soft color in the background of this card. You can make a stencil out of most any die either out of acetate if you want  to use it many times, or out of thick cardstock for just a few cards.  I love the new line of sentiment dies from Tonic Studios called Miniature Moments! All of them are small enough to use on an A2 card and have a gorgeous mix of fonts and sizes. I used Tonic Studio's Heartfelt Sympathy die cut in brown cardstock for the focus of this CAS card. I added some Nuvo English Mustard Crystal Drops and layered the front piece on a dark brown A2 card base.