Pages

Wednesday, November 30, 2016

Scratch Off Winter Love Card


I bought some scratch off stickers from Inky Antics to use with their stamp sets and designed this card for a special grandson this winter. I love the Joyful Snowman die from Penny Black- he just makes me smile:) I sponged some color on him to highlight his face and features. I also sponged a snowflake background using a Penny Black snowflake stencil. I created a snowbank and sponged that with blue ink and attached my joyful snowman with a small Action Wobble. I wrote a secret message under the scratch off sticker, attached a penny with a removable glue dot and stamped a helpful suggestion from an Inky Antics scratch off stamp set. Here is what my grandson will see when it is scratched off: 


I am linking this card to Work It Wednesday at Simon Says Stamp.

Tuesday, November 29, 2016

Joyful Foiled Holiday Card

 I have one more foiled holiday card to share with you. The background on this card was created with Gina K Foil Mates and the starry Deco Foil. IRL it sparkles and shines when it is moved- you can see a little of the sparkle and stars from this angle: 


The beautiful reindeer on the front of the card was cut out of navy cardstock with a new die from Impression Obsession. Joy is my favorite Christmas word and I attached a "joy" with a snowflake O cut with a die cut by W plus 9. Here is a peak at the inside of the card:

Tim Holtz's new "wish" die from Sizzix was die cut out of the negative of the snowflake Foil Mates sheet so it is full of sparkly stars too. 

I am entering this card in the Christmas to Die For challenge at Simon Says Stamp Wednesday Challenge.

Monday, November 28, 2016

CASED Snowflake Stenciled Card


A long time ago, I pinned this card at the Snippets blog with the intent of CASING it and I finally made my own version of this lovely CAS card. In case you do not know these acronyms, CAS is Clean and Simple, and CASE is Copy and Steal Everything, or as I prefer, Copy and Selectively Edit. I did use the same stitched snowflake die as Karen D. did - in fact I bought the Stitched Snowflake set at Lawn Fawn because I loved her card so much. I did use the same color palette too, but slightly different distress inks (I used Fossilized Amber.) I die cut the front of my card with a large stitched rectangle die from Lil' Inker and I added the "Noel" sentiment from Tim Holtz for Sizzix. I raised my stitched snowflake on a white fun foam snowflake. And the stencil I used for my background was a new one called Bevelled Diamond from Tonic Studios. 

I am entering this card in the Christmas to Die For challenge at Simon Says Stamp Wednesday Challenge.

Sunday, November 27, 2016

Playing with Foil and New Christmas Dies

I am working my way closer to my goal of designing with all my new Christmas dies as I play with my laminator and the different Deco Foils I bought in Madison. I die cut a new Merry Christmas Wish die from Memory Box out of a toner sheet and ran it through my laminator with Rainbow Deco Foil for this colorful Christmas tree. I attached it to an embossed front created with a Darice embossing folder. Very simple card to create, but I love how it turned out. Here's another view of the gorgeous rainbow foil: 


I am entering this card in the Christmas to Die For challenge at Simon Says Stamp Wednesday Challenge.

Saturday, November 26, 2016

Super Sparkle with Gina K Foil Mates


A couple days ago I posted a card here I made after watching Gina K demo in a booth at the stamp show in Madison. She demoed her Foil Mates paper using a starry foil from Deco Foil and a laminator and I grabbed some of the snowflakes sheets and special foil before it all sold out. She also demoed how to use the left over foil with a toner sheet and that is what I did for the starry sparkly background on this card. IRL when I move it, the stars just pop out with movable shine- love it! I simply layered the sheet on green and red and added a joyful snowman I cut out with a new die from Penny Black. I also purchased Gina K Holly Jolly Sentiments Foil Mates and I ran one of them through the laminator with the Rainbow Deco Foil. 


It is really hard to capture all the starry sparkle on this card in photographs. I die cut a Poppy Stamps Callum Stitched Snowflake out of the white center piece and popped a silver foiled snowflake back in for a fun center to write my holiday message on. My goal is to play with all my new Christmas dies, stamps and other products and get the cards blogged before Christmas. 

I am entering this card in the Christmas to Die For challenge at Simon Says Stamp Wednesday Challenge.

Thursday, November 24, 2016

Thankful for Nuvo Sparkle and Thanksgiving Blessings


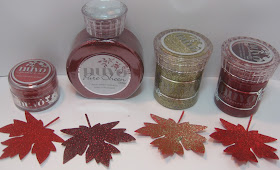
Thanksgiving will be here before you know it, and I am grateful for family, dear friends and the opportunity to design with Nuvo sparkle and Tonic Studios dies. I recently pulled out my Nuvo Glimmer Pastes, Sparkle Dust fine glitters, Pure Sheen Glitters, Embellishment Mousse and Crystal Drops to create some Thanksgiving sparkle. I am fascinated with the different looks easily achieved with the Nuvo glitters and Glimmer Pastes. I die cut four red maples leaves using a die from the September Harvest Die set. The two on the left were die cut out of two sided tape paper from Sookang, and I applied Nuvo’s Hollywood Red Sparkle Dust fine glitter to one and Nuvo’s Pure Sheen Ruby Red glitter to the other.  I used an inexpensive large brush to add Golden Crystal and Garnet Red Glimmer Paste to the leaves on the right. Each leaf is beautiful in its own sparkly way! I continued to play with different dies and colors of Nuvo sparkle and shine and created a Blessings card and a Thanksgiving centerpiece. 

For both my Thanksgiving projects, I die cut a multitude of different kinds of leaves from Tonic’s three Autumn Die Collections out of fall colored cardstock and two sided tape sheets. Then I “colored” them with Nuvo Glimmer Pastes, Sparkle Dust fine glitters and Pure Sheen glitters. I also die cut some acorns and twigs and “colored” those with brown Nuvo Embellishment Mousse.


I die cut my wreath card out of gold cardstock using several circular layering die sets from Tonic. Then I attached a fall harvest of sparkly leaves and a couple acorns all around the wreath front using my Nuvo and Tonic glue pens.

Through the open center of the wreath, you can see a digital stamp of one of my favorite sayings “when I count my BLESSINGS, I count you twice” that I found shared here. I printed it on orange cardstock, cut it out with one of Tonic’s Scalloped Circle Layering Basics dies and added some English Mustard Crystal Drops. 


I used the rest of my sparkly leaves, twigs and acorns in a Thanksgiving centerpiece for my table. Using an inexpensive large brush, I brushed Golden Crystal and Garnet Red Glimmer Pastes on the edges of many pinecones found in a friend’s woods. The glittery leaves fill the center of the centerpiece and twigs and other elements from the three Autumn Die Collections are mixed in at different heights. I die cut a Thanksgiving sentiment using Tonic’s Mixed Edge Rectangle, Miniature Moments Many Thanks and the Clarice Lowercase Alphabet die sets and attached it to the centerpiece handle.


My Thanksgiving table is all set – it just needs the turkey, pumpkin pie and loved ones gathered around.


Here is the list of the supplies I used in these Thanksgiving projects:

DIES: Circle dies from 481E Circle Layering Die Set and 1455E Scalloped Circle Layering Basic Die Set, 1457E Mixed Edge Rectangles Basic Layering Set; Leaves, acorns, twigs etc. from 1430E Pinecone Season, 1431E Autumnal Oak and 1432E September Harvest; 1252E Many Thanks Miniature Moments Die, 1123E Clarice Lower Case Alphabet Set.

NUVO: Glimmer Pastes Garnet Red, Emerald Green, Golden Crystal; Sparkle Dust Fresh Kiwi, Cinnamon Spice, Hollywood Red; Pure Sheen Glitter Spiced Apricot, Ruby Red; Embellishment Mousse Cosmic Brown, Fresh Copper; Crystal Drops English Mustard.

TOOLS & MISC.: Tonic Tangerine Die Machine, Tonic Advantage V Blade Trimmer, Tonic Funky Glue Pen, Nuvo Glue Pen; Other: Digital Blessings Sentiment by Desert Diva, Sookang two sided tape sheets, pine cones.

Wishing you and yours a blessed and peaceful Thanksgiving!

Wednesday, November 23, 2016

Another Thanksgiving Blessing!


Guess who is turning one on Thanksgiving? I've shared some pictures of my darling grandson Evan here during this last year, but here a couple recent pictures so you can see how much he has grown:

All dressed up for the chilly weather and at his first Cubs game with Daddy. I wasn't able to see him this week, so I sent a special card I made. We celebrated earlier with him and the whole family, and will see them soon for Christmas.

I die cut a couple sweet elephants with a die from Tonic Studios and added a die cut balloon (Avery Elle) with the birthday number from Tonic. The real fun happens when the card is opened: 


I have seen many versions of this four panel pop up card on Pinterest and blogs and I have tried a few. The easiest way I have found so far to achieve this four fold pop-up is to use the Karen Burniston Twist Circle Pop-Up die (from Elizabeth Craft Designs) as was shown in this video. I die cut Evan's name with dies from Tonic Studios and added a Happy Birthday wish cut out with a Memory Box die. Here is a couple more looks to see how the pop up element opens: 


Tuesday, November 22, 2016

Snowman Sparkle from My Favorite Booths at Madison Stamp Show


I had so much fun this weekend at the One of a Kind stamp show in Madison and this card was made with make and takes and ideas from my favorite two booths at the show. The snowy background which sparkles with stars and shimmer when it is moved IRL was made with a Gina K product called Foil-Mates and a laminator. I saw a video by Gina K last summer here and immediately bought everything I needed to make the background. But I didn't find the time until I was inspired by her demos in the Craft Fancy booth. So of course I bought some more of her Foil-Mates sheets and Deco Foil and pulled out the laminator and gave it a try. It is impossible to capture the movement and sparkle on this card, but here is another view: 
I added some small gem stickers by Stampendous to the snowflakes and around the snowman  for even more sparkle. The snowman was a make and take in another favorite booth - Stamplistic. The scarf and buttons are sparkling with real Swarovoski crystals and the snowman is layered for great dimension. Here is a look at the inside where I foiled the sentiment with another Gina K Foil-Mates and rainbow foil.

I will be sharing many other cards with Gina K Foil-Mates and Stamplistic stamps and sparkle in the near future. 

Monday, November 21, 2016

Age is Irrelephant Bubbles Card


I recently found a tutorial on how to make a fun bubbly background with Distress Inks and bubbles. For another card with the technique and a link to the tutorial, check out this earlier blog post. On this card front I mixed brown and green distress inks and then dipped it into soap bubbles, then let it dry. I used my MISTI to stamp the super cute elephant and sentiment from Fun Stampers Journey. Then I paper pieced the elephant with grey polkadotted patterned paper. I layered the completed piece on a green cardbase and added a punched greeting in the inside: 


I am going to share this technique and this card in my in home classes coming up.

Saturday, November 19, 2016

Anything Goes 4 Kids at Send a Smile 4 Kids


It’s Saturday and time for another fun challenge at Send a Smile 4 Kids! This time our challenge is: Anything Goes 4 Kids! Create and link any card appropriate for a child and you could win one of our great prizes. 


We have two very generous sponsors for this challenge: All Dressed Up Stamps is giving their winner 2 stamps of their choice! And the winner from Bugaboo receives 7 digis of their choice! TEAM S.A.S will also be choosing their favorite cards for our top three and the winners will receive a blog badge and an opportunity to be a guest design team member on a future challenge.

I think the digital stamp from All Dressed Up called "Love My Shades" that I used on my card above is so cute! I printed him on several patterned papers and and on a shiny blue paper that I cut out for his shades. Super simple but super sweet for any young child! 

Friday, November 18, 2016

Merry and Bright Christmas Card with Nuvo Glimmer Pastes


I think most of my Christmas cards this year will be full of sparkle from Nuvo Glimmer Pastes. It is so easy to use in so many ways. The first step in making this card was to die cut  the top part ("May Your Days Be") of Tonic Studio's Merry and Bright Header Fold Die along the center score line of a dark green card base. I created a stencil with the "Merry and Bright" part and applied Garnet Red Glimmer Paste through the stencil and let that dry. I used the Essentials Sunray Venus Layering Die Set to cut out the white and gold mirror card layers on the card front. Then I die cut Tonic's Poinsettia Wreath Die several times and applied Garnet Red, Golden Crystal and Emerald Green Glimmer Pastes to color it with texture and sparkle. I finished the holiday flowers with a center of Nuvo Crystal Drops. Here is a close up look at all the texture and sparkle:

On the inside of the card, I added Tonic's Happy Holidays die cut out of Tonic's gold mirror card. 


Tuesday, November 15, 2016

Spread Love Rainbow Card


Spreading love is a good thing anytime and I had fun playing with my Color Burst powders to create this card. I used my ROY G BIV rainbow colors of Color Burst to create the background in this card. When it was dry, I created a heart out of safety pins and added "love" cut out with a Tonic Studios die and "spread" cut out with a Memory Box alphabet set of dies. I had some extra rainbow colored watercolor paper so I added some hearts to the inside of the card too:
These scribble hearts were cut out with a die from Tim Holtz. Have a great day and spread some love in whatever you do.

Monday, November 14, 2016

Double Embossed Christmas Card with Die-Versions Dies


Happy Monday everyone! It's my turn to post a card on Die-Version's blog and mine, and I am sharing this Christmas card I created with the beautiful Madonna Ornament die from Die-Versions and a favorite background technique. For more information on the double embossed technique and a link to the original tutorial, please visit my blog here.

For this card, I did the Staz-On streaks with Azure and Black Staz-on on aluminum foil. I embossed with a Spellbinders embossing folder and dumped on blue, silver and gold embossing powders and melted it with my heat gun. Then I sponged on black archival ink. After layering the completed piece onto a navy card base, I die cut the Madonna Ornament out of white, layered it on a navy blue circle and attached it. On the inside I added the gorgeous Christmas Greetings Die-Versions die as shown here:


**Remember you can get a 15% discount on any of Die-Version’s great dies by simply using my discount code karen15 when you check out at the Die-Versions website.**

Sunday, November 13, 2016

Merry and Bright

I love header dies and designed a bunch of my Christmas cards with some new header dies I purchased from Tonic Studios. This one is called Merry and Bright Header Fold Set and I diecut it right along the fold of this square red card. I lined the inside of the card with white so the sentiment both pops up out of the top and shows through with the white background. I die cut the Holly Vine Frame out of a pretty green and kraft colored dp and raised the center piece. I added some Nuvo Autumn Red Crystal Drops and gold glitter tape to complete the holiday card. One more for my stash:)

Friday, November 11, 2016

Layered Sparkle from Tonic Studios


I was having so much fun playing with Tonic Studio's new layering dies and Nuvo glimmer pastes that there was no way I was going to stop after my three design team projects this month. The sparkle in the glimmer pastes is so beautiful IRL and the pictures do not do it justice. I die cut three Mixed Edge Oval Layering Dies and attached them together with temporary tape on a square white card. Then I used a stencil knife to apply Blue Topaz Glimmer Paste through a swirly snowflake stencil by Echo Park. After washing the stencil and knife (very important to do this immediately) and letting the glimmer paste dry, I pulled the ovals apart and attached them as shown raising each one with mounting tape. Here is a look from the side showing the dimension better: 


I die cut the beautiful Rococo Winter Snowflake from Tonic Studios out of a navy blue scrap and added some sparkle to the edges with Silver Gem Glimmer Paste. I finished the sparkle with a Silver Moondust Glitter Drop in the center of the snowflake. On the inside of the card, I layered two of the scalloped ovals from the same Mixed Edge Oval Layering Die Set (half are scalloped and half are not and all fit on an A2 card!) and added a "Joy to the World" sentiment wish (also from Tonic of course.) 


I am entering this card in the sparkle challenge at Simon Says Stamp Monday Challenge.

Thursday, November 10, 2016

Season's Greetings from Wisconsin


I found this Wisconsin state map stamp by B & J Art Stamps at Let's Create in Wisconsin Rapids and knew it had to come home with me. I stamped my state on the front and added a "Season's Greetings" die cut from Tonic Studios and some silver stitched snowflakes from Lawn Fawn. The inside of the card is the best part:


I love interactive cards and am having so much fun designing with several dies I bought recently from Karen Burniston for Elizabeth Crafts. I used the pop up circle die for this card and attached a red circle with a Merry Christmas Ornament greeting from Simon Says Stamp. The ornament pops up and moves when the card is opened. I added a Cockle Shell shaped white piece on the back to write a greeting and sign my name cut with a die from Tonic Studios:


I am entering this card in the Holidays challenge at Live Love Cards and the Anything Goes challenge at Scrapy Land.

Wednesday, November 9, 2016

Sparkle and Shine on Double Embossed Foil


I am sharing a new version of the double embossing technique I have been having so much fun with that has more sparkle and shine but does not show the embossing texture as much as the ones I made with aluminum foil. I started with a green foil paper from Recollections instead of aluminum foil. As I have done with the previous cards, I added streaks of StazOn (black and green), then applied Versamark to one side of a Sizzix holly embossing folder. I ran it through my machine and then dumped on sparkly gold, red and green embossing powders and melted them with my heat gun. This version of this technique does not highlight the raised embossing as much, but is very sparkly and lovely IRL. Here is a closer view: 


I attached the completed piece to a white cardbase and added a white beautiful Poinsettia Candle cut with a die from Memory Box.

I am entering this card in the sparkle challenge at Simon Says Stamp Monday Challenge  and the Holidays challenge at Live Love Cards.

Tuesday, November 8, 2016

Music is Life Mixed Media Card


I saw a video here on a background technique that used Distress Inks and soap bubbles and it looked so fun, I just had to try it. I made this card with one of the pieces and if you look in the background, you can see the bubble marks. Here is a picture of some of the other pieces I did with different colors of Distress Ink:


The center one also has dried Elmers Glue on it. The darker the distress ink, the better the results. I will make some cards with these and share them soon. I used Dusty Concord Distress Ink on my Music is Life Mixed Media Card. Before I sponged and dipped the card front into the bubbles, I stamped the lovely musical tree with Versamark and heat embossed with black embossing powder. The guitar and tree (from Fun Stampers Journey) resisted the ink and bubbles. After sponging and dipping in bubbles, I let the piece completely dry. Then I used my MISTI to stamp the sentiment and Postage Stamp (both also from Fun Stampers Journey.) I applied Nuvo's Black Diamond Glimmer Paste though Tonic Studio's Falling Diamond Stencil on both sides. Then I die cut Tonic Studio's Piano Melody Die out of a purple scrap, backed it with white and attached it to the card. The Black Diamond Glimmer Paste (from Tonic Studios) is sparkly and adds great dimension to the card.  I love all the colors of this great new product! It is hard to show the dimension and sparkle in a photograph, but here is a close-up: 


I am entering this card in the Anything Goes (with a stamp) challenge at Craft Stamper Magazine. 

Monday, November 7, 2016

Thanks with Wrinkled Double Embossing


I showed my in home class students some samples with the double embossing technique I fell in love with recently (scroll down for many more samples and links to original tutorials), and they loved it too. They asked that all the cards in October be made with this technique. In playing that day, one of my creative students suggested wrinkling the aluminum foil before applying the StazOn ink and I loved how her card turned out. I tried it myself and this is one of the cards I made. Here is a picture of the aluminum foil early in the creative process: 
I applied the black StazOn direct to paper on top of the wrinkles in the aluminum foil. Then I applied Versamark to the top side of a Thanks embossing folder from Darice and ran the sandwich through my machine. I dumped on purple, blue and gold embossing powders (one at a time) and melted them with my heat gun. The last step is to sponge on black archival or StazOn ink to tone down the silver edges and highlight the embossing. Then I simply attached the completed piece to a purple card base. The wrinkling of the aluminum foil does result in an uneven side to the card front, but I decided I like the grunge look.