Pages

Thursday, August 31, 2017

Rainbow Brushos Thinking of You Card


Recently I hosted a play date at my house where we played with my Brusho Coloured Crystals again. I hadn't pulled out any of my watercolor powders for awhile and it was fun to get messy with them again. I created a rainbow background with ROY G BIV colors of Brushos and it was sitting in a pile in my craft room when I decided to play with a new die from Tim Holtz and Sizzix called Paper Cut Bird. I simply cut it out of white cardstock, attached it to the rainbow background and the card was almost complete. I have been in need of "Thinking of You" cards recently so I added that sentiment from Tonic Studios on a strip of vellum so it stands out from the busy background.

I am sharing this card in the Anything Goes challenges at Simon Says Stamp Wednesday and at Scrapy Land.

Thanks for helping me #spread the joy of creativity!

Wednesday, August 30, 2017

Spooktacular New Fun Fold


I love love love finding new fun folds! I saw a video and a blogpost explaining how to make this bridge card here and knew I had to try it right away. Sandi made hers with matching Christmas dies in the front and the back, but I wanted to include some new Halloween dies from Tonic Studios and Karen Burniston and this is what I came up with. Here are some more looks so you can see this fun fold: 


I started with an orange cardbase scored and folded following the directions on the video. I attached Tonic Studio's Haunted House in the back of the card. I cut four strips of some Halloween dp I had in my stash for the 4 side panels. I die cut a ghost, a bat and a spooky tree from Karen Burniston's Halloween Elements and Halloween Scene die sets and attached them on the sides as shown. I punched a Halloween fence using an old punch from Martha Stewart, leaving an inch along the bottom for the bridge. I attached a yellow Spooktacular die cut (from Tonic Studios) and another ghost to complete the card. If the die cuts do not stick out (and mine do), this card will fit into an A2 envelope and lay flat as shown here:


I am sharing this card in the Anything Goes challenges at Simon Says Stamp Wednesday and at Scrapy Land.

So fun to play with new fun folds! Thanks for helping me #share the joy of creativity!

Monday, August 28, 2017

YouTube Monday - Special Holiday Edition of Enabler Alert!


It's Monday so it must be time for a new YouTube video over on my YouTube channel! On this new special edition of my Enabler Alert series, I am sharing all the new Christmas and Halloween dies in the latest release by Karen Burniston, all the Halloween dies in the latest release by Tonic Studios, and a look at the Tim Holtz Tonic Studios Stamp Platform. Be prepared to be amazed - so many awesome dies in these two releases and the Tim Holtz Tonic Stamp Platform is awesome!

Here is a direct link to see the new products in this Enabler Alert video: https://youtu.be/1a0b8mahO84

Are you a subscriber yet? And have you left a comment on one or more of the videos I have made in the last three weeks? If so, you are qualified for the grand prize drawing to be held the end of September. You get one chance per comment (one per video) IF you are a subscriber. I appreciate comments and followers here on my blog, but really need the subscribers and comments on my YouTube channel if I am to succeed there. 

Thanks for helping me #spread the joy of creativity!

Friday, August 25, 2017

Handmade Hugs Card with NBUS (Never Before Used Schtuff)


I finally got a chance to play with my pile of NBUS (never before used schtuff) on the bed in my craft room and this handmade hugs card is the result. I saw a few cards made with the marbled background stamp from Stampin' Up and knew I had to get it. The different tones of blue and white are created with the stamp and only one color of ink- so pretty! I die cut the top and bottom pieces out with Jaded Blossom's Card Layer Die Set Two and then cut the hugs die cut (from Lawn Fawn) out of the bottom one. I also die cut a "hugs" out of white fun foam, glued the two together and then attached it back in the spot I die cut it from. The sentiment and the hearts in the center strip are from a new set called Cuddles and Hugs from Concord and 9th. Here is a peak at the center of the card where I attached another strip of that lovely marbled paper:


I figure every time I send a card I made to someone, it is a handmade hug, so I love the sentiment on this card!

Thanks for helping me #share the joy of creativity!

Thursday, August 24, 2017

Hello Gorgeous Flamingo Card with NBUS

I finally got a chance to play with some of my NBUS (never before used schtuff) that was piled on my bed and I made a couple cards I will be sharing this week on my blog. I featured the Card Layering Die sets from Jaded Blossom, Distress Oxide Inks and the Zen Waves background stamp from Technique Junkies in my 1st Enabler Alert video on YouTube and here is the first card I made with them. I stamped the Zen Waves stamp with two colors of blue distress oxide inks (Salty Ocean and Broken China) in my Tim Holtz Stamp Platform (in case I didn't get a perfect impression the first time- and I didn't, so this tool is a must especially for large background stamps.) I die cut the perfect stitched triangles with the Card Layers Die One from Jaded Blossom and sponged some blue distress ink around the edges. I also used my Tonic Studios Tim Holtz Stamp Platform to stamp the flamingo from Hero Arts in three shades of pink inks and then cut it out with the matching Hero Arts Flamingo Frame Cut die. I attached him with mounting tape to raise. The "hello gorgeous" stamp is from the same Hero Arts Color Layering Flamingo stamp set. I added some sticker gems to the front. Here is another look and a peak at the inside of the card:


I die cut a stitched tag with the Card Layer Dies One from Jaded Blossom out of the Technique Junkies Zen Waves background and stamped another fabulous sentiment from the Hero Arts flamingo set. 

Tuesday, August 22, 2017

I Love my Tim Holtz Stamp Platform, my Nuvo Glitter Markers and You!


I am loving my Tim Holtz Stamp Platform from Tonic Studios and could not have made this card without it. I had to stamp the Delicate Detail Floral Flourish stamp from Tonic Studios on white speckled paper and on watercolor orange paper in exactly the same position to achieve this look. Here is a picture that helps explain that:


After stamping the flower in exactly the same place on both pieces of cardstock, I die cut "YOU" (also from Tonic Studios) out of the two pieces in exactly the same spot. I will save the one on the top for a future card. I attached the orange watercolor cardstock piece to a YOU diecut out of white fun foam with my Nuvo Deluxe Adhesive (best liquid glue on the market!) and glued it back into the spot it was cut out of. 

I am also loving my Nuvo Glitter Markers! I used them in four different ways on this card! Can you count that many different ways to use them? 


Here is a close up that shows all four ways: 1.) I colored the lines and details of the Floral Flourish Stamp on both the card front and the orange raised YOU. 2.) I colored the "love" die with a green Nuvo glitter marker. (that love was cut from a Tonic Studios Sent with Love die.) 3.) I dotted a heart with several colors of Nuvo glitter markers using several sizes of Tonic Studios Traditional Hearts Layering Set. 4.) I colored the clear gems to match the colors in my card also using Nuvo Glitter Markers.

I am entering this card in the "Add a Sentiment" challenge at Simon Says Stamp Wednesday and the Anything Goes with a Die challenges at Dies R Us and Scrapy Land.

Monday, August 21, 2017

YouTube Monday - Tonic Studios Trick or Treat Boxes with Unique Embossing Technique

I had so much fun creating this sparkly trick or treat box using Tonic Studio's new Halloween dies, that I could not stop at just one, and have created a new YouTube video showing how I made them!


Here is the link to where my YouTube tutorial is posted so you can watch how to assemble the coffin treat box and how I made the sparkly version with a unique embossing technique I discovered.


The boxes open up to put Halloween candy in for your special trick or treaters. While you are at my YouTube channel, be sure to watch the Grand Opening video to find out how to qualify to possibly win a prize package valued at almost $200! Here is a link to my YouTube channel where you can find these two videos and others as well:  https://www.youtube.com/user/khasheck04

I am entering the sparkly trick or treat box in the "Add a Sentiment" challenge at Simon Says Stamp Wednesday and the Anything Goes with a Die challenges at Dies R Us and Scrapy Land.

Saturday, August 19, 2017

CAS (Clean and Simple) Cards 4 Kids at Send a Smile 4 Kids!


It’s Saturday and time for another fun challenge at Send a Smile 4 Kids! This time our challenge is: CAS (Clean and Simple 4 Kids! Create and link any CAS card appropriate for a child and you could win one of our great prizes.


We have two very generous sponsors for this challenge: All Dressed Up Stamps is giving their winner two digis of their choice! And the winner from Dies R Us will receive a $15 gift certificate! TEAM S.A.S will also be choosing their favorite cards for our top three and the winners will receive a blog badge and an opportunity to be a guest design team member on a future challenge.

My card is very CAS but super cute. I simply printed the Monsterific digi from All Dressed Up Stamps on a square yellow piece of cardstock and also on some dp scraps and paper pieced the adorable monsters. I added some googly eyes and attached the completed card front to a black square card. 

I am entering this card in the "Add a Sentiment" challenge at Simon Says Stamp Wednesday.

Thursday, August 17, 2017

Another Rainbow "Part of the Dance" Card

I love rainbows and gorgeous stamps and playing with them when I have time. I am taking a class called Rainbow Maker at Online Card Classes and played with one of the ideas they shared creating a round rainbow of colors with Distress Oxide inks and a sponging tool. It is easier to blend the Distress Oxide inks than the traditional distress inks I think, but I am still not an expert. Even so, I do like the background especially with the water spots and I love the stamp from Technique Junkies that is the focal point. I stamped it several times using my Tim Holtz Tonic Studios Stamp Platform and black Versafine ink. I attached the finished card front to a white 5 1/2" square card base and added some Sparkling Clear Droplets from Kat Scrappiness to finish the card.

I will be entering this in the "Add a Sentiment" challenge at Simon Says Stamp Wednesday and the Day One gallery at the Rainbow Maker Online Card Class. Thanks for helping me #spread the joy of creativity!

Wednesday, August 16, 2017

Tonic Studios Cupcake and Treat Boxes for Teachers and Weddings


I am proud to share that the treat boxes I made with Tonic Studio's Cupcake and Treat Box are being featured at the Tonic Studio's USA Blog here today. I made a fall one for bringing a special teacher a treat on the first day of school and also made a quick one that could be used for a wedding or shower favor:


These treat boxes are so easy and fun to make! For detailed instructions and more pictures, head on over to the Tonic Studios USA blog and thanks for helping me #spread the joy of creativity!

I am entering my fall treat box in the Anything Goes challenge at Dies R Us and the Add a Sentiment challenge at Simon Says Stamp Wednesday.

Tuesday, August 15, 2017

Rainbows and Gorgeous Stamps Make Me Happy


I have been taking the Rainbow Maker class at Online Card Classes but hadn't had the time to try any of the colorful rainbow ideas they shared until this weekend. The beautiful stamp from Technique Junkies featured in this card called "Part of the Dance" has been calling my name since I received it and I finally had time to play with that too. I started this card front with Bristol Smooth Surface cardstock and a stencil from Ranger and Dina Wakely called Mighty Waves. I taped the stencil down and used my Clarity Stencil Brushes to brush on a rainbow of colors using my Distress Oxide inks. Then I placed the stenciled card front in my Tim Holtz Tonic Studios Stamp Platform and stamped the gorgeous stamp from Technique Junkies several times with black Versafine ink. I love how this card came out and will be entering it in the Day One gallery at the Rainbow Maker Online Class.

Thanks for helping me #spread the joy of creativity!

Monday, August 14, 2017

YouTube Monday- Stretching Your Dies


Many times on this blog I have received comments from followers and visitors who saw the cards I was teaching in my in home classes or stamp camps and wished they lived closer so they could take the class. Now everyone, no matter where they live, can take my monthly card making classes for free on my YouTube channel and if you live in the USA, you can even possibly win the cards I created! Once a month I am going to post a YouTube video showing how to make the cards I taught in my home that month. Today I posted the first in my series here on YouTube.  I am sharing three cards using some favorite dies from Karen Burniston and Altenew and how to stretch the dies we own in creative ways.

Please be understanding as I am still very much a newbie at YouTube especially the editing part. I need to figure out how to delete unwanted parts and how to speed up others, but can't on my present software. I am going to try a new editing program this week- wish me luck! This is hard for someone like me who is not very computer literate, but I am determined to figure it all out! The best way to learn is to simply try and try again! 

While you are at my YouTube channel, check out my Grand Opening video too and find out how you can win a prize valued at almost $200! I am planning on posting a new video every Monday, so if you want to be sure to not miss any, click the bell next to the subscribe button (after subscribing) and you will be notified every time I post a new video. You can go directly to my channel by clicking on the YouTube picture on the right side of my blog. The Grand Opening and Prize Giveaway is the featured video.

Here is a link to this month's class on YouTube:  https://youtu.be/TV91ubPWkHk

Thanks for your support here on my blog and on my YouTube channel and for helping me #spread the joy of creativity!

Friday, August 11, 2017

You and Me Anniversary Card


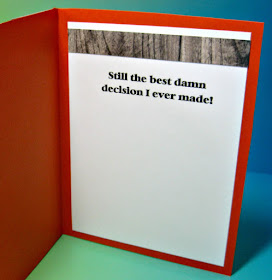
Today is the 27th anniversary of the day I married my DH and if you take a look inside this card, you will see how I feel about that decision:


I have never regretted that decision in the 27 years we have been married, so I know I am blessed. 

I was inspired by this card by my friend Verna because I thought it was so pretty with the foil embossed with a wood embossing folder. To make mine, I put a piece of Amber Watercolor Deco Foil on a piece of Deco Foil Toner Sheet (both by Therm O Web) and ran it through a hot laminator. I embossed it with a new embossing folder from Stampin' Up called Pinewood Planks. IRL it is lovely and textured with the embossing, but very difficult to photograph. I used a heart die from Tonic Studios to emboss the heart shape in SU wood cardstock and sanded the heart to resemble a heart carved on a tree. I die cut "you & me" using a Little B die and attached it along with some gold sticker gems. I added a strip of black cardstock behind the Deco Foil piece to help it stand out. 

I think my husband will like it... Orange is his favorite color and the sentiment is so true:)

Thanks for helping me #spread the joy of creativity!

Thursday, August 10, 2017

Butterfly Encouragement Card


I haven't played with my Brusho Coloured Crystals in a very long time and finally had a chance recently to create this card with a Brusho background and a new set of butterfly stamps and dies from Hampton Arts. I sprinkled several colors of Brushos on a piece of watercolor paper and spritzed them with Tattered Angels gold spray to activate the colors and leave a touch of sparkle. When the piece was dry, I embossed it with a new 3D embossing folder from Stampin' Up. Then I cut it into inchies and attached them to a blue piece of cardstock. (This is the sketch we were challenged to use for my monthly card club.) I stamped the butterfly on a piece of watercolor dp and cut it out with the matching die. The beautiful sentiment is from the same set from Hampton Arts. I added some jewels and Nuvo Shocking Pink Glow Drops to the butterfly and popped her up on pop dots to attach.


The first piece of Brusho beauty I tried to emboss ended up de-bossed because I put it in the embossing folder wrong. But I decided it was still pretty and put it in the inside of this card along with a stitched sentiment piece cut with a die from Lil' Inker. 

Thanks for helping me #spread the joy of creativity!

Tuesday, August 8, 2017

You Make Me a Happy Camper!


I really use that expression all the time- and right now I am truly a Happy Camper because I found time to play with some of the new dies I have sitting on my bed in my craft room and also because of my new adventure! I played with some new dies from Recollections (the Happy Camper set I couldn't resist) and the new chunky alphabet die set from Jaded Blossom to make this card. I received some summer flowers recently from my husband and they were wrapped in the cheerful striped paper I cut out for the front of this card. It was just too cute to discard and I loved the bright primary colors. I started with a round cardbase I cut out with layered circle dies from Tonic Studios. The striped wrap was die cut with a stitched circle die from Lil' Inker. I die cut and attached the camper and "happy camper" sentiment and attached with pop dots and my favorite glue- Nuvo Deluxe Adhesive. Then I die cut "You Make Me A" using the new dies from Jaded Blossom. I like that I can say anything now with these dies and they are a nice size even for longer sentiments. 

I am also a "Happy Camper" right now because the grand opening of my YouTube channel is going well and I have received many encouraging comments and new subscribers. To check out the new YouTube channel and see how you can qualify to win a prize package of dies, stamps and Nuvo goodies valued at almost $200, click on the top picture on the right side of my blog or go here.

I am entering this card in the Anything Goes challenge at Scrapy Land. Thanks for helping me #spread the joy of creativity!

Monday, August 7, 2017

Announcing the Grand Opening of Karen's Kreative Kards on YouTube!


I am very excited to finally share what I have been working on so hard behind the scenes. I am now going to be sharing card making videos as well as product reviews and monthly classes on my brand new YouTube channel here! As you know, I have been blogging for over 7 years now and also sharing ideas in my classes and in articles I have written, so this new adventure on YouTube seems to be the perfect next step. I did a lot of research and now have the equipment and set up where I can start. I am a rookie yet and struggling a bit with the editing program I am using, so any constructive advice you can give me regarding what you use and what you have learned in your YouTube experience would be appreciated. On the first full length video I posted today on how to make the cute #Love Puppy Slider card I posted on my blog here, I was unable to edit at all so there are a few minor mistakes and silences. I will learn as I go, but the only way to get better is to keep trying. 

**You are going to want to go to my YouTube channel and become a subscriber, then leave a comment on one or more of the videos I have posted so far. If you do, you will have earned a chance at my grand prize valued at almost $200! Watch the Grand Opening Video here to see all the great stamps and dies in this package! If you do not have a YouTube account, you will need to establish one to be able to subscribe. Here is a helpful tutorial on how to get a YouTube account set up. **

I am planning on posting a new video on YouTube every Monday and will link from here when it is applicable. I truly appreciate all my loyal readers and subscribers here on my blog and hope you will jump over to my YouTube channel and become a subscriber there too. 

Thanks for helping me #share the joy of creativity!

Saturday, August 5, 2017

Anything Goes 4 Kids at Send a Smile 4 Kids!


It’s Saturday and time for another fun challenge at Send a Smile 4 Kids! This time our challenge is: Anything Goes 4 Kids! Create and link any card appropriate for a child and you could win one of our great prizes.

We have two very generous sponsors for this challenge: Dollar Graphics Depot is giving their winner a $15 gift certificate! And the winner from Kitchen Sink Stamps receives a $25 gift certificate! TEAM S.A.S will also be choosing their favorite cards for our top three and the winners will receive a blog badge and an opportunity to be a guest design team member on a future challenge.

I am featuring a very cute set of colored digital stamps by Dollar Graphics Depot called Crayon Puppies. I printed the orange puppy and cut him out with an oval stitched die from My Creative Time. I attached him to a top opening blue patterned cardstock base and added the sentiment. The fun for the kids happens when this card is opened:

I used Karen Burniston's Twist Panel Pop Up Die and Nature's Edges to create a fun pop up center with puppies and their red, yellow, blue and green crayons also from Dollar Graphics Depot. Too cute for a small child just learning his or hers colors!

I am entering this card in the Anything Goes challenge at Scrapy Land.

Wednesday, August 2, 2017

#Love Puppy Slider Card with Kat Scrappiness Dies and Stamps


I love to make interactive cards but sometimes the recipient does not know that he or she is to pull or push or slide to make the card move, so when I saw this set of interactive card instructions at Kat Scrappiness I just had to get it. I also fell in love with the Kat Scrappiness Pet Sentiments Brush Script Word and Sentiment Die Set adorable paw print words and featured them on this slider card I made. 

**Edited to add: I finished my first full length video for the Grand Opening of my YouTube Channel and it is how to make this card. So if you prefer a video for detailed instructions, head on over to my YouTube channel here. While you are there, you should check out how you can win a prize valued at almost $200 for my grand opening! Contest open until the end of September 2017.** 

I started with a red card front and cut a slider channel with a die from Lawn Fawn called "Slide on Over", then embossed with a Paw Print embossing folder from Darice. I stamped #For Real on the white cardbase where it would show when the slider is pulled. I designed this card for a special child who loves to use hash tags and couldn't resist a set of stamps from Butterfly Reflections Ink with all sorts of hashtag sentiments. I stamped "Pull Here" on the right side of a 5" x 1/2" piece of red cardstock and attached the bone die cut (from a set from Tonic Studios called Dinner's Up) to create the slider piece.

I die cut the puppy portion only of a die from Tonic Studios called Best Buddies out of black and grey and layered them together. I also die cut the cute Love pawprint die from Kat Scrappiness out of both black and grey and inlaid the grey paw pieces into the black love diecut.


On the back of the completed card front, I created a channel with scrap pieces of a thicker pop dots sheet and raised the sides of the card with pieces as well. When the paper is removed from the top of the sticky pop dots pieces, the sides of the channel is also sticky. Here is a tip to prevent the slider from sticking- apply powder using an EK Success Powder Tool to the insides of the channel pieces and the slider will move easily. This great tool also works well on the sides of shaker cards to prevent the shaker elements from sticking. I attached the completed card front with the slider and then attached the puppy with three small layered pop dots to the slider. When the recipient pulls on the slider where it says "pull here", the puppy slides over and the "For Real" is revealed declaring my love #for real!


On the inside of the card I stamped a hashtag and attached another cute die cut from the Kat Scrappiness set - #Woof -- Too cute! 


I am entering this card in the Anything Goes challenge at Scrapy Land (I used Lawn Fawn and Tonic Studios dies.) Thanks for helping me #spread the joy of creativity!