Pages

Tuesday, December 31, 2019

More Fun Fold Cards with Clear Views Transparencies


I had fun creating fun fold cards with beautiful Clear Views transparencies for my newest video here. Inside staircase cards like this one can be time consuming and difficult to create but not if you start with a pre-scored and cut one from The Paper Cut like I did. I simply stenciled on some swirly snowflakes and added perfect sentiment from Sue Wilson and some gems. Here is a side view of this inside stairstep card: 


Slider cards can also be time consuming and hard to create but once again I used a pre-cut and scored card set from The Paper Cut and created this pull up slider card with another gorgeous Clear Views transparency picture. The awesome stamps are from a set by Honey Bee Stamps and the embossing folder is from Darice. 

To see how easy it is to make fun fold cards with the gorgeous transparency pictures, watch the video here

Wishing you and yours a happy and healthy fun crafty New Year!

Monday, December 30, 2019

Video - Combine Clear View Transparencies With Fun Folds For Gorgeous Cards


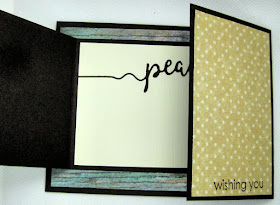
I love to make cards with fun folds and also with Clear Views Transparencies and I combined those two loves when I made the cards for this week's video. I have dies and pre-scored and cut kits for easy fun fold cards, but also show how to make this lovely Joy Fold card with just a few easy cuts and scoring:


The frame die is by Gina Marie Designs and the "peace" die is from Tonic Studios. The beautiful picture is a Clear Views transparency which is a picture printed on acetate. I am lucky to live close to the creator of these gorgeous pictures and a stamp shop who sells them. You can also purchase them directly from Let's Create by calling them at 715-424-1343 and telling them you saw them in my video. The cost is $5.00 for each sheet that makes 8 cards and $6.00 with adhesive which makes them so easy to attach as I show in the video here.


This card is a Z-fold card I made easily with a new die from Divinity Designs called Z-fold With Layers. A traditional Z-fold card is not too hard to make but to cut all the perfectly sized layers is difficult so I am loving this die set!


I used some beautiful papers from Crafter's Companion and sentiment dies from Tonic Studios and of course another gorgeous Clear Views Transparency and love how this card turned out!

I share these and many more fun fold cards with transparency pictures in the new video here. Thanks for your visit here and your support of my YouTube channel too!

Happy New Crafty Year!

Saturday, December 28, 2019

Hey! Non-romantic Valentines with Spellbinders Small Die of the Month Sentiments


I needed some non-romantic Valentines and I quick made a couple using a new Radial Hearts cover die from Altenew and sentiments from the December Spellbinders Small Die of the Month. There are 14 words in this set and it was only $15! 
I embossed the Altenew Radial Hearts cover die on this card front instead of cutting it out, then added a super cute frog circle from Simon Says Stamp. The "hey" and Love You are three of the words from the Spellbinders Small Die Set of the Month that is available just until the end of December. 
 

Friday, December 27, 2019

More Textured Napkins and Diecuts Cards


I had so much fun making gorgeous die cut elements with napkins and Nuvo Aqua Flow pens for my latest video and on these cards I combined them with new stamps and stencils to make the cards I am sharing today. I made the desert scene card with a new stamp from Penny Black called Desert Dream for a sister and brother-in-law who winter in Arizona. The cactus was made with the napkin technique I show in the video here, and I added a favorite sentiment die cut from Sue Wilson.


This card features dies from Bright Rosa, Poppy Stamps and Lil' Inker Designs, a pretty background stencil from Bright Rosa and a sentiment strip from Taylored Expressions. I added the gold shimmer to all the napkin layered die cuts with my Nuvo Gold Midas Aqua Shimmer Pen and that gold shimmer is even more beautiful in real life.
My last card features  a new Hero Arts wood frame cut out of gold, a Gina K Designs stenciled background and layered napkin flowers (Poppy Stamps die), and a dragonfly and leafy sprig (created with Penny Black dies.) 

Thanks for your visit today and your support of my YouTube channel too. To see how to take simple napkins and turn them into colored textured and glittery additions to your cardmaking, watch the new video here (or bookmark it for a less busy week.)

Thursday, December 26, 2019

Quick Cards with Spellbinders December Small Die of the Month Sentiments


I love sentiment dies and so was very excited to see the new December Small Die of the Month set from Spellbinders:

Just look at all those word dies and the whole set only costs $15! Each month I see the set we receive as part of this club and am amazed at the value! I can skip it if I don't like it, but that very rarely happens. This one is only available for another week or so, so I quick made some cards to show you most of the words in the set. On the card above, I brushed on some dark green ink through a new stencil from Simon Says Stamp and die cut Bright Rosa's Foliage Sprigs and Thinking of You from the Spellbinders December Small Die Set of the month out of Tonic's gold mirror card. 


It was so easy to make this pretty birthday card with Sue Wilson's Millie Frames and Dies set along with "Birthday Wishes" from the Spellbinders set. Isn't that font fun? And the size is perfect for when you don't have a lot of room on the card for the sentiment.


I occasionally like to do white on white cards especially when there is lots of texture on the card. The card base was embossed with a very subtle Stampin' Up embossing folder and then I glued on some new Tonic Studios Susan's Garden Holly and Berries and Beauty Berry Bush sprigs as well as the With Sympathy from Spellbinders. 

Stop by Saturday for a couple more cards featuring this Spellbinders Small Die of the Month and click the link before the end of the year if you need this set (you know you do:)

Tuesday, December 24, 2019

Napkins, Cardboard Boxes and Masking Tape Create Gorgeous Textured Cards!

Can you guess how I made all the die cuts on this card? Layered napkins, Nuvo Aqua Flows and Aqua Shimmer and dies as I show in my newest video here. I used slightly patterned napkins for a little more interest and colored with Aqua Flow pens from Tonic Studios then added gorgeous gold shimmer with my favorite Midas Touch Aqua Shimmer Pen from Tonic Studios. The beautiful fern die and fern shaped side were created with dies from Bright Rosa by Paula Pascual and the sentiment die is another favorite from Sue Wilson. The dragonflies and butterfly dies are from Penny Black and Lil' Inker Designs.

The background in this masculine card was created with torn strips of masking tape sponged with brown ink. The dragonfly (Die-Versions) and the textured die cut on the left side (Paper Roses) were made with corrugated torn cardboard pieces that were stenciled and then die cut out. "You Da Best" is a fun die cut from Simon Says Stamp.
And I made this masculine card simply by tearing and sponging ink onto cardboard box pieces and adding some silhouette die cuts from Sizzix. The little bit of a pattern in the background was created with a stencil. I had so much fun playing with these common household items and show these and many more cards in my newest video here.

Happy Holidays and Merry Christmas Eve!

Monday, December 23, 2019

Video - How To Use Three Common Household Items for Textured Cardmaking


Do you have cardboard boxes, napkins and masking or painter's tape in your house? Most of us do, and in my newest video I show how to use these three items to make easy textured cards! 

Did you know you can rip a cardboard box apart, then rip off the top layer to reveal a cool corrugated textured inside piece that is perfect for masculine and other cards? I sponged brown ink on this background and added some pretty birds (Sizzix die) and peace (Tonic Studios die.) The feather was die cut out of another piece of the corrugated cardboard but because it went through the die cut machine, it is flatter yet still textured. I brushed on some ink and added some sparkle with Nuvo's Midas Touch Aqua Shimmer brush marker. I show in the video how perfect this gold brush marker from Tonic Studios is on almost all the cards I made in this video. 
I bet you have masking tape and/or painter's tape in your house, right? Years ago we made backgrounds by tearing masking tape into little pieces but that takes way too much time for me. So I tried simply tearing the masking tape and  blue painter's tape into uneven strips and layering them for the sand and sky on this card. I sponged on brown ink for the variations in color on the sand. 

The cacti above and the feather and birds in this card were made with another common household item you probably have - paper napkins. Dave from Memory Box showed in this video how to take white napkins and watercolors to create pretty textured die cut pieces. I do not have plain white napkins nor do I own watercolors so I tried it with some slightly patterned napkins and my Nuvo Aqua Flow pens and love how these turned out. This is the card I make step by step in the video and to see how easy it is to create these textured gorgeous die cut feathers and birds, I recommend you watch this new video. If you are too busy this week with the holidays, make a note on your calendar to stop back later. 

The gorgeous gold shine on all the napkin pieces was added by simply brushing on Nuvo Midas Touch Aqua Shimmer and the pretty colors were created with Nuvo Aqua Flow pens. I die cut another feather opening and added a beautiful Clear Views transparency in the feather frame. Thinking of You is a favorite sentiment die from Sue Wilson. The birds were created with a die cut from Impression Obsession and the feather dies are older ones from Kelly Purkey and Die-Versions.

To see how I made this card and many more samples of cards with awesome texture created with common household items, watch the new video here.

Wishing you and yours peace and joy this holiday season and into the new year!

Friday, December 20, 2019

More Super Simple Stenciled Cards AND Season of Giving Winners Announcement!


I love the Marvelous Mask simple shaped stencil packs from A Colorful Life Designs and created three cards with the stars for my newest video here. Each package has the positive and negative shaped stencils and I used both for the sympathy card above. I also used the beautiful dove stencil from A Colorful Life Designs and stamps from Gina K Designs and Heather's Stamping Haven.


I uses several shades of inks and sizes of the star stencils along with some perfect stamps from Taylored Expressions for the Star cards above and below.  I will be donating the card below for the Honor Flight when my twin brother goes.


And now I am announcing the winners of the three packages of dies and stamps valued at about $85 each from my Season of Giving Giveaways on YouTube, Instagram and here on my blog. Here are the winning comments and names: 

I am a brand new subscriber and am excited to go see everything I've missed. Thank you for your spirit of giving and Happy Holidays! I am in Texas. 
Jennifer Gray from Texas on YouTube

 I am a returning follower. I found a kindred spirit in you and your love of interactive cards. Thanks for your generosity in sharing your talent. Happy holidays from Washington state.
Vivian C.  on blog from Washington State

 I am a returning follower and live in Ohio and enjoy your projects.  
waterlily57 on Instagram


Congrats to each of you! Please send me an email to khasheck at gmail dot com with your complete name and address before December 31, 2019. If the new year arrives without hearing from you, your prize will be forfeited. 

Thanks to all who entered and who have supported my YouTube, Instagram and blog by subscribing and sharing and commenting and thanks, too, for helping me share #the joy of creativity!

Tuesday, December 17, 2019

More Simple Shaped Superb Stenciled Card From My Latest Video


 In my newest video I show how easy it is to create simple but superb cards with simple stencil shapes many of which we can create ourselves out of acetate and simple shaped dies such as this oval. After brushing on ink a little darker around the edges and then lighter towards the middle with my Taylored Expressions Blender Brushes, I added some more stenciling with the Faded Petals Stencil from A Colorful Life Designs. The flower silhouette stamp and the sentiment stamp are from Gina K Designs. 


I combined a simple shape handmade square stencil with the Tap Dance Stencil from Simon Says Stamp in two different shades of coral ink for the background on this fun card. Then I over stamped with the Chicago scenery stamp and sentiment from Brutus Monroe. 

I had so much fun creating simple stencil shaped cards I made a bunch and show them all in the video. The Marvelous Masks from A Colorful Life Designs have both the positive and negative versions of each shape, so I used the heart shaped stencil to mask the heart world stamp from Lil' Inker Designs and brushed on blue ink to a blue marbled cardstock on this card front. Then I stamped the perfect sentiment also from Lil' Inker Designs. 

Stop back Friday December 20th for more simple superb stenciled cards and the announcement of my THREE lucky winners from my Seasons of Giving giveaways on YouTube, Instagram and here on my blog. You still have another day to enter simply by commenting on any or all of them. See the rules and how to enter here on my YouTube channel.

Monday, December 16, 2019

New Simple Shape Stencils Video and Giveaways Reminder


I think my favorite tool to make cards with this year has to be stencils! They are so easy to use to make gorgeous cards and I show in my newest video how to use simple shaped stencils you can make yourself or purchase to create superb lovely cards. 


I show how to make this love card in the video using simple shaped heart stencils from A Colorful Life Designs. The ACLD Marvelous Masks line of stencils are a collection of simple shapes in many different sizes and in both positive and negative formats. I show in the video how I used a series of purple and pink inks and the heart Marvelous Masks to create this card front and then added some more hearts in the background with another stencil from A Colorful Life Designs. The sentiment stamp is from Stampendous and I created the design on a marbled cardstock from Park Lane (at Joann Fabrics) which results in the marbled lines in the design.


You can make your own simple shaped stencils with whatever circle or oval or other shaped dies you currently own in whatever size you want. I make mine out of acetate so they are reusable and I can see through them where I am stenciling ink. I made a circle stencil into an ornament with some purple inks and dies from Sizzix. The "believe" sentiment die is from Tonic Studios. 

I hope you will watch the new video here to see many more cards I made with simple shaped stencils, inks and stamps and how easy they are to make.

Reminder: you have until Thursday December 19th at midnight to enter my Season of Giving giveaways on my YouTube, blog and Instagram. Each of the three package is full of dies and stamps valued at about $85! Here is a link to my blog post with links to all three giveaways. Comment on all three for three chances to win and Happy Holidays!

Saturday, December 14, 2019

Gnome Warm Holidays Interactive Card


I wasn't going to make any more Christmas cards and also wasn't going to jump on the Gnome bandwagon, but I could not resist this super cute Lil' Gnome from Simon Says Stamp during their Black Friday sale. I die cut him out of white and several designer paper scraps and popped him up on an Action Wobble so he jiggles and wiggles. The sentiment oval die is from Karen Burniston and I die cut the green flannel dp with the Wonky Rectangles die from Gina Marie Design.

Here is a side view so you can see the Action Wobble which pops up the adorable gnome and allows him to wiggle like crazy.

I am entering this card in the interactive Christmas challenge at Simon Says Stamp Wednesday.