Pages

Monday, May 31, 2021

Video - Cardmaking With Faux Suede and Hero Arts Message Cover Dies


Playing with new dies and techniques is my favorite thing to do and in my newest video here I share many cards I made with a Faux Suede technique and Hero Arts Message Cover Plates. 

I learned how to make this textured awesome background in this tutorial and bet you already have most of the ingredients needed in your home right now. Here is my favorite card that I made for this video with the Faux Suede technique and the Hero Arts Thank You Message Cover Die:


Isn't that textured distressed background awesome? And it is so easy to do as I show in the new video here. After the faux suede background is complete, if you run it through the diecutting machine as I did here, it does flatten the wrinkles but still looks great. I added some Spiced Marmalade distress ink to some of the diecut letters, raised them on fun foam letters and popped back in. I added some Nuvo Aqua Shimmer Gold Midas Touch so the letters shimmer and added a sentiment strip from Simon Says Stamp and some favorite gems from Gina Marie Designs. 

I made this card very simply with a faux suede background and the Happy Birthday Message cover plate from Hero Arts. If you look closely at the background you can see the texture and wrinkles this technique results in when the piece is not run through a die cut machine. 


This is the card I show how to make step by step in the new video. I show how to make the background with the faux suede technique and IRL it is much prettier with the texture and sparkle I added with Therm O Web's Gold Glitter Spray. Then I share how to create a shaker behind just the  "so so so so" with seed beads that add movement and fun to the card. 

I am entering the first card in the Anything Goes challenge at Simon Says Stamp Wednesday.

I hope my cards and new video inspire you to give this technique and these products a try. Thanks for watching, sharing and subscribing and for helping me share the joy of creativity!

Monday, May 24, 2021

Video - Cardmaking With Foil, Fun Folds and Easy Pop-Ups


You know I am die cut crazy and love to find unique ways to color my die cuts and create interactive cards. But pop up dies can get expensive, so in my newest video here I show how to make cards with pop up and fun folds where no fancy dies are needed. Of course the cards are full of fun dies from Dies...To Die For at Shopscrapbook101.com and I colored most of those dies with foils attached with Deco Foil Foam Adhesive Sheets as I show here. Here is the Floating Gatefold card I show how to make in the video:


The frog was created with Deco Foil Foam Adhesive Sheets and green Deco Foil. I changed "Hugs & Kisses" from Dies...To Die For to "Bugs & Kisses" and added some bugs from the Large Frog Die Set. I learned how to make a Floating Gatefold card from Dawn Griffith here and show how to make the frogs inside pop and float when the card is opened:


Inside I have three more foil colored frogs and another play on words created with DTDF dies. 


Here is another card I share in the new video with another fun fold and shoes created with favorite foils from Brutus Monroe and Deco Foil Foam Adhesive Sheets. I also created a slimline envelope to mail this card in with this Slimline Envelope Maker die.


I also show in the new video that after a die cut is made with foil and foam adhesive sheets, it can be embossed for extra texture like I did on this watering can and one of the flower pots. And just look at what happens when this slimline card is opened: 


The butterflies (colored with my favorite foil from Brutus Monroe called Rainglow) float in the air on acetate strips and I added some grass and a perfect sentiment with more dies from Dies...To Die For. 

I am entering the first card in the Dies challenge at Simon Says Stamp Wednesday.

I really love how these cards turned out and hope my cards in the new video here inspire you to give some of the ideas and products a try! 

Tuesday, May 18, 2021

More Monochromatic Sympathy Cards From My Newest Video


It is so easy to make easy and elegant cards for any occasion with dies and monochromatic colors as I show in my newest video here.  Here is another one of my favorite cards featuring the Antique Rose Layering Die Set from Altenew. I made many cards so easily with this die set. The card front on this card was debossed with Honey Bee Stamps Quilted A2 Cover Plate and then I added the small hearts with a matching stencil set also from Honey Bee Stamps. The sentiment die is from Sue Wilson. 


Both of these cards were so easy to make but I love how they turned out. Besides the gorgeous layered monochromatic rose, I added texture to the cardbase with a leaves debossing die and a 3D embossing folder both from Memory Box. 


Here is my last sympathy card from the new video and this one again is in shades of peach. All of the dies on this card are from Dies...To Die For and I continued the butterfly theme in the inside of the card too: 


The sentiment strip here is from Simon Says Stamp. I used those sentiments on many of my sympathy cards and they are perfect. But I also have them for every other occasion and these cards could be easily changed to be for any season or reason. 

I love how all these cards turned out and hope my cards encourage you to give some of these products and ideas a try. 

Monday, May 17, 2021

Video - Die Cut Crazy Video Series - Easy and Elegant Monochromatic Sympathy Cards


Sympathy cards are a sad necessity of life, but in my newest Die Cut Crazy video I share many easy to make monochromatic sympathy cards featuring die cutting and no stamping. I recently purchased the Antique Rose Layering Die Set from Altenew and I was able to make many lovely sympathy cards easily as I show in the video. Here is my favorite of the Antique Rose sympathy cards: 


Gina K from Gina K Designs showed in a class recently how to simply swipe down the card front with a grey ink for a subtle background and also encouraged us to try flowers in shades of grey and black. I did the Altenew Antique Rose flowers and leaves in monochromatic shades of grey and added a pretty sentiment from Karen Burniston on this slimline card. 


This monochromatic sympathy card was created with the split negative technique in purples and dies from Dies...To Die For at Shopscrapbook101.com. The split negative idea means I used dark purple elements on the light purple side and vice versa. This card is a joy fold card and here is a look at the card open:
 

The butterfly die from Dies...To Die For also includes an Awareness ribbon die and I chose to use purples to honor a family member recently diagnosed with pancreatic cancer. In the video I make a peach version of this card, and peach awareness ribbons can be used for Endometrial Cancer, Invisible Illness, Uterine and Vaginal Cancer. Here is a list of the meanings of various colors for Awareness Ribbons.


I show how to make this joy fold card with the split negative technique and several shades of peach cardstock. Here are a couple more views of this card:


I used sentiment strips from Simon Says Stamp on many of the sympathy cards I share in the new video. Of course, any of these cards would be perfect for birthdays or thinking of you cards just by changing up the sentiment diecuts and sentiment strips. 

I share many more monochromatic sympathy cards in the new video here and hope my cards inspire you to give some of the products and ideas a try! 

Friday, May 14, 2021

Guest DT At Cutplorations - Cards With Cover Dies


I am once again honored to be a Cutplorations Creative Cuts Guest Designer today and am sharing a peak at the cards I made here. But to get all the details and information, please use this link to visit the Stamplorations blog.


One of my favorite types of dies is cover dies and all my cards feature cover dies from Cutplorations. This one is a coffee lovers shaker card. 


Debossing cover dies make creating an interesting background that is both flat and textured and I love how easy this card was  to create. Of course all the clear stickers and sentiment dies are also from Stamplorations and you can get links and more info here on their blog.

Remember that my discount code STAMPGIRLKARENH saves you 20% at the Stamplorations website. The dies you see here are all in the Cutplorations part of the website. 

Tuesday, May 11, 2021

More Interactive Slimline Cards with New Dies from Karen Burniston and A Giveaway!


In my opinion it is never too early to make Christmas cards and I made this slimline card with the new Waterfall Card Die Set from Karen Burniston and it is one of four cards I share in my newest video. It is best to see the card move in the video here, but here is a mini-movie to show the waterfall action and my wishes for you and yours: 


The texture on each of the waterfall pieces was created with Memory Box's Pinpoint Snowflake Plate. The "Christmas Wishes" die is from Sue Wilson and the Peace, Joy and Love dies are from Quietfire Design. The stitched slimline die is from Pinkfresh Studio and I used it on the back too with another lovely sentiment die from Sue Wilson:


In the new video I share 4 interactive cards made with the new dies in this release and this card features the new Slim Flaps and Frames die set. I didn't want to use magnets to hold each flap closed and got the brilliant idea to use fancy paper clips like these arrows to help the card stay shut from a member of the Karen Burniston design team on their Facebook group here. When the card is opened, my dear friend will see I am thinking of her in every season:


Aren't those tiny pop up trees awesome? I made them with the new Tiny Trees Pop Up die set and the Seasons word dies are from Dies...to Die For at Shopscrapbook101.com. The sentiment dies on the front of this card are from Sue Wilson and Karen Burniston. Here are a couple more close-up views of the inside of this card:


To see all the cards I made with the new dies from Karen Burniston and to get a chance at winning the Tiny Houses Pop Up Die Set valued at $29.95 and one of the cards I made with it, watch the new video here and leave a comment on the video per instructions. You have until May 24, 2021 to leave a comment for a chance to win.

Monday, May 10, 2021

Video - Tiny Houses, Lights, Trees, Flaps & Waterfall Pop Up Cards & Giveaway!


It is always so exciting every time Karen Burniston has a new release of dies because they always include many pop up and interactive dies! In my newest video here I share 4 different interactive cards I made with dies from the new release and a giveaway where you could win one of the brand new pop up die sets valued at $29.95! Both of the cards I am showing in this blog post feature the Tiny Houses Pop Up Die Set and that is the die set you could win along with this card I made with it:


I love the "hello" die from Gina K Designs on the card front, but of course the most fun on this card is when the card is opened and the tiny house with a white picket fence pops up. The "From our house to yours" sentiment die from Dies...to Die For is perfect for this card! Of course to really see this card and its pop up motion you should watch the video here, but here is a mini-movie showing that action:


Here is the card I show how to make in the new video:


The gnome from Simon Says Stamp is on an Action Wobble so it jiggles and wiggles and I added a fun gnome stamped sentiment from Lawn Fawn. Where do gnomes like to live?


In mushroom houses of course! Not only does this mushroom house pop up, but it lights up too! It is hard to photo that, but here is the house lit up using EZ Lights from Pear Blossom Press


I made the mushroom house with an add on die set released with the Tiny Houses Pop Up die set called Mushroom Tiny House Add-Ons. 

In the new video I show how easy it is to make this card and share several more interactive cards as well. Another reason to watch the new video is that in the video I tell the viewers how they could win their very own Karen Burniston Tiny Houses Pop Up die set and the first card I shared in this blog post. You must leave a comment on the video (not on this blogpost) before May 24, 2021 and live in the USA to qualify to win. Other details on this giveaway are in the video.

Monday, May 3, 2021

Video - How To Color DieCuts With Foil and Embossing Powder Part Two


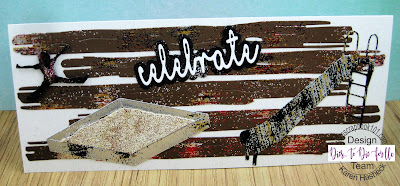
I had so much fun coloring my Dies...To Die For diecuts with foil and embossing powder, I made enough cards for two videos! My newest video is Part Two and both are being shared at the ShopScrapbook101.com YouTube channel too while my friend and the owner Stacey is taking some time off to deal with health issues. This video also features the brand new dies in the May release here. Here is a look at the slimline card I make in the video: 


One of my favorite of the new May dies at Dies...To Die For is the Slimline Driftwood die and I show in the new video how I distressed the planks with my Distressed Foil technique and embossing powder. I cut the planks apart  and used them as a background on this card. I created the slide and sandbox with more of the techniques I show. The layered celebrate die is a favorite from last month's release at Dies...To Die For. 


Another favorite die from the May release at Dies...To Die For is this fun Trampoline with Jumping Kids die set. All the die cuts are colored with foil as I show in the new video. I did the "letter substitution" technique on the JUMP and on the inside as I show here: 


I used more foil techniques to color the Swingset and Playground dies on this card, as well as the sentiment and Monkey Bars on the inside. This card is a slimline easel card as is shown here: 


To see all the cards and techniques to color diecuts with foil and embossing powder, you can watch the newest video here. If you missed Part One it is available here to watch.

I am entering the second card in the Anything Goes challenge at Simon Says Stamp Wednesday.