Pages

Monday, September 26, 2022

Holiday Stand and Display Card Creations with New Karen Burniston Dies


I am a huge fan of Karen Burniston's pop up dies and in my newest video I share many Halloween and Christmas cards made to stand up and be displayed by the delighted recipient. Here is the fireplace pop up card I made a version of in the new video:


The front of the card is very simple but lovely with a pretty designer paper and Karen's layered Merry Christmas die popped for the eclipse look. The real magic happens when the card is opened:


As I show in the video, I used the new Fireplace Pop up dies and Fireplace Extra die sets to make this lovely scene. The fireplace pops up with stockings and a picture of my Mom and Dad. I am making each of my siblings one of these cards. This one has an extra special feature which happens when the "push here" is pushed and can't be shown properly with still pictures. You can see it in the new video here and in this mini movie:


(If you are a subscriber and are reading this in your email, the videos added to a blogpost do not appear. But you can go to the actual blogpost by clicking the title and see this mini video showing the fire light up.) 

I added EZ Lights from Pear Blossom Press after seeing a similar card done by Lois Bak of the KB design team to make the fire light up. Here is a Halloween version of this card:


Again a very simple card front with an older Tonic Studios fun sentiment die and a Easy 3D Topper from Hearty Crafts. Just look at what happens when this card is opened:


Isn't that scene amazing? I once again CASED an idea from the KB design team and have hanging ghoul hands in the fireplace. All the dies used are new or older dies from Karen Burniston. 

I had great fun making these and other cards for my newest video and hope they inspire you to give some of these products and ideas a try!

Thursday, September 22, 2022

Bonus Faux Rice Paper Fall Cards


I had a bunch of pretty fall napkins so decided to make some pretty cards with the Faux Rice Paper Technique and share them in my new video here. This card is an easel card and the light shining through the translucent fall scene is created with this:


My favorite way to use the gorgeous paper created with this technique is to fold it and use the front part as the front of the card like I did here:


And here are a couple cards I used frame dies to frame the beautiful fall napkin created with this fun easy technique:


The new video is the third in a series of three about this gorgeous technique and you can see all three videos here in this Playlist on my YouTube Channel.

Tuesday, September 20, 2022

Faux Rice Paper Technique PLUS Beads and Color


In my newest video here I take the Faux Rice Paper Technique a step further by adding beads, glitter, paint and small sequins right into the glue mixture. I made this card for my son with a Bucky Badger napkin, red beads and confetti.


I also tried stamping on the napkin before adding the glue mixture and that does work but you need to use an archival ink or Versafine ink as I did here. The stamp is from Penny Black and I cut out all the square layers with a stitched die set from Crealies. 


I added gold and blue acrylic paint - just a few drops is needed- to color the glue mixture to make these colorful cards with a fun polka-dotted napkin. The first step is always to skin the napkin (take the layers apart) and when the napkin is three ply, the second layer still has some slight pattern on it (I  call it ghosting) which shows on the yellow tag. I love how the layers are see through so the die cut sentiments on the inside show through the front. The tag die is from Crealies as are the stitched balloons, the stamped sentiment is from Stampendous and the "celebrate" die is from Karen Burniston. 

I had so much fun playing with color and texture additives for my new video here and hope you will watch and give this technique a try!

Monday, September 19, 2022

Faux Rice Paper Technique PLUS Video and Many Cards


Bet you can't guess what I added to the Faux Rice Paper glue and coffee mixture to make these tags:


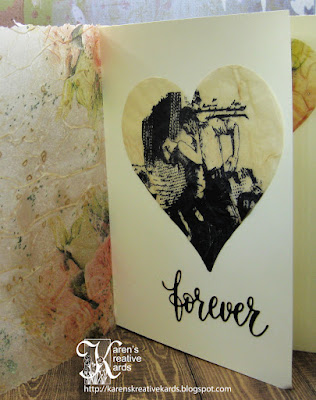
My favorite new technique this year is the Faux Rice Paper Technique and in my new video (3rd in a series!) I step it up by experimenting with adding color and texture to the faux rice paper I created. Can you guess what I used for the color and texture on these tags cut with dies from Crealies? My favorite projects use a combination of white glue and coffee for a vintage look, but on these and the card and tag I make in the new video, I added gold beads, crushed red peppers and chopped chives!?! I was looking for something to add color and texture with and love the result of this unusual combination! Here is the slimline card I made in the video:


It is much easier to see the beauty of the faux rice paper in the video, but you can see on the first picture that the "forever" sentiment die (from Gina K Designs) can be seen through the gorgeous translucent slimline card front made with just a floral napkin, white glue, coffee and the spices and green glass glitter. The slimline wonky stitched die used to cut the center piece is from Kat Scrappiness. 


I also showed in the video how to make this beautiful 3 layer Christmas gift tag using a set of stitched tag dies from Cutplorations. This is my favorite card that I made with the vintage look and stamping:


The heart layer under the front was created with a stamp from Creative Expressions and Andy Skinner called Last Tango on a napkin before doing the technique and the heart on the back was also created with the Faux Rice Paper technique with the same lovely floral napkin. The hearts were cut with a die set from Tonic Studios. 

I am in love with the look this technique creates especially when stepped up with colorful textured additives like I show in the new video. I hope you watch, and then try some of the technique and products featured.

Thursday, September 15, 2022

Mason Jar Pop Up Floral Thinking Of You Cards


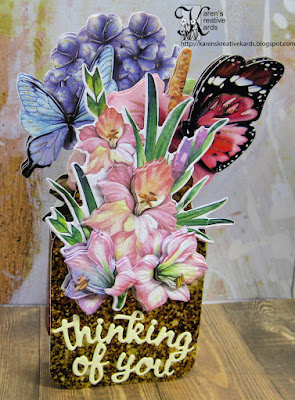
A local hospice care facility recently requested handmade "thinking of you" cards to cheer their patients and I thought I would make some stand up floral cards for them with the new Mason Jar Pop Up Box Card die set from Fabulous Folded Cards at Paper Wishes. I am a subscriber of the Fabulous Folded Cards and get a interactive die set every month for a very reasonable price. But one thing I love about this subscription is that you or anyone can get an individual die set anytime without subscribing.


I created each mason jar for these three cards with patterned mirri card also from Paper Wishes and it took less than 5 minutes to put them together. Then I decorated each one with Easy 3D Toppers from Hearty Crafts that I also purchased from Paper Wishes in a large bundle at a great savings.  They are called Easy 3D Toppers because there are only 3 layers and they are already cut out and packaged together, so it only takes a few minutes to create the layered beauty. I added a die cut sentiment from Karen Burniston to each floral mason jar pop up card. Here are pictures of the other two cards I made:


Wednesday, September 14, 2022

Crealies Stitched Snowflake Cards and a Dutch Giveaway


One of my favorite kinds of dies is pinpoint or debossing dies that leave a stitched image but do not cut out the shape like the Mix and Match Snowflakes from Crealies on the top and bottom iridescent mirror card strips on this card. In my newest video I show how to make the snowflake above with Pigment Colorzz water color pigment powders and many other projects with the stitched snowflake dies. The front of this card is on acetate with upper and lower strips bridged by the pretty snowflake. 


On the inside of this card is another pretty snowflake and the end of my "Merry Christmas" wish on a Square With Wonky Stitchlines piece of cardstock where I will sign and write a message. 


Here are two more cards I made with the pinpoint stitched snowflake dies from Crealies and more of the snowflakes I created with the Pigment Colorzz pigment powders for the new video.

Do you speak Dutch or do you know someone who does? I accidentally received two layered dies from Crealies that say Merry Christmas and Happy Holidays in the Dutch language. I don't know anyone who speaks Dutch and would love to send these dies to someone in the USA who could use them on their handmade cards. After watching the new video, leave a comment here, on the video, or on my Facebook page or Instagram telling me who you know who speaks Dutch and confirming you have a USA mailing address, and you could be the winner of these two dies! More comments equal more chances to win! (One per location.)

Monday, September 12, 2022

Crealies 3D and Pigment Colorzz For Christmas Projects and Video


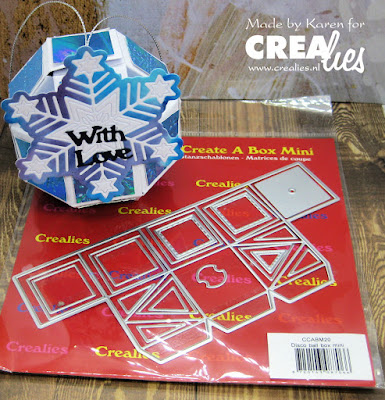
I love to make 3D gifts and projects for the holidays and the new September release at Crealies is full of dies that make display worthy projects. In my newest video, I show how to make a gift box or ornament with the new Create A Box Mini Disco Ball die set and also how I colored the snowflakes with Crealies Pigment Colorzz. Here is a look at the ornament and also one I left open to give a small gift or candy in:


In the video I also share many holiday cards I made with the Pigment Colorzz and here is one which pops up when the card is pulled from the envelope:


The new Platform Fold and Pop up die set creates cards that fold flat and then pop up for display when opened. I used more of the purple and turquoise Pigment Colorzz to color the snowflakes and the stitched punched snowflake decorations. Here is another view of this fun pop up card: 


In the new video you will see many more cards I made with the new Christmas dies and Pigment Colorzz. Here are the products used in the cards shown here:

Thursday, September 8, 2022

Spellbinders Scenic Poinsettias and New Embossing Folder Technique


I just received this gorgeous Spellbinders Scenic Poinsettias 3D embossing folder and used it to make another Christmas card for my stash with a new embossing folder technique I learned how to do from Erum Tasneem here. I love to find new ways to use crafty products like our 3D embossing folders, and this easy to do technique uses the debossing side of the embossing folder with inking before adding some embossing powder to complete the grunge look. I added some gold gems from Gina Marie Designs and a sentiment strip to complete the card. 

Wednesday, September 7, 2022

More Two Sided Sequin Sparklers From My Newest Video


One of my favorite colors of two sided sequin material I found here on Amazon is this pretty red that turns to gold when I brush my finger up on it:


Isn't that fun? The ornament is a Spellbinders die, the background snowflake pinpoint die is from Memory Box and "believe" is from Tonic Studios. I thought this color combo was perfect for Christmas and so I made this card too:


Here is another magical card I made and shared in the new video:


So pretty even if the sequins are not brushed for that second color! All you need is an open die and the 2 sided sequin fabric to create these fun interactive cards! Here is a bonus card (not in the video) that I made for my grandson's birthday:


He loved his interactive birthday cake which I made with two rectangle shaped dies. The cheerful Happy Birthday die is a favorite from Karen Burniston. 

I love how all these 2 sided sequin cards turned out and hope you will watch the video and get inspired to try some of the ideas and products featured. Have a creative joyful week!