Pages

Monday, April 24, 2023

Bee-ing Creative With Crealies Newest Dies


I love to beee creative with innovative dies like those from Crealies’ newest releases, and today I am sharing two fun fold cards and a new video in my continuing Crealies CreativeTriple Fun Fold Video Series. This video features the #21 On the Move – DiagonalSquares die set.


Isn’t this fun fold card adorable? It is so easy to make with the Diagonal Squares Triple Fun Fold die set. Then I decorated it with the new bees, honeycomb andbee sentiment dies from the newest release at Crealies.


In the video I showed how I decorated the front of this square card with those same bee themed dies. But I have a surprise in the inside:


I have made z-fold cards with others of the Triple Fun Fold dies from Crealies, but on this card I added a cover so the inside pops up to delight the recipient and stands up for display. Here is another view of this fun card:


 I had great fun designing these cards and hope you will watch the new video and try different ways to use your Crealies dies. 

I am entering the first card in the Things With Wings challenge at Simon Says Stamp Wednesday.

Wednesday, April 19, 2023

Two More Cards with the new Divinity Designs Shining Light Lantern Die Set and Foil


Here is another card I share in my newest video here which features 5 ways to use the new Divinity Designs Shining Light Lantern. This one has a background and the blue patterned inside of the lantern created with a new product from Gina K Designs called Poly-Glaze Foiling Diamonds Sheets and her Lovely Notes foiled sentiments. I created the texture on this lantern with some embossed black cardstock and Sterling Foundry Wax from Ranger and Distress. I also created the brass texture on the lantern below with the Foundry Wax in the coppery Mined color:


Isn't that embossed copper lantern gorgeous? I show how easy it is to create that look in the new video too. I was reminded of how much I love to create backgrounds with foil from the last card, so pulled out my foilable toner pattern sheets from Brutus Monroe and Deco Foil and made this background. The scenery inside the lantern was created with the Lantern Add-ons die set also from Divinity Designs

Monday, April 17, 2023

Five Different Ways to Use The New Divinity Designs Lantern Dies


I knew the new Shining Light Lantern die set along with its Add-ons Scenery dies from Divinity Designs just had to come home to me the minute I saw them! As soon as I received it, I started playing and in no time I had four cards designed and a great idea for another, and you can see all five of them in my newest video here.

To see how I made the fifth card and to really see the other cards, you should watch the new video, but here are some pictures of that one:


I put the Divinity Designs Shining Light Lantern on the Crealies new Triple Fun Folds Card with Octagons die set for a fun z-fold look. I also showed how to make the lantern embossed with that gorgeous brass shine too by adding Ranger/Distress Mined Foundry Wax after embossing it with a Stampin' up embossing folder. The "thinking of you" die is from Karen Burniston and the birds die is from Sizzix. Here is another of my favorites of the cards I made with this great die set:


One of my favorite products to design with are Clear Views transparencies from The Mark-It Place and available at Let's Create here. I put it in a lantern embossed with a new Stampin' up embossing folder and attached it over a Pinpoint Burst background created with a die from Memory Box.


This card was so easy to create with the Shining Light Lantern and Lantern Add-ons from Divinity Designs as well as their Landscape scenery designer paper. I simply added a sentiment die from Crealies and a bird die from Sizzix. 

I had great fun creating five different cards with these great die sets and show them all in the new video here. I hope my cards encourage you to give some of these ideas and products a try!

Thursday, April 13, 2023

Spellbinders Floral Friendship Beauties


Oh my! Have you seen the new Floral Friendship release at Spellbinders? I was asked recently by Spellbinders if I wanted to design with this release of gorgeous papers and other fun embellishments for their April release and of course I said yes! The 6 x 6 Floral Friendship Paper Pad has 10 different designs all of which are really lovely! I used that paper on all the cards in this blogpost and will be using more soon I am sure. I also received the Chipboard Frames and Iridescent Gems you see on all my cards as well. The chipboard frame was perfect for a shaker card and for a faux shaker card as you see below:


The Iridescent Gems look like they are shaker elements but are attached for a faux shaker look in the Chipboard Frame. Isn't that foiled paper beautiful? 


The Chipboard Frames are also perfect to highlight a sentiment as I did here. All the sentiments on these cards are from the Thanks Enclosed Sentiments die set from Spellbinders.

Wednesday, April 12, 2023

More Spirelli Thread Art Cards


This is one of my favorites of the cards I made for my newest video featuring Spirelli string art with newer products such as pinwheel dies and metallic thread. The more detailed pinwheel dies on the center pieces are from The Greetery and the sentiment dies are from Spellbinders. I love this copper and blue color positive and negative combination! 

 
This Spirelli Christmas wreath was so easy and fun to make using two Spellbinders scalloped dies that I am going to teach how to make this card in a local Christmas in July class where I have students of every level of experience.


The circular spirelli embellishments reminded me of flowers so I made this slimline card with an embossed stems and leaves background and 4 string art circles with various dies and strings. 

I had great fun making these cards with a forgotten technique that I did years ago and now updated with today's products for my newest video here.  

Tuesday, April 11, 2023

Crealies On the Move - Squares With Layering, Positive and Negative Die Options


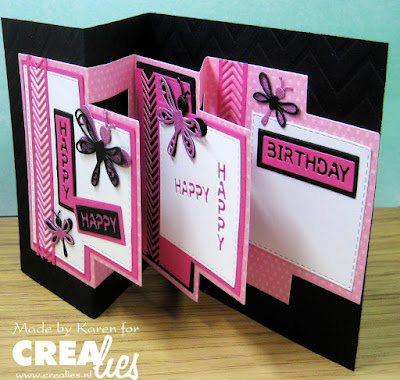
I love to design with Crealies dies that have so many options of different ways to use them! I created this card with the new On The Move #21 Squares Fun Fold die set as well as vertical and horizontal Happy Birthday dies in many different ways. I also used the Crealies Mix and Match Strips A and the Partz 28 Dragonflies in several ways on this card. Here is another view of this card:


I also created a video showing how I made this card. Here is a link to Crealies blogpost with my video showing how I made this card.


Monday, April 10, 2023

Upgrading an Older Technique With Today's Products - New Video


Remember Spirelli? It is an older Dutch String Art technique we did years ago with punches and string or thread. I was reminded of it recently in a class I took with Julie McGuffee where we used dies she designed and did some string art. Her kit and/or dies are available here very reasonably, and I used some of her dies and others in my stash to create a bunch of spirelli cards for my newest video here. Here is the card I make in the video:


I show how to do the spirelli string art with metallic threads in green and gold on an oval I cut with an older Spellbinders scalloped die and a pointy die from Julie McGuffee. The focal piece is layered on a gorgeous Adriana Pop Up Easel die set from Poppy Stamps. Here is another view of this card:


I had this idea to do the spirelli thread art on acetate and then "float" it on acetate in a larger die cut scalloped circle and I love how this turned out. It is even prettier IRL. The layered Hugs die is from Karen Burniston and I used copper cord on the acetate scalloped circle. Here is another view of this card:


To see many more cards I made with this forgotten technique and how easy it is to do with dies in your stash, watch the video here. Then try to find some time to play in your craft room and then send some handmade joy out into our world.

Wednesday, April 5, 2023

More Hide and Seek Cards In Different Sizes with Inexpensive DP Hack


I love to make interactive cards for my grandson especially if I can incorporate images of things he loves like Monster Trucks. As I show in my newest video here, I was able to purchase this designer paper alternative for just pennies and then easily attach it to cardstock (too flimsy otherwise) without an iron or MINC machine. I cut it out and attached it to the front of this A2 card. Can you guess what I used? Napkins from Oriental Trading! The card is even more fun when it it opened and surprises pop out:


Each of the cards I share in the new video feature the Hide and Seek die set from Dare 2B Artzy, and I also show how easy it is to make these panels pop out each time the card is opened. This die set works great in A2 cards but also in larger cards and even in mini-slimline cards like this cute one I made also with napkins:


I made it a happy birthday card with some more animal friends popping out when the card is opened. I had great fun making these cards and show these and many others in the new video here

Monday, April 3, 2023

Hide and Seek Cards With Inexpensive DP Alternative

Want Monster Truck, Minecraft or other specialty designer paper for your special cards but either can't find it or hate to pay the high price per sheet? In my newest video here, I share an inexpensive alternative and how to make Hide and Seek pop up cards with it many different ways. 

My grandson loves Monster Trucks and I wanted to make him some cards but was having trouble finding designer paper. Years ago I learned how to attach napkins to cardstock (because they would be too flimsy to work with otherwise) using melted clingwrap first with an iron and then with my MINC machine. But in the new video I show you how to attach the napkin easily with a product you may already have- sticky two sided tape. I have a large roll of my favorite Tonic Studios Craft Perfect Double Sided Tissue Tape I use all the time, but there are other brands and styles such as sheets that would work as well. The Monster Truck image above is 1/4 of a napkin I found at Oriental Trading and it cost me less than 10 cents! Even more fun is what happens when this card is opened:


I show how to make this card using the napkin hack and the Hide and Seek die set from Dare 2B Artzy. The side panels are hidden and pop out when the card is opened. It is hard to show that in a still photo, so be sure to watch the new video here.


I have two grandsons I love dearly and my teen grandson loves Minecraft so I found these napkins at Oriental Trading for pennies per napkin and made this card for him. The front is fun and the inside even more so:

The name of the Minecraft character is Creeper so I created a sentiment using an expression from my youth and the sword is from the napkins and the Minecraft world. 

I have many more examples of fun Hide and Seek cards made with napkins so easily in the new video here, and their surprise pop up movement is much easier to see in the video too. I hope my cards encourage you to give some of these ideas and products a try!

I am entering the first card in the Anything Goes Challenge at Simon Says Stamp Wednesday.


Saturday, April 1, 2023

Cards 4 Moms at Send A Smile 4 Kids

It’s the first Saturday of a new month and time for another fun challenge at Send a Smile 4 Kids! The theme for this challenge is Cards 4 Moms or Special Ladies, but you can choose to participate in our challenge with any card appropriate for a child.

The front of my card is simple with pretty dp, inked flower diecuts and a circle die cut. But when the card is opened, look what happens:


The inside circle flips open and stands up with the popped up sentiment cut with a die set from Karen Burniston.

Be sure to check out the rest of the cards from TEAM SAS here and we would love it if you entered our challenge.

 I am entering this card in the Anything Goes Challenge at Simon Says Stamp Wednesday.