Pages

Monday, February 29, 2016

Embossed Gilding Flakes Birthday Wishes from Tonic Studios


I know that Tonic’s Nuvo gilding flakes can be attached with any of Tonic’s glues, but my favorite way to work with gilding flakes is to use a
strong two sided tape sheet and buff the flakes in with a small piece of a stamp cleaner pad.


I used Sookang’s one and half inch roll of two sided strong tape in strips attached to cardstock and squares of Inkssentials Rubit Scrubit stamp cleaning pad. I wanted to get a multi-colored shiny look so I chose to use all three of Tonic’s gilding flake colors. I started with pieces of  Nuvo Sunkissed Copper as the picture shows and rubbed that in with a small square scrub pad. Then I added the Radiant Gold and Silver Bullion one at a time and scrubbed them in as well. The scrub-it square works beautifully to both attach the gilding flakes and scrub away any unused flakes. Another indispensable product I use when working with gilding flakes or glitter is Swiffer Sweeper dry clothes. They clean up the flakes or glitter that is left on our work surfaces the best of any product I have tried.


I attached the two multi-colored gilding flake strips to the front of a gatefold card.  The gatefold card was made with a black cardstock
piece cut to 8 ½ x 5 ½ inches and scored at 2 1/8” and 6 3/8”. Next I embossed the whole card with Tonic’s Forever Moments Rosalyn embossing folder. I added gold and black Crystal Drops to the dots in the embossed front.


I also used Tonic’s Nuvo gilding flakes and a larger piece of Sookang two sided tape paper for the sentiment piece on the inside of the card. I rubbed in the Sunkissed Copper gilding flakes into a rectangle of the sticky tape attached to cardstock, then die cut it with “Birthday Wishes” from Tonic’s Everyday Sentiments Two. I die cut the same die out of black cardstock and glued them together slightly offset, then attached the Birthday Wishes to a white inside piece.


If you haven't tried Tonic's Nuvo gilding flakes yet, I hope this card convinces you to give these gorgeous shiny flakes a try! 

I am entering this card in the Anything Goes challenges at Simon Says Stamp Wednesday Challenge and 613 Avenue Create.

Sunday, February 28, 2016

Forever Wedding Card

Today I am sharing a card we are making in my in home classes this week. I am really loving the subtle colors of Magenta Nuance watercolor powders. I sprinkled raspberry, turquoise and violet Nuance crystals on watercolor paper and spritzed with Dazzling Diamonds Glimmer Mist to activate the soft colors. After it was dry, I die cut Die-Version's Mr. and Mrs. Background, attached it to a white piece and then onto a top folding purple A2 card. I die cut Tim Holtz's "forever" out of a scrap of the same Nuance paper and attached with a rose fabric flower colored with purple dye ink. More magic on the inside:


Of course I have to share my favorite new Pixelated Heart die from Neat and Tangled with my class:) The front die from Die-Versions cuts out a large heart and the semi heart I attached to the inside top. I die cut the smaller pixelated heart from N&T out of the Nuance heart. The inside heart pops up and I attached the initials of the loving couple on the heart (cut out with Paint Brush Alphabet die from Die-Versions.)

I am entering this card in the Anything Goes challenge at Simon Says Stamp Wednesday Challenge and the challenge at Simon Says Stamp Monday Challenge to be inspired by a song title. There are many many songs with Forever in the title. I checked on line and found this list. My favorite is "Forever and For Always" by Shania Twain.

Saturday, February 27, 2016

Minecraft Fun with the Pixelated Heart Die

I love my new Pixelated Heart die set from Neat and Tangled and am sharing a Minecraft inspired card today that I was inspired to make after watching this video with tips on how to use this die set.  My grandson loves Minecraft and since Valentine's Day is in the past, I made a birthday card for him. The front is 4 of the pixelated hearts fitted together with "Happy Birthday 2 You" abbreviated. The real magic happens when you open up the card:


Is that not cool? I wish they had more shapes besides the heart! This set was sold out the last time I checked the Neat and Tangled website, but was available at Ellen Hutson. I used my Word program to type a Minecraft saying and cut it out with the smaller pixelated heart.

I am entering this card in the Anything Goes challenges at Simon Says Stamp and Crafty Girls Creations. 

Friday, February 26, 2016

Fabulous Black Dress Card with Crackerbox Palace Stamps


It’s Crackerbox Palace Friday and today I am sharing a “Little Black Dress” card I made with Crackerbox Palace stamps. I am a big fan of Chris Young’s Black Dress Song (Getting’ You Home), and you can click on the title to see a video. I started this card by heat embossing Crackerbox Palace’s Little Black Dress and “You’re Utterly Fabulous” with black embossing powder on watercolor paper. Then I sprinkled on some Magenta Nuance colored powders and spritzed them with Glimmer Mist to release the soft colors. I attached a strip of black glitter tape on the left side of a white A2 card base and then attached the fun and fabulous finished card front.


I am entering this card in the anything goes challenge at Simon Says Stamp Wednesday challenge, and the “Inspired by a Song" challenge at Simon Says Stamp Monday Challenge.

Thursday, February 25, 2016

Can We See Spring Through the Window?


My puppy and kitty and I are sure hoping Spring is on the way! I chose a Clear Views Transparency full of Spring greens to look at through our window. This card is for a challenge for my local stamp club to create something with a tri-fold window card. I created the front wood grain look and then attached the completed piece the wrong way, so mine is no longer a tri-fold. The cute front and back pets are from AI. The window was a bit bigger than the Clear Views transparency, so I added a wood valance (die by Memory Box.) I used distress ink and Elmer's glue to create the wood grain background as I learned how to do here.


Here is a look at the inside of the card. The fronts of the sweet pets are shown over a window sill (also Memory Box.) The large I Love You is a fun die by Die-Versions. If you like it, you need to hurry- it is in the Farewell Sale here so it will not be around too much longer.  All the dies in the Farewell sale are marked way down, so be sure to check out these great deals!

I am entering this card in the "Create Your Own Background" challenge at Tuesday Throwdown, and the Anything Goes challenge at Simon Says Stamp Wednesday Challenge.

Wednesday, February 24, 2016

What If? Wed. Sketch Challenge at Repeat Impressions


Happy Wednesday everyone! It's time for another fun sketch challenge at The House that Stamps Built and we are challenging you to make a card using the sketch below and link it up for a chance at some great Repeat Impressions rubber! For all the details on what you can win and to see the other Rock Stars cards using this sketch, please visit our blog.


I stamped Repeat Impression’s Cottontail Rabbit with brown ink on a white square and layered it on a green square and rounded all the corners. I embossed a pink card base with an embossing folder with small flowers. I created a sparkly bright strip with a variety of glitters on a sticky strip and attached it diagonally on the card. I stamped “Some Bunny”, cut it out with deckle scissors and attached.

Here is the sketch for you to follow when you create a card for our challenge. You do not need to use Repeat Impressions stamps to enter our challenges, but you get an extra chance to win if you do!

I am entering this card in the Anything Goes challenges at Crafting from the Heart and Craft Your Passion.


**Don’t Forget: for a 10% discount on any size order at Repeat Impressions, make a note of my discount code (rr10kh), click on the blog badge on the side of my blog and go to the website here to shop and save!**

Tuesday, February 23, 2016

Baby Girl Love Card


I have been playing with some new dies for a couple challenges I wanted to enter. I was inspired by this photo at Die-Namites to create a love card using their dies:

Here is the sweet die I wanted to feature on this card:

I started by creating a heart stencil out of acetate with a Nestabilities heart die. I attached the heart stencil down with temporary tape over a square card base. Then I attached another stencil from TCW over the heart opening and sponged the double stenciled heart with Fired Brick Red Distress Ink. I also used Distress Ink (Pickled Raspberry) to color the seam binding bow. I cut apart the "Baby's Love die to feature the Momma and baby giraffe and some of the floral curls on the card front. I added some Tonic Nuvo Crystal Drops to the eyes and flowers.

I am entering this card in the "Tie One On" challenge at Scrapy Land and the February challenge at Die-Namites.

Monday, February 22, 2016

Stamping with Brushos and Woodgrain Easel Card POTW


Happy Monday! Today it is my turn to share a Project of the Week at Repeat Impression's blog, The House that Stamps Built. I am showing you an easy way to get the look of watercolor in your stamping, how to get an awesome woodgrain look, and how to make an easel card (just in case you have never made one.) Ready?


I highly recommend using a MISTI (Most Incredible Stamping Tool Invented) for this and any technique where you want to be able to stamp a second or third time in the exactly the same place. I stamped Repeat Impression's Heart Shutters Window with brown ink using the MISTI for placement. Then I mixed Crimson Red and Orange Brusho Coloured Crystals with a little water and painted the colors onto the stamp, then stamped again with the MISTI. The result is an easy watercolor look to the stamping.


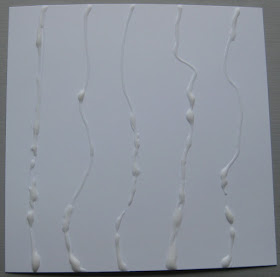
Next I started working on the woodgrain look on the card front above. I learned both these techniques from the talented Karen at her Snippets blog here.  The woodgrain look starts with ordinary school glue drizzled on in lines on a piece of white cardstock.


Waiting for the glue to dry is the hardest part and hurrying it along with a heat gun does not work well. I let mine dry several hours or overnight. After it is dry, I scored every 1/2 inch from the back of the glued piece.


The next step is to choose some distress inks and rub directly on the glued scored piece, then spritz with water to mix the colors a bit. I chose Vintage Photo, Aged Mahogany and Weathered Wood Distress Inks (by Ranger) for this weathered woodgrain look. I cut the inside of the Heart Shutters Window out with a craft knife and then attached it to the woodgrain front, and cut it out again.

I stamped "Some Bunny" inside the window on a green piece the same size as the wood grain front (5 1/2" square.) I created a square green card 5 1/2" x 11". The top half of the card is scored at 2 3/4" and folded down. The woodgrain window front is attached to the bottom half of the folded front. I stamped and cut out Repeat Impression's Cottontail Rabbit, and attached it to the bottom inside with pop dots. The front of the card is held open by the popped up rabbit. Here is a picture of the completed easel card standing up:


I had fun playing with Brushos and glue and distress inks and Repeat Impression's great stamps to make this card. I hope you give them all a try!


Sunday, February 21, 2016

Tie One On Bridal Shower Gift Bag with Tonic Studios Dies


The challenge this week at Scrapy Land is Tie One On or use a bow in the projects we link up. I recently purchased Tonic Studio's Small Dainty Bow Set from Create and Craft and knew they would be perfect for a project for this challenge. I am designing some 3D projects with my Tonic Studio dies for an upcoming class and decided to make a bridal shower gift bag. Years ago I was taught how to take an ordinary 9 x 12 mailing envelope and turn it into a handmade gift bag with some scoring and trimming. It is easy to do- check out this photo for the basics:


To make this easy gift bag, cut off the top flap, score at 1 inch on both sides and the bottom, fold out the sides and the bottom and then fold under the bottom flaps. The first picture above shows the sides of the gift bag when standing up. I die cut Tonic Studio's beautiful Silhouette Scene Bride and attached her to a strip of two sided tape and added Tonic Nuvo Radiant Gold Gilding Flakes. I die cut Tonic's Simply Screens Moroccan Mosiac out of gold for the handle and attached it to the bag with strong two sided tape and black brads. I sprayed some bridal flowers with gold glitter dust and added Tonic Nuvo Black Crystal Drops before attaching them to the gift bag.


Of course the highlight of the bridal gift bag is the gorgeous double layer bow created with Tonic Studio's Small Dainty Bow Set and gold and black thin cardstock. I cut each bow twice, layering the gold on the black. I did the same for the strip the bow is attached to. I added a couple more drops of Tonic Nuvo's Black Crystal Drops to each corner of the bottom bow. I love how these drops are self leveling and form perfect pearl drops each time without any annoying tags or points! 

**Edited to Add: I also shared this project here on the new Blog Tonic U.S.A.  The U.S.A. Tonic Studios design team will be sharing many awesome projects on our new blog shortly, so you may want to check it out and subscribe so you don't miss any of the great projects to come.

I am entering this project in the "Tie One On" challenge at Scrapy Land. ( Of course, I used Tonic Studio's dies). I am also entering this project in the Anything Goes challenge at Jo's Scrap Shack.

Saturday, February 20, 2016

Anything Goes at Send a Smile 4 Kids


It’s Saturday and time for another fun challenge at Send a Smile 4 Kids! This time our challenge is Anything Goes 4 Kids! Create and link any card appropriate for a child, and you could win one of our great prizes.

We have two very generous sponsors for this challenge: The Cutting Café is giving their winner 3 sets of cutting or digi files! And Create a Smile’s winner gets a 15 Euro gift certificate! TEAM S.A.S will also be choosing their favorite cards for our top three and the winners will receive a blog badge and an opportunity to be a guest design team member on a future challenge.

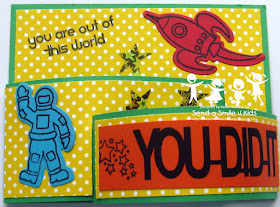
I always wanted to learn how to do a bendi card and the cutting file from The Cutting Cafe' made it so easy. I also printed the "You Did it" from the same CC file. Here is another view from the top to show how the card bends and hold together: 

I cut a layer of yellow polka-dotted dp for each part and stamped and die cut a spaceman and rocket from a set of stamps and dies by Die-Versions. I added a few punched stars to complete the card.

I am entering this card in the Anything Goes challenges at Whimsy Stamps and Little Miss Muffet.

Friday, February 19, 2016

I'm a Die Cut Addict- No Intervention Needed:)


I admit it- I am a die cut addict. I just can't stop myself from buying them- especially if they are unique and brilliant like this Pixelated Heart die from Neat and Tangled. I saw it on a card and just had to have it! It is sold out on the Neat and Tangled website but available here at Ellen Hutson.

But I am getting ahead of myself. Here is the front of the card:

There are two dies in the package- the smaller pixelated heart above and the larger die that cuts the pop up heart shown in the first picture. I learned how to use the die here on this blog post with a video. It is not easy to work with until after watching the video. I started with a red card base 5 1/4" x 10 1/2" and embossed it with a hearts embossing folder. I cut two pixelated hearts and added pink glitter to the smaller one (much more sparkly IRL.) I attached the "you & me" die cut from Little B.


But the magic happens on the inside of this card! I just love how the pixelated heart stands up when the card is opened! I die cut the smaller heart out of the center of the pop up heart and attached Tim Holtz's "forever" on the inside of the heart.

I am entering this card in the Dies R Us challenge to use Red and the Hearts challenge at Deep Ocean.

Thursday, February 18, 2016

Feathers and Fran-tage


Hope you are having a great day! It's my turn to post a card on Die-Version's blog and mine, and I am sharing this card featuring Die-Version’s beautiful new Feather die cut. This die is part of a brand new release you can find here on the Die-Versions website.. I love feather dies and will be sharing several more cards I have designed with this die! On this card I decided to use the negative space after cutting the die to frame a picture of Die Version’s Beach House. I die cut the Beach House out of black cardstock and attached it to a light blue card base. I die cut the Feather die from the center of a cream colored card front. I sprinkled several colors of blue embossing powder around the edge of this piece and melted them from under the piece using an electric griddle. This technique is called Fran-tage and results in an unique frame for the card front.

**Remember you can get a 15% discount on any of Die-Version’s great dies by simply using my discount code karen15 when you check out at the Die-Versions website.**

I am entering this card in the Anything Goes challenges at Crafting from the Heart and 613 Avenue Create. 

Wednesday, February 17, 2016

Photo Inspiration Challenge at Repeat Impressions


On the third Wednesday of every month at Repeat Impression’s blog, The House that Stamps Built, the challenge is going to be an Inspiration Photo challenge. Here is the photo chosen to inspire us this month:


Will you be inspired by the colors or the shapes in the photo? It is up to you to pick out what inspires you and make a card, then enter it for a chance to win some great Repeat Impressions rubber. Be sure to check out the RI blog for the inspiration based cards by the other Rock Stars. I have seen them and you do not want to miss them!

I was inspired by the heart shape, the clouds and the tree line in this gorgeous photo. I embossed Repeat Impression’s small and large pine tree stamps with black embossing powder and the cloud silhouette stamps with white embossing powder. I stamped the heart shaped hot air balloon on some red dp, cut out and attached.

 I am entering this card in the Anything Goes challenges at Crafting from the Heart, Craft Your Passion. 

Tuesday, February 16, 2016

Another CAS Text Me Card


Text Me! is the technique they want to see at Craft Stamper Magazine's Take a Technique challenge this month. I made this card a while back and never blogged it, so am sharing it today. I started with a page out of an old book and stamped the fun sentiment in the middle. Then I sponged through a stencil with aqua blue ink, and layered it on a black A2 card. CAS and fun.

I am also entering this card in the Anything Goes challenge at 613 Avenue Create.

Monday, February 15, 2016

Text Me Distressed Card

Text Me! is the technique they want to see at Craft Stamper Magazine's Take a Technique challenge this month. I made this card a while back and never blogged it, so am sharing it today. I started with a designer paper that has text all over it, and distressed the edges with Tim Holtz's distresser tool from Tonic Studios and his Distress Ink. I stamped the old typewriter and "Just My Type" with black ink and added a little blue distress ink to highlight the sentiment. I added an old looking brad and attached all to an aqua A2 cardbase.

I am also entering this card in the Anything Goes challenge at 613 Avenue Create.

Sunday, February 14, 2016

My First Magenta Nuance Card


If you follow me, you know I own and play with my BB/CB (Brushos, Bisters and Color Burst) powders frequently and really don't need any more watercolor powders. But I was seeing some beautiful projects made with Nuance by Magenta, so I decided I did need them:) This is my first try at a card with them and I used Mauve Purple, Violet and Turquoise Nuance powders spritzed with Dazzling Diamonds Glimmer Mist by Tattered Angels. I like them- they are more subtle colors than Color Burst and more true to the specific colors than Color Burst. But I like all the options I now own. I made this card for a friend whose birthday is today. After the Nuance colors dried, I layered the piece on a white A2 cardbase. I die cut Poppystamp's Floral Frame in white and added some Tonic Nuvo Blue Lagoon Glitter Drops to the flowers. I punched a small butterfly out of a scrap of the Nuance colored paper with a Martha Stewart punch and added some Nuvo white Crystal Drops to the butterfly and to dot the i.

I am entering this card in the Anything Goes with Sentiments at Suzy Bee's Bloomin' Challenge and the Birthday challenge at Digi Designs.

Saturday, February 13, 2016

Happy Valentine's Day with Kisses


Today I am sharing another Valentine's Day project I designed with Tonic Studio's dies and stamps for the Tonic booth at CHA in January. I learned how to make this cute gift box here in a tutorial on Kelly's blog.  Here is another view that shows the view from the top and also that the box is a great way to give a gift card as well as Hershey's Kisses:


Would you like to win some Tonic goodies for Valentine's Day? Of course you would! Just go to Tonic Studios USA Facebook page here, like the page and enter for a chance to win! (Sorry, open to U.S. residents only.)

I won't go into detail about how I made this treat and gift card holder. I just followed the video linked above with a few size revisions for the Tonic Studios dies I used. Here are the supplies I used:

Dies: Everyday Squares Die Set 185E, Paisley Heart (stamp) 1046E   Tools:  Tonic Tangerine Die Machine, Tonic Trimmer and Scissors, Scoring Board   Adhesives: Tonic Funky Glue Pen, Scor-Tape   Cardstock:  pink, white and red cardstock, acetate  Other: pink dye ink, pink ribbon, Hershey candy kisses

I am entering this card in the Anything Goes challenge at Scrapy Land and the Say It with Love challenge at Die Cuttin' Divas. 

Thursday, February 11, 2016

Happy Valentine's Day with Tonic and Nuvo AND a Facebook Contest!


Today I am sharing a Valentine I made with Tonic Studio's awesome products and also a chance for you to win a prize package of Tonic goodies! Take a look:


All you need to do is go here and like the Tonic Studios USA Facebook page and enter the contest. I do not have some of these products- like the Tonic detail scissors and know they are on my wish list because Tonic Studios has the best scissors in the world! I do have the butterfly set -gorgeous!- and the paper cutter- highly recommended! So you know you want to win- go like the page and enter the contest here! (If that link does not work on your mobile device, try this one.)

Here are the products I used to make my Valentine above: 
Dies: Missing You Strip Die and Stamp Set 1168E    Tools: Tonic Trimmer , Tonic Tangerine Die Cutting Machine, and Tonic Scissors   Adhesives: Tonic Funky Glue Pen, Scor-tape sheets   Cardstock: pink and red cardstock  Other: Nuvo Radiant Gold Gilding Flakes, Nuvo Red Berry Crystal Drops, Tonic Forever Moments Rosalyn A4 Embossing Folder, red dye ink, stamp cleaner pad

I love the Nuvo Gilding Flakes and attached them to a two sided sticky paper and rubbed them in with a square of a stamp cleaner pad from Inkssentials. I die cut the Tonic Missing You die out of a red cardstock strip, and stamped and die cut a couple romantic tickets from the same set. I embossed the whole legal size card in Tonic's Rosalyn embossing folder and added some red Crystal Drops to complete the romantic Valentine. 

I am entering this card in the Anything Goes challenge at Scrapy Land and the Say It with Love challenge at Die Cuttin' Divas. 

Wednesday, February 10, 2016

Hearts DCC at Repeat Impressions


It’s another Designer’s Choice Challenge at The House that Stamps Built, Repeat Impression’s blog. It is Heather’s turn and her theme is “Use Some Hearts”. Why don’t you join us in this challenge and enter your hearts project for a chance to win some awesome Repeat Impressions rubber? Please visit the blog for all the details and to see the other Rock Star's projects for this DCC challenge. I have seen them and you do not want to miss them!

I started with a red A2 card base and layers of white and red, then embossed the whole thing with a hearts embossing folder. I stamped Repeat Impression’s ruffled heart and cut it out. I stamped the heart with the small hearts background and LOVE, then attached it to complete the CAS Valentine.

I am entering this card in the Anything Goes challenges at Crafting from the Heart and Craft Your Passion.

And don’t forget: For a 10% discount on any size order at Repeat Impressions, just make a note of my discount code (rr10kh), click on the blog badge on the side of my blog and go to the website here to shop and save!

Tuesday, February 9, 2016

Get Ready for Spring with Die-Version's New Dies


Hope you are having a great day! It's my turn to post a card on Die-Version's blog and mine, and I am sharing  a card featuring Die-Version’s beautiful Spring Scene card front die. This die is part of a brand new release you can find here on the Die-Versions website. I started this card by sprinkling Spring colors of Magenta Nuance powders on a watercolor paper card front. Then I spritzed them with water and let the piece dry. I die cut Die-Version’s Spring Scene out of white cardstock and attached it to the card front. I added some colorful Tonic Nuvo Crystal Drops to the flowers and the eye of the bunny to complete the card.

**Remember you can get a 15% discount on any of Die-Version's great dies by simply using my discount code karen15 when you check out at the Die-Versions website.**

I am entering this card in the Anything Goes challenges at 613 Avenue Create and Scrapy Land. (All the dies are from Die-Versions.) 

Monday, February 8, 2016

You & Me CAS Romantic Card


I am posting another card I made with the technique I learned about from Jennifer McGuire here. Once the background is created with masking, distress inks, embossing and perfect pearls, all you need to do is add some die cuts and you have a lovely CAS card. I chose a Tonic Studios embossing folder but put the card front in the wrong way and ended up with de-bossed roses. I still liked the way it looked,so I attached it to a card base and added the roses and sentiment dies. Originally I die cut the roses corner (from Penny Black) in a light pink vellum and the "you & me" in a red. But after the card was done, I was not happy with the roses, so I added another layer of roses cut in a bright red. Then the reds clashed, so I added another black "you and me" (from Little B.)

I am entering this card in the Anything Goes challenge at Scrapy Land (Penny Black and Little B dies used) and the CAS challenge at Allsorts. 

Sunday, February 7, 2016

Hugs and Prayers Coming Your Way


I bought this Prayers die and stamp set from Simon Says Stamp when I heard about the Lasting Hearts Card Drive and fundraiser.  Click on the link to see how you can help mothers who have lost a child to miscarriage. I started this card with a pretty pink dp die cut with Memory Box's Starlit Breeze. I wanted to use hearts instead of the stars in that die, so I punched (with a Martha Stewart edge punch) and sponged a bunch of hearts. I die cut the "prayers" die (from Simon Says Stamp) in the same pink dp and also from white fun foam to raise it. The stamp is part of the same lovely set.

I am entering this card in the "Have a Heart" challenge at Simon Says Stamp Wednesday Challenge and the monochromatic challenge at Fussy and Fancy.