Happy Monday! Today it is my turn to share a Project of the Week at Repeat Impression's blog, The House that Stamps Built. I am showing you an easy way to get the look of watercolor in your stamping, how to get an awesome woodgrain look, and how to make an easel card (just in case you have never made one.) Ready?
I highly recommend using a MISTI (Most Incredible Stamping Tool Invented) for this and any technique where you want to be able to stamp a second or third time in the exactly the same place. I stamped Repeat Impression's Heart Shutters Window with brown ink using the MISTI for placement. Then I mixed Crimson Red and Orange Brusho Coloured Crystals with a little water and painted the colors onto the stamp, then stamped again with the MISTI. The result is an easy watercolor look to the stamping.
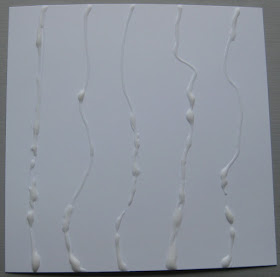
Next I started working on the woodgrain look on the card front above. I learned both these techniques from the talented Karen at her Snippets blog here. The woodgrain look starts with ordinary school glue drizzled on in lines on a piece of white cardstock.
Waiting for the glue to dry is the hardest part and hurrying it along with a heat gun does not work well. I let mine dry several hours or overnight. After it is dry, I scored every 1/2 inch from the back of the glued piece.
The next step is to choose some distress inks and rub directly on the glued scored piece, then spritz with water to mix the colors a bit. I chose Vintage Photo, Aged Mahogany and Weathered Wood Distress Inks (by Ranger) for this weathered woodgrain look. I cut the inside of the Heart Shutters Window out with a craft knife and then attached it to the woodgrain front, and cut it out again.
I stamped "Some Bunny" inside the window on a green piece the same size as the wood grain front (5 1/2" square.) I created a square green card 5 1/2" x 11". The top half of the card is scored at 2 3/4" and folded down. The woodgrain window front is attached to the bottom half of the folded front. I stamped and cut out Repeat Impression's Cottontail Rabbit, and attached it to the bottom inside with pop dots. The front of the card is held open by the popped up rabbit. Here is a picture of the completed easel card standing up:
I had fun playing with Brushos and glue and distress inks and Repeat Impression's great stamps to make this card. I hope you give them all a try!


Fabulous card Karen, and thanks for the tutorial
ReplyDeleteBlessings
Maxine
I learned from Karen how to do the woodgrain look as well. A great technique. I also need to try and do more stamping with my watercolor crystals too. Thanks for reminding me. I love how the shutter window takes on such a great look the way you did it.
ReplyDeleteWatering coloring I'm not that comfortable with; but your use of the misty color and watering technique is something I'm definitely going to try. Great card, and thanks for joining us at Aud Sentiments.
ReplyDeleteOh wow fab job with the distress inks. Thanks for joining us at Aud Sentiments
ReplyDeleteJulie T