Pages

Friday, June 30, 2017

A Christmas Retiform Grid Card


Yesterday I shared another retiform or grid card with a link to a tutorial where I learned how to do this fun technique. If you missed it, you can scroll down to the last blog post. I make Christmas cards all year round to share with my classes and to make sure I am not rushed later in the year. For this Christmas retiform card, I sponged with Broken China Distress Oxide ink and stamped with Ranger Archival Cobalt Blue. Most of the stamps are from a set by Gina K and I filled in with some snowflakes from Inkadinkado.

I am sharing this card in the Anything Goes challenge at Wed. Simon Says Stamp.

Thanks for helping me #spread the joy of creativity!

Thursday, June 29, 2017

Packers Retiform Card


I recently re-discovered an older technique called Retiform Stamping or grid stamping after watching this video on YouTube. The technique is easy and fun to do and I decided to go with a Packer theme for this one. I sponged with a green ink to create all the grids, then masked and stamped the Packer images in each grid. The HB to a true cheesehead and the cheesehead stamp are from Peachy Keen. The helmet, football and "have a ball" stamps are from Crackerbox Palace. The two Packer Gs are personalized stamps also from Crackerbox Palace.The fill in stars are old stamps from PSX and Great Impressions. I will be sharing this card in my in home classes in the fall when our Packers are playing again.

I am entering this card in the Anything Goes challenge at Wed. Simon Says Stamp.

Thanks for helping me #spread the joy of creativity!


Wednesday, June 28, 2017

Personalized Birthday Boy Card with Tonic and Nuvo


I am sharing a sneak peak of a card that is on the Tonic Studios USA blog today with tips on how to personalize a card and add sparkle with Nuvo's glitter markers. Click on this link to get all the details.

And it is a good time to share a new picture of the cutie grandson of mine who will receive this card on his birthday:


Love this boy!! We just had a super fun visit with him and Mom and Dad at the cottage in Eagle River. Can't wait for our next visit the end of the month in Chicago!

I am sharing this card in the Anything Goes challenge at Simon Says Stamp Wed.

Thanks for helping me #spread the joy of creativity!

Tuesday, June 27, 2017

Club Challenge Wallpaper Card


The challenge this month at our local stamp club was to create a card using some vintage looking wallpaper. I chose the beautiful flower swag and the burgundy diamond pattern and created a larger square card. Then I simply die cut Quietfire Designs "Warm Thoughts" out of the rest of the floral wallpaper piece and also out of black fun foam. I glued them together with my favorite glue, Nuvo's Deluxe Fine Tip Adhesive and attached to the wall paper covered card front. Raising the words on the fun foam makes them stand out more but I left the swirls hang free. I added some green Nuvo Crystal Drops for more dimension in the flowers. Here is a closer look:

I am entering this card in the "Use Patterned Paper" challenge at Simon Says Stamp Wednesday Challenge. I am considering wallpaper to be designer paper - the old fashioned kind:)

Thanks for helping me #spread the joy of creativity!


Monday, June 26, 2017

Tonic Studios Birthday Fan Fold Card is Live!


I found a new fun fold and created a card with it using some favorite Tonic Studios dies and color coordinated the ribbon with Nuvo glitter markers. For details on how to make this card and to see how the fan fold looks when open, click on this link to go to the Tonic Studios USA Blog. 

Thanks for helping me #spread the joy of creativity!

A Guy's Shirt and Tie Card

I found a tutorial on line by Keenan Kreations that taught the best shirt and tie fold I have ever tried. The video is very helpful and does show using one or two sided designer paper. I taught it in class and wrote up these instructions for the students using one sided dp:


1.    Cut shirt piece 4” x 5 7/8” and tie piece 4 x 4 inches in lightweight patterned papers.
2.    Score shirt piece gently at 5/8” and 1 ¼” on the long side.
3.    From the back, fold down the first fold to the 2nd scored line and secure with tape runner or adhesive.
4.    Mark and cut in one inch from each side right under the folded top. This can be done by hand or with a paper cutter.
5.    On front side, mark center (2 inch line) and fold each side of the collar to that center line. Set aside.
6.    On tie piece (4”x 4” patterned paper), fold in triangle to mark center with patterned side down. Fold each side to center.
7.    Flip and mark 1 ½ inch down on center line. Fold center point up halfway (or ¾”) and then fold again to top of piece. Tuck the top piece to the back of the folded tie.
8.    Flip and from back, fold the sides of the tie into the center again and secure. If the top of the tie is not perfect, it is OK because it is tucked under the collar when the tie is attached. Attach the tie flat and the collar sides with a little piece of mounting tape or pop dot so it is raised a bit.

I cut a pocket for my shirt with a stitched square die from Pretty Pink Posh and popped it up for dimension. I added an "Enjoy Today" sentiment from Tonic Studios, some tiny buttons to the collar and some white Nuvo Crystal Drops to the sentiment. 

Thanks for helping me #spread the joy of creativity!


Friday, June 23, 2017

Foiled Layered Floral Birthday Wishes Trio #3


Today I am sharing the third card I made for a challenge to make three cards with the same supplies. I am hoping this mini series shows you how to stretch your supplies to create very different looks with the same supplies. This spring I have been loving my Altenew layered dies and the foil products from Gina K. and Therm O Web. Here are the supplies I used for all the cards in this series:


My Creative Time Stitched Oval Dies
Tonic Studios Tangerine Die-cutting Machine
Misc. cardstock pieces
Tim Holtz Blending Tool

For this card, I also used Therm O Web's Deco Foil Transfer Gel. I created a stencil by die cutting Altenew's Layered Floral Cover Die A out of a thick cardstock. I attached the stencil to a piece of cream cardstock and applied Deco Foil Transfer Gel through the stencil holes. I removed the stencil and let the gel dry until it was clear. Then I layered a piece of Lapis Watercolor Deco Foil on top and ran it through my hot laminator. It is so easy to make a gorgeous card with these awesome products.


I foiled another Gina K Birthday Essentials Foil-mate for the greeting on the inside of this card. I cut it out with an oval stitched die and sponged on some color with Ranger's Tumbled Glass Distress Ink. If you missed the first two of the trio of cards I made with the same supplies, scroll down on my blog to Wednesday's and Thursday's blog posts.


Thanks for helping me #spread the joy of creativity!

Thursday, June 22, 2017

Foiled Layered Floral Birthday Wishes Trio #2

Today I am sharing the second of three cards I made for a challenge to make three very different cards using the same supplies. Here is a list of the supplies I used for all three cards:


My Creative Time Stitched Oval Dies
Tonic Studios Tangerine Die-cutting Machine
Misc. cardstock pieces

I die cut Altenew's Layered Floral Cover Die A out of navy cardstock, and Cover Die B out of a lighter blue. I adhered them together with Nuvo Fine Tip Deluxe Adhesive, then cut the top and bottom flowers off with their edges. I attached the top two to the front of a cream A2 cardbase. I foiled Gina K's Birthday Essentials Foil-Mate greeting with Lapis Watercolor Deco Foil, cut it out with an oval stitched die, and then layered it onto a navy stitched oval. 


I attached another beautiful layered flower on the inside of the card. Be sure to stop back tomorrow for the 3rd of the foiled layered birthday wishes trio.

Thanks for helping me #spread the joy of creativity!


Wednesday, June 21, 2017

Foiled Layered Floral Birthday Wishes Trio #1

I recently accepted a challenge to create three different cards using the same supplies and today I am posting the first of the three cards. Here is the list of supplies I used on all three cards:


My Creative Time Stitched Oval Dies
Tonic Studios Tangerine Die-cutting Machine
Misc. cardstock pieces

On this card I also used Therm O Web's Toner Sheets. I started with a cream colored A2 cardbase and die cut the Altenew Layered Floral Cover Die A out of navy cardstock. I die cut the Layered Floral Cover Die B out of a Therm O Web toner sheet, covered it with a piece of Lapis Watercolor Deco Foil and ran it through my heated laminator. The gorgeous color you see is the result- although IRL the bottom flower is more blue and silver than the picture shows. I adhered the two layers to the cream card base with my favorite glue - Nuvo Deluxe Fine Tip Adhesive.


Gina K's Foil-Mates make adding a pretty sentiment to a card so easy. I foiled this sentiment, cut it out with a stitched oval die and sponged some distress ink on it to complete this card.

I will share the 2nd and 3rd cards using the same supplies in the next couple days, so be sure to stop back.


I am entering this card in Virginia's Summer Blog Party here.

Thanks for helping me #spread the joy of creativity!


Monday, June 19, 2017

Karen Burniston New Pop up Dies Series - Day Eight


Today is the last day of my series of cards featuring Karen Burniston's new pop up dies. I have had so much fun designing these interactive cards, and a little birdie told me Karen is working on another release, so I am sure I will be playing and sharing cards with those as soon as I can. I made a spring card with the Tree Pop Up Die Set , but I can't share it with you yet as I am waiting to hear if it has been accepted in a recent design call at a national magazine. (Edited to add: Woo Hoo! Just heard from CardMaker and they have accepted my KB spring pop up tree card for the Spring 2018 Issue!!!) But I love fall cards too and designed this one to share with my classes in a couple months. I started with an A2 top folding card and die cut a leafy border (from Tutti's Designs) and a lovely pumpkin from Die Versions. I colored the leaf and stem on the pumpkin with Nuvo's green glitter marker and grounded the pumpkin with a wavy hill cut with the KB Nature's Edges die set. As always, the best part of these card is in the inside:


Here is another look that shows the simple pop up where the tree is attached:
I die cut the pop up apparatus in a piece of dark green with the Nature's Edges grass and hill dies on the top and bottom. I die cut a tree in brown and the larger foliage piece in gold. Then I die cut and added a bunch of orange, red and gold leaves for a lovely fall tree. I added a "warm thoughts" sentiment cut with a die from Quietfire Design and some birds cut with IO dies. 

Thanks for helping me #spread the joy of creativity!

Sunday, June 18, 2017

Joyful Foiled Celebration Card


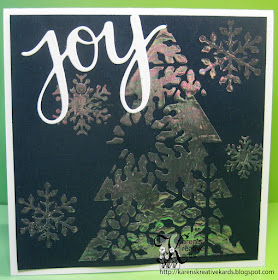
I make Christmas cards year round so I am under no pressure to get them done in November or December. I had my laminator hot and was playing with Deco Foil Transfer Gel and some stencils and this card is the result. I applied Deco Foil Transfer Gel through an i stencils Christmas stencil. After the gel was dry and clear, I ran the navy piece through my laminator with a piece of Opal Deco Foil. Here is a close up from another angle to help see the lovely shimmer in the foil: 


IRL it is very pretty. I layered the piece on a white square card base and simply added a "joy" die cut from a Hero Arts set to complete the card. One more for my stash:)

I am entering this card in the Anything Goes challenge at Scrapy Land and the Celebrations challenge at Dies R Us.

Thanks for helping me #spread the joy of creativity!

Saturday, June 17, 2017

For the Boys Challenge at Send a Smile 4 Kids


It’s Saturday and time for another fun challenge at Send a Smile 4 Kids! This time our challenge is: For the Boys. Create and link any card appropriate for a boy or a teenage boy and you could win one of our great prizes.

We have two very generous sponsors for this challenge: Dollar Graphics Depot is giving their winner a $15 gift certificate! And the winner from Tonic Studios USA is giving their winner 8 Crystal Drops! TEAM S.A.S will also be choosing their favorite cards for our top three and the winners will receive a blog badge and an opportunity to be a guest design team member on a future challenge.

My boy's card features a cool boy and sentiment from Dollar Graphics Depot. I started with an A2 blue card that I embossed with an embossing folder from WeR Memory Keepers. Then I printed and cut out the boy and cool sentiment and attached them for a fast CAS but fun boy's card.

I am entering this card in the embossing challenge at Simon Says Stamp Wednesday challenge.

Friday, June 16, 2017

Proud to share...


All Free Paper Crafts.com has published another of my cards and you can check it out here: https://www.allfreepapercrafts.com/Card-Making/Charming-Thanks-Teacher-Pop-Up-Card.

It is a sweet teacher thank you card featuring Karen Burniston's Charm Accordion Die Set. The picture shown is a sneak peak. For complete instructions and more pictures, please click the link above and check it out. Comments on the linked page would be greatly appreciated.

Thanks for helping me #spread the joy of creativity!

Thursday, June 15, 2017

Karen Burniston New Pop up Dies Series - Day Seven


As I tend to do when creating a card with Karen Burniston's amazing new pop up dies, I kept the front of this birthday card clean and simple. I die cut the "wishing you a" sentiment out of a navy blue scrap using a die from Memory Box. I hung a little cupcake charm from Karen's 1004 Birthday Charms set with some baker's twine. The sprinkles on the frosting and the dots on the i's were created with Nuvo Caribbean Ocean and Midnight Blue Crystal Drops. 

Are you ready for the fun inside pop up surprise?


A big sweet cupcake pops up and stands up for a fun surprise. Here are some close ups to show you more: 


Karen Burniston's 1008 Cupcake Pop Up Die Set is another ingenious set of dies that includes the pop up mechanism and all the pieces to make large and medium sizes of cupcakes. If you watch the video on the page linked above, she shares all her tips that make it so easy to create a fun pop up card. I wished the birthday recipient a "Sweet & Happy Birthday" using dies from Tonic Studios and Memory Box. I created both cupcakes with green mirror card cupcake liners and the larger one was folded and attached per Karen's instructions for great dimension. I chose lemon frosting for these cupcakes and added more Nuvo crystal drop sprinkles. 

Everyone loves cupcakes, right? So I think anyone would love receiving a sweet cupcake birthday card like this one.

I am  entering this card in the Celebrations challenge at Dies R Us.

Thanks for helping me #spread the joy of creativity!

Tuesday, June 13, 2017

Karen Burniston New Pop up Dies Series - Day Six

I am loving all the new dies recently released at Karen Burniston.com, but admit my favorite is the Charm Accordion Die Set.  I posted another card I made with that die set here on day four of my series. But I decided to try making a card this time with two of the panels attached together. My theme for this card was "happy birthday cupcake." I stamped "hello cupcake" on the front using stamps from two Tonic Studio stamp sets. On the front twisting panel, I attached a cupcake made with dies from the KB 1008 Cupcake Pop Up Die Set. I die cut the cupcake liner out of gold mirror card, the frosting out of pink cardstock, and the cherry out of a scrap of red cardstock. I colored the stem with a black marker and added some sprinkles on the frosting using Rhubarb Crumble, Carnation Pink and Gloss White Crystal Drops by Nuvo. To hold the card flat until the recipient opens it, I tied it shut with a piece of pink baker's twine. Look at the magic and fun when the twine is removed and the card pops open:


Isn't this clever card design amazing? I just love how the charms hang down from the charm frame on paper jump rings and how the windows swing as the card is opened and closed! I cut two bases out of red cardstock and attached them together with white hinges. I die cut 4 white stitched frames. Here is a picture of the left side pieces close up: 


My pink frosting cupcake from the front swings to show on the inside when the card is opened. I created three different flavors of cupcake charms all with gold mirror card cupcake liners and Nuvo crystal drops sprinkles. This one has chocolate frosting- my favorite:) And isn't the racoon from the KB Woodland Animals Die Set so cute with his cupcake treat with vanilla frosting? 


The third and fourth panels say Happy Birthday to You in abbreviated form using Concord & 9th script letter stamps and a numeral 2 die from Tonic Studios. This cupcake charm has cherry frosting and more Nuvo Crystal Drops sprinkles. 


I hope you come back again later this week to see a few more cards I made with the new dies from Karen Burniston. 


Thanks for helping me #spread the joy of creativity!

Monday, June 12, 2017

Karen Burniston New Pop up Dies Series - Day Five


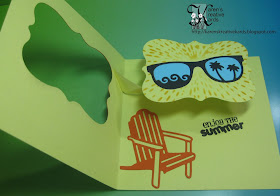
Today I am sharing a sunshine summer card featuring the new 1011 Katherine Label Pop Up Die Set from Karen Burniston. If you click on the link, you will see all the pieces in this die set as well as a die assembly video and handy pdf. You will also see that the die set does include label dies to create the pop up label and the label frame. I used them on another card that is going to be blogged July 1st for a Send a Smile 4 Kids challenge. But for this card, I knew I wanted to feature the summer sunglasses die (from Alina Crafts) which were too big for the label dies in the set. I was able to easily switch out the pop up label and frames to some larger ones from the Cockle Shell Layering Set by Tonic Studios. I started with a 5 1/2" x 11" side folding yellow card base. Before I cut out the pop up label and frame, I sponged Fossilized Amber Distress Ink through a TCW stencil that looks like sun rays and stamped "You are my Sunshine" (from Crackerbox Palace) with black ink.


The label with the sunglasses pops up on the inside as shown, and when the card is closed, pops into the opening on the front. Such an ingenious design from Karen Burniston! I added a die cut Adirondack chair (die cut from Die-Versions) and a summer sentiment from Joy's Life Stamps. Here is a peak at the apparatus that pops up the sunglasses label:


 I admit I tried to make a card with this pop up into an opening on the front following a tutorial video in the past and struggled mightily. With this new Katherine Label Pop Up Set from KB, it was so easy to make this fun pop up card and I am teaching this card in my next classes in my home. 


Thanks for helping me #spread the joy of creativity!


Wednesday, June 7, 2017

Karen Burniston New Pop up Dies Series - Day Four


I think if I had to pick a favorite of Karen Burniston's new dies, it would be the Charm Accordion Die Set I used to make this card. It is so easy to make sweet pop up cards with this ingenious die cut set! When the recipient opens the envelope, this is what they see:


Cute, right? But then the card pops open to show the hanging charm and pivoting swinging squares shown here:


If I wanted, I could add a second set of pivoting frames and charms to the card and the next one I make I am going to do that. But I was charmed (pun intended) with this sweet birthday card just the way it was. I die cut the base, the jump ring and the charm frame out of thick black cardstock and followed the easy directions on Karen's video and PDF here to create the cardbase. I also cut two extra card bases out of polka dotted patterned designer paper and cut them in half at the center scored line. I used a trimmer to cut off 1/8" on each side, rounded the corners and adhered them to the front and two inside pieces. I punched a pretty butterfly out of the same dp using a The Paper Studios punch, added some sticker gems from Stampendous and adhered it to the stitched square frame in the first pivoting square. To finish the front, I die cut and adhered Happy Birthday from Karen Burniston's Word Set 2 - Birthday.


The charm frame has tabs on each side to attach to the swinging pivoting squares. I chose a butterfly charm for this card and after die cutting it and adding some more sticker gems, I hung it on the paper jump ring. I am amazed at how clever this design is and that it includes paper jump rings that hang charms on them! I diecut and attached "celebrate" from the Birthday Word Set and added a little punched butterfly (from Tonic Studios) onto the stitched white frame on the 2nd pivoting square. I die cut a stitched oval label from the 1011 Katherine Label Pop up set to sign the card on before sending it out. The finished size of this Charm Accordion Card when folded is a petite 4 1/4" by 3 1/4" so it will fit easily into an A2 envelope even when it is expanded to 4 swinging pivoting charming frames. 

I am proud to share that the very first one of the cards I created with the Karen Burniston Charm Accordion Die Set was immediately snatched up for publication at AllFreePaperCrafts.com. It is a sweet teacher thank you and I will share a sneak peak and a link here when it is published. I did have another new card go live yesterday and here is a link to check it out: https://www.allfreepapercrafts.com/Card-Making/U-R-Awesome-Handmade-Card/


Thanks for helping me #spread the joy of creativity!