Pages

Tuesday, October 27, 2020

More Simply Made Pinwheel Cards From My Newest Video


I had so much fun creating easy pinwheel cards with a new die from Helen Griffin for Simply Made Crafts for my newest video here. The Pinwheel Die Set includes the main piece that folds easily to make a pinwheel card, a stitched belly band die and many other decorative dies. I added a layered butterfly from Birch Press Designs to the belly band of this card. Here is a look at the inside and that beautiful butterfly:


The sentiment die is from Sue Wilson and the square decorative die is from Karen Burniston. You don't have to use the belly band and can choose to put the pinwheel on the front of a regular card as I did here:


I stamped the "open" on the flap the recipient should pull on to open and here is a peak at the inside of this pinwheel:


The 'happy birthday" die is from Penny Black and I added a gift card to the inside of this birthday card.


Here is the last of the pinwheel cards I created with this awesome die. I embossed the belly band and the circle (from the same die set) with a snowflake embossing folder from Taylored Expressions out of Tonic Studios mirror card. Christmas Blessings is a favorite sentiment die from Sue Wilson. On the inside are my wishes for you and your family (die from Penny Black.)


I had so much fun creating pinwheel cards and hope you will watch the video to see how easy they are to make with this die set from Simply Made Crafts and Helen Griffin.

I am entering the 1st card in the Layer It Up challenge at Simon Says Stamp Wednesday Challenge.


Monday, October 26, 2020

Video - Simply Made Pinwheel Cards For All Reasons and Seasons


I have always liked the look of pinwheel cards but thought they looked too difficult to make until recently when I found the Pinwheel Card Die Set by Helen Griffin for Simply Made Crafts. In my newest video here, I show how easy it is to make a unique pinwheel card with this die set and a bunch of pinwheel cards I made for the holidays and for other seasons.


This is the card I made in the video, although with different papers. I loved the idea from Jennifer McGuire's recent video where she showed how to attach ornaments to a belly band that the recipient can take off and hang on their trees or in their home. I incorporated that idea into the pinwheel card which I show how to make in the video. 

Here is a look at the inside of this card as well as the ornament I made with the layered Radiant Ornament dies from Birch Press Designs. 


I don't own a lot of two sided designer paper (light weight works the best.) So I attached Memory Box's Woodland Watercolor Sprigs wide washi tape to the back of a plaid paper and then cut out the Pinwheel Card die. Wide washi tape like this one looks totally different depending on what cardstock you attach it to. So the belly band is the same wide washi tape over green cardstock and the flaps and inside (below) were created with the wide washi tape over white cardstock. 

I created a Christmas mug with a Gina Marie Designs die and cut out the center to create a shaker with Maker Forte's candy canes and chocolate and other candies as well as some beads. "For You" is a die from Crealies. Here is a look at the inside where I made a pocket  for a gift card and the pretty paper is Memory Box wide washi tape on the white back of the plaid paper. 


I had so much fun creating pinwheel cards so easily with the Simply Made Crafts Pinwheel Card Die set for this video and hope my cards and the new video here encourage you to give these a try!
 
I am entering the 2nd card in the Layer It Up challenge at Simon Says Stamp Wednesday Challenge.

Thursday, October 22, 2020

Bonus Video - Melting Magic With Super Thick and Embossing Powder Mixes


One of the few perks of 2020 is all the extra time I have play with cardmaking ideas and as a result, I have extra videos and cards to share with you. I love to experiment with embossing powder techniques and in my newest video, I share the melting magic of super thick embossing powders as well as mixes of different types of embossing powders on sticky sheets and strips. 


How do you think I achieved that awesome mix of black and white and texture on this cute Scottie dog (cut with a die from Tonic Studios)? It was easy with Super Thick Dalmatian Embossing Powder from Glitters Galore heat set on sticky two sided sheets from Sookwang as I show in the video. The stamps on this card are from Gina Marie Designs.


The flowers and the little square embellishments on this slimline card were created with Checkers Super Thick Embossing Powder on flowers die cut with Altenew dies on sticky two sided sheets. I added some leafy flourishes and a sentiment strip from Simon Says Stamp.


Sookwang strips also work well for backgrounds with a mix of the super thick embossing powders as I show on this birthday card. I also like adding specialty embossing embossing powders from Stampendous on the side of dies like I did on the butterfly.


This is the card I show how to make in the video because it shows all the techniques and ideas of mixing super thick embossing powders and adding specialty powders in a fun easel card format. The brown card base was die cut with a debossed leaf die from Memory Box. The bucket is a combination of super thick embossing powders as I show in the video and was cut with a die from Tonic Studios. Each flower is a different mix of super thick and specialty embossing powders as is the strip along the bottom that holds up the easel. Here are a few more pictures:


The gold centers of the flowers and the square embellishment on the inside of the card were made with thick embossing powders melted on sticky circles and squares designed to raise our elements and is just one of the many tips I share in this bonus video.

I am entering the last card in the Layer it Up challenge at Simon Says Stamp Wednesday.

Tuesday, October 20, 2020

More Gorgeous Embossed Cards With Tonic Studios Specialty Cardstocks


My favorite of the Tonic Studios specialty cardstocks I show in my newest video is the Iridescent Mirror Card like I used on the embossed fronts of these two cards. On both of these cards I embossed different colors of Iridescent Mirror Card with a Tim Holtz Sizzix 3D embossing folder and then added more texture with foliage dies from The Ton and Crealies in the same color of iridescent cardstock. Both cards feature sentiment dies from Sue Wilson and Creative Expressions. I also used the pink iridescent mirror card on this wedding card: 


Catch the rainbows in that lovely mirror card?! I used a floral 3D embossing folder from Nellie's Choice on this card and on the inside too with a sentiment die from Cutplorations:


I used a new layered butterfly die set from Hero Arts as well as many colors of Tonic's Pearlescent cardstock on this card. I embossed the cardfront with a SU embossing folder and the middle butterfly was cut with Tonic's glitter cardstock. 

I hope all my embossed cards with specialty cardstocks from Tonic Studios in my newest video inspire you to give these a try. 

Monday, October 19, 2020

Video - Iridescent, Pearlescent and Mirror Cards Embossed for Gorgeous Texture


Tonic Studio's Iridescent, Pearlescent and Mirror cardstock is just beautiful and when you add texture with embossing folders, they make our cards even more gorgeous as I show in my newest video. Here is a favorite of the many cards I created for the video: 


I embossed Tonic Studios Firestone Red Iridescent cardstock with a new 3D poinsettia embossing folder from Creative Expressions, added a Cheery Lynn poinsettia with leaves from Spellbinders and a sentiment strip from Taylored Expressions.


I saw this card sketch idea on Pinterest from this blogpost and I cased it but the blogger admitted she also cased (copy and selectively edit) from another card maker so I don't know whose original idea it was. I used 6 colors of Tonic's Pearlescent cardstock on my and embossed it all with a Sizzix embossing folder. "Blessings" is also a die from Tonic Studios.

I love both these cards but in my videos, I always try to teach something new, so I created the card below which shows a version of the sketch above showing you don't have to use circle dies, and also how to extend a regular size embossing folder to create a slimline card (my current favorite card layout.) 


I used Tonic's mirror card for the stitched curved squares (dies from My Favorite Things), and show how I used templates to cut them easily in half. After attaching them, I embossed the card front with an embossing folder from Creative Expressions. I die cut the sentiment from Kat Scrappiness out of white with iCraft Easy Cut Adhesive from Therm O Web on the back, and added some yellow ink on the bottom to make it stand out a bit more before attaching with some yellow gems from Gina Marie Designs.

I hope you check out the many cards for all seasons with this lovely specialty paper from Tonic Studios in my newest video here.

Thursday, October 15, 2020

Taylored Expressions Stamp Joy Cards and Review

I just spent a wonderful weekend stamping while socially distant with a dear friend at a virtual crafty event called Stamp Joy 2020 hosted by Taylored Expressions. I took the two hour class last Friday and then spend all day Saturday making 10 cards in hourly Make and Take sessions. The one - and perhaps only one? - good change that 2020 has brought is that TE made Stamp Joy virtual so 900+ people could participate instead of the usual in person gathering at their store in Iowa. I would not have been able to attend and am sooo glad I could this year. I highly recommend you consider attending next year either way. I learned so much starting on Friday with the two cards above. I learned that the Taylored Expressions Masking Stencils are so versatile and can be used to make some very cool cards such as the ones above and below:


To be honest I thought I could make my own rectangle stencils, but then after trying their quality versions, I ordered my own and got them in two days! 

We did shading and double stenciling and ink brushing on embossing and all the sentiment and butterfly stamps you see were included in our kits. The butterflies were high quality rubber stamps with matching acrylic stamps that fill them in with color. Brilliant - especially for those like me who don't like to color. Taylor also taught a technique for stamping the  butterflies perfectly in the matching butterfly dies I had never tried but will do every time now! Most of the stamps and some of the stencils you see in my pictures were exclusive for Stamp Joy attendees but may be available in the future at Taylored Expressions. Here are some of the cards we made on Saturday: 


I am a very experienced stamper and card maker and did learn new tips and ideas both days. Once again what we received was so organized and generous! All the pieces for all the cards were provided as well as many stamps, stencils and embossing folders. I added the Wish Big sentiment die from Stamplorations and some of my favorite gems (even though those were provided), but that is all I used of my own. That gorgeous floral background stamp is a full size stamp with open flowers that can be "colored" with acrylic stamps shaped for the leaves and flowers. They are designed to be not perfectly covered for a easy fun look. And there is a matching stencil set to color with too as I did here in one of the bonus cards I made:


We received the "Share Joy" stickers because that is Taylored Expression's motto. We also used Therm O Web's Shattered Foil on the Brighter Skies card above and I couldn't let any of that gorgeous foil go to waste so I ran it again through my MINC with a Deco Foil Toner Sheet and made the top card with two of the cute stamps we received. We also received an awesome craft apron and TE gave away thousands of dollars worth of prizes too! And we were all surprised with a personalized stamp for each of us! 

My review? I loved it all and can tell you honestly Stamp Joy 2020 was worth every penny and I hope it is virtual again next year because I really want to attend again. 


Tuesday, October 13, 2020

More Stamped Only (Mostly) Cards From My Newest Video

In my newest video I shared a bunch of cards made with only stamping (with one minor exception below) and some stenciling. I made this card for my amazing grandson with a new stamp set from Stampin' Up and a stencil from Simon Says Stamp. 


I have two adorable grandsons and I made this theatre fun fold card for the younger one using a bunch of old stamps (and one die- can you spot it?)


I stamped and paper pieced the "see you later alligator" and on the inside when the theater doors open, "in a while crocodile." I think Evan will love it! 

I had fun making my stamping only cards and hope you like my samples and take time to watch the video.


Monday, October 12, 2020

Video - Cardmaking - Stamping With Stencils and (Almost) No Dies


My newest video is full of cards I made with a technique I just don't do all that much anymore - stamping! I admit I am die cut crazy but felt the need to get back to my roots - cardmaking with stamps. 


This is the card I show how to make in the video. Isn't that Old World Door gorgeous! It is made with a layered stamp set from Kitchen Sink Stamps - no shading or coloring, just stamps! I started with a beautiful paper from Divinity Stamps and stamped the tree and sentiment from Penny Black. As I show in the video, the door is a series of browns and black ink to create that dimensional realistic door. The front of the card was cut down to about half way and stenciled with a brick wall stencil from Honey Bee Stamps.


This card combines my current favorite card layout (slimline) with creating a background with stamps and paper piecing. I do not color but I am fine with fussy cutting and paper piecing and I love the look of the patterned paper on the stars and Julie Nutting's Toby. The background is a combination of Taylored Expressions and Lil' Inker sentiments.


This card was created with two Pinkfresh Studios background stamps. 

Do you mostly stamp on your cards or use die cuts, stencils and other products on your cards nowadays? To see all the new stamped cards and how I made the first one, please watch the new video here.


Thursday, October 8, 2020

Crafty Chefs October Challenge Tag

I am having fun with a new challenge Facebook group called Crafty Chefs. Each month the host chef posts some prompts for us to use to make a crafty project. Here are the October prompts:
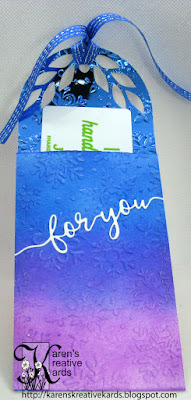
I decided to create a tag with a pocket and of course I used plenty of dies since I am die cut crazy.  My analogous colors were blue, blue violet and violet and I used my blending brushes to blend them on a piece of Perfect Blend Cardstock from Maker Forte. Here is another look at my tag:


I embossed the blended front with an embossing folder from Taylored Expressions. The back was die cut with a die from Elizabeth Crafts out of Tonic Studios mirror card and also embossed with snowflakes. I added some pretty ribbon, a "for you" scripty sentiment (from Tonic Studios) and a gift card from JoAnns. 

Anyone can join the Facebook group and you can choose to participate or not and do your project anytime, even months later. It is laid back and fun, but also a challenge to make something I would not have made without the challenge. Why don't you come join us?