Friday, March 31, 2017

Happy Birthday to my Twin


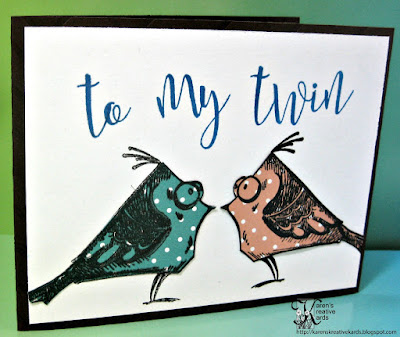
Today is my twin brother's birthday and this is the card I made for him. I am loving my new sets of calligraphy style alphabet stamps from Concord and 9th. They are called Sophisticated Script and make it so easy to personalize a card. I used a piece of rubber in my MISTI to flip Tim Holtz's bird stamp so the boy is looking at the girl bird. I paper pieced each bird with polka dotted designer paper.

I am entering this card in the Anything Goes challenge at Simon Says Stamp Wednesday challenge and the Things with Wings challenge at Simon Says Stamp Monday Challenge.

Thursday, March 30, 2017

Deco Foils Hello Friend Card

I have been playing with Deco Foils and Deco Foil Transfer Gel and had several pieces sitting on my craft desk without any ideas on how to pull them together. Then I remembered this sketch from the Spring CardMaker issue: 


I know it is hard to see, but I think you can get the idea. Great sketches are most helpful when designing cards. You don't have to follow it 100%, but use it as a starting point. I started with a black card base and a card front that I made with a stencil from The Crafter's Workshop. I taped the stencil down on a white card piece and applied Therm-o-web's Deco Foil Transfer Gel though the stencil. I let it dry about an hour, then laid Rose Gold Deco Foil on top and ran it through my laminator. It is so easy to add texture to a card with the transfer gel and gives us another way to use our stencils! I used a couple Foilables from Creative Vision Stamps for the sentiment (cut the "hello friend" in half and used purple Deco Foil) and the feather (used teal Deco Foil on a patterned Foilable, then laid the negative on a Deco Foil toner sheet and ran that through the laminator again.) I attached the "friend" semi-circle with a black script washi tape strip and attached the feather with pop dots. 

I am entering this card in the Anything Goes challenge at Simon Says Stamp Wednesday Challenge.

Wednesday, March 29, 2017

Tonic Studios Easter Table Favor


I am proud to share that this Easter table candy favor I made featuring Tonic Studio's dies and Nuvo products is being featured today on the Tonic Studio USA Blog here. Hope to see you over at the Tonic USA blog and remember, comments are always appreciated. 

I am entering this table favor in the Anything Goes challenge at Simon Says Stamp Wednesday Challenge.

Tuesday, March 28, 2017

A Z-Fold Spring Birthday Card


I was playing with z-fold cards recently and remembered an old Martha Stewart fence punch and thought it would be perfect for inserts in the z-fold card. The fence punch was designed for Halloween with bats on the fence but I cut them off and the card idea started to come to life. I was also playing with new stamps that had not been inked and created my card front with an Altenew layered flower stamp and three shades of Altenew ink.I created the z-fold banner across the bottom and attached a "happy birthday" greeting cut with a Memory Box die. Here is a look at the card when it is opened:


I die cut Cheery Lynn's leafy stem and Poppy Stamps Hampstead Butterfly Stem and attached them to acetate and then onto the layered fences. I die cut a flowery butterfly from Die-Namites and stamped a "beautiful day' sentiment. To finish the card I added a bunch of small punched butterflies with sticker gems. 

I am entering this card in Simon Says Stamp Monday challenge called Things with Wings and Simon Says Stamp Wednesday challenge to use more than one die or punch. 

Monday, March 27, 2017

The Reading Tree Dreams Card


Happy Monday everyone! It's my turn to post a card on Die-Version's blog and mine, and I am sharing a card I made with the brand new “Reading Tree” die from Die-Versions. I love this die with the lovely tree and the sweet kids reading under its branches. I started with a background that I stamped with the Dream stamp from Local King Rubber Stamp. I die cut the reading tree out of the stamped card front, sponged it with brown ink and inlaid the tree back into the stamped card front on a navy blue cardbase. I die cut the little girl and boy readers out of black pieces and used pop dots to attach them so they are raised for dimension. I believe reading gives kids (and everyone) dreams and the passion to “reach for the stars to change the world.” 

Saturday, March 25, 2017

Butterfly Celebrate Surprise Card


I am going to be teaching a class soon that will feature Karen Burniston Pop It Up dies and this is the third card I have designed for the class. I love butterflies- who doesn't? and am featuring them on this card. The beautiful stamped butterfly is from a set by Fun Stampers Journey and I stamped it once and then a second time without re-inking. I created a belly band out of a floral dp and attached "celebrate" which I cut out with a Tonic Studios die and sponged just the bottom half with a blue ink. The front was completed with a small butterfly punched out of the dp with a Martha Stewart punch. And as always with Karen's dies, the surprise inside is my favorite part: 


I die cut the pop up center of this card with a die from Karen Burniston called Anita Frame. There is a stamp set by Karen called "Occasions" with stamps that fit perfectly on pieces of this die set. I stamped and die cut the "Happy Birthday to you" label and attached it to the interactive right label of the diecut. The die set also included a die to decorate the top and bottom pop outs perfectly. I punched some more butterflies, adhered them and added some pearls to each. The Anita Frame die makes a gorgeous card very easy to make! 

I am entering this card in the challenge at Simon Says Stamp (Wednesday) to use more than one die and/or punch.

Friday, March 24, 2017

Concord & 9th Butterfly Fold Card

I am loving the dies and stamps from a new company I discovered at Creativation (CHA) this year called Concord and 9th. I showed you a card I made with their interlocking Hugs die here on my blog and the same videos linked on that blogpost on how to space and cut the Hugs die also work with this butterfly interlocking die. But I decided I wanted the opening with the interlocking butterfly a bit to the left of the center of the front, so I used the 12 x 12 instructions, but scored at 2 1/8", then folded the other side to meet there. I sponged the beautiful die cut butterfly with Broken China Distress Oxide Ink. I die cut the row of little butterflies into the right side of the card front with a Memory Box die called Butterfly Delights and attached a strip of sparkly blue glitter cardstock behind the butterfly openings. I sponged some of the die cut small butterflies with the same blue distress oxide ink and attached them with glue dots. 


When the interlocking butterfly wings are opened, this is what the recipient will see on the inside of the card. I die cut and attached the Happy Birthday Circle from Poppy Stamps and added some gems and more little butterflies.

I am entering this card in the "use more than one die or punch" challenge at Simon Says Stamp Wednesday Challenge.

Thursday, March 23, 2017

Twist and Pop Kitty Card

We love cats in our home and so when I saw this beautiful Zen Kitty in the Seaside Stampin' Ink booth at the Rockford stamp show recently, I knew she had to come home with me. I dug out some old designer paper and die cut the edge with a Penny Black die. I stamped the Zen Kitty with my MISTI to make sure I got a good image and colored her eyes and nose with some markers. I own many kitty stamps and dies so I decided to use lots of them in the twist and pop center: 


The twist and pop card has many tutorials and pins all over internetland, but I saw one card where the pop up panels were turned to go vertical and I decided to turn mine that way. I have tried many tutorial instructions of how to make a twist and pop card and the easiest one I learned from this video tutorial by Jen Evers. I cut my four panel piece out of red cardstock and cut a couple white pieces to stamp the fun sentiment from Crackerbox Palace. I die cut the paw and "meow" with a new set of dies from Kat Scrappiness. The kitty on the bottom panel is a Fiskars punch and the two cats on the top panels were cut with dies from Tonic Studios. 

I am entering this card in the use more than one die or punch (I used six) at Simon Says Stamp Wednesday Challenge.

Monday, March 20, 2017

Tea Lover's Warm Wishes Pop Up Card


I am sharing another card I made with new dies especially my interactive dies from Karen Burniston. On the front of this card I created a "warm wishes" border with a new Memory Box die. The beautiful teapot with butterflies was cut with a new die from Tutti Designs and layered on a yellow cardstock window. As always with Karen Burniston's dies, the inside may be the best part of the card:


The teacup pops up on top of a lovely saucer created with the Cup Pop Stand die and matching stencil. I left the top of the saucer unattached in case I decide to give a gift card with the card. Here is a close up look at the teacup pop up:


The "Just for you" teabag was from a set of tea stamps and die I received with a magazine I bought at JoAnns from the UK. The silver spoon die is also part of Karen's Cup Pop Stand set. I cut off the words on the "warm wishes" border die for the bottom of the inside of the navy blue card so I can sign my name when I send the card to one of my favorite tea lovers.

I am entering this card in the "borders or edges" challenge at Dies R Us.

Sunday, March 19, 2017

Guest Artist Gail Jaeger and Rose Mille Designer Papers

On March 8th here on my blog I shared the story of how I met Michelle of Rose Mille on the way to Creativation (CHA) this year and showed you a card I made with her fabulous vintage style papers, glitter and Dresden trims. I shared some of the subtle wallpaper styled designer papers with my dear friend, Gail Jaeger, who is an artist as well as a cardmaker, and today I am sharing two gorgeous cards she made with them. She used pens to highlight and enhance the vintage inspired papers on her cards. Here is a close up and Gail's description: 


"The soft, gentle color of the papers from Rose Mille suggested a bold design to make the card pop.  I started with cutting the base striped paper and adding the floral designed paper on top of it.  Note that the flowers have edges cut off and the leaves actually run off the top.  This all adds tension (interest) to the piece.   The various widths of the pens and the designs on the flowers make the card come together."

Here is another beautiful card Gail made using the same technique, her description and a close up of the card: 


"In keeping with the mild, supple look and feel of the Rose Mille papers, a sympathy card came to mind.  A soft grey was used as the base color, followed by the Stripes in Blue with the floral cut out and attached.  A Prismacolor pen was used to create the designs.  A vertical stripe in the flower copies the vertical stripes in the background.,  The word Sympathy in a monotone paper  adds a tender touch."

Thanks to Rose Mille for the gorgeous papers and to my talented friend, Gail Jaeger, for allowing me to share these lovely cards on my blog today.

Saturday, March 18, 2017

Animal Cards 4 Kids Challenge at Send a Smile 4 Kids


It’s Saturday and time for another fun challenge at Send a Smile 4 Kids! This time our challenge is: Animal Cards 4 Kids! Create and link any card with animals appropriate for a child and you could win one of our great prizes.

We have two very generous sponsors for this challenge: All Dressed Up Stamps is giving their winner two digis of their choice! And the winner from Tonic Studios receives 8 Nuvo Crystal Drops! TEAM S.A.S will also be choosing their favorite cards for our top three and the winners will receive a blog badge and an opportunity to be a guest design team member on a future challenge.

I am featuring a sweet Baseball Bear from All Dressed Up Stamps on my cute card for this challenge. I paper pieced him and layered him on a stitched oval die cut with a die from My Creative Time. I cut some swirly stars with a die cut from Memory Box and stamped the perfect sentiment from Lil' Inker. 

Wednesday, March 15, 2017

Tonic Studios New Life Cross Card


I am proud to share that this card I made featuring Tonic Studio's dies and Nuvo products is being featured today on the Tonic Studio USA Blog here. love the New Life Cross and green is my favorite color and a sign of new life this spring. Greenery is the Color of the Year as declared by Pantone: 


Hope to see you over at the Tonic USA blog and remember, comments are always appreciated. I am entering this card in the "Bit O' Green" challenge at Simon Says Stamp Wednesday Challenge.

Tuesday, March 14, 2017

Feather Pop up Card


I am working my way - or should I say playing my way - through a pile of new stamps and dies and today's card features a beautiful new set of stamps from Visible Image on the front with a sponged background created with new Distress Oxide inks. Love the front, but love the inside even more: 


I was thinking about the feather in Forest Gump and continued the theme on the inside with a couple feathers die cut with a Sizzix die set. The pop up bench was created with a die from Karen Burniston called Garden Bench. I die cut it in the center of the fold and also out of dark brown to add a little contrast to the sides and top. The gorgeous Thinking of You was cut with a die from Quietfire Designs.

I am entering this card in the Take It Make It challenge at Craft Stamper Magazine.

Monday, March 13, 2017

Baby Bear Hugs Card with Die-Version's Dies


Happy Monday everyone! It's my turn to post a card on Die-Version's blog and mine, and I am sharing a sweet CAS card I made with the brand new monkey die from Die-Versions. I cut and embossed him and sponged with pink distress ink. I attached him with pop dots onto a hearts designer paper layered on a peach A2 sized card. I die cut Die-Version’s “hugs” and intertwined the two dies. I think my grandson will love this card!

Sunday, March 12, 2017

Coffee Lover Happy Birthday Pop-up Card


I have been having so much fun designing interactive cards using dies from Karen Burniston! I have also been playing with all the new stamps I have purchased lately and this card is a combination of both new dies and new stamps. On the front is a coffee cup stamped and paper pieced using a new stamp called Flower Tea Cup from Art Gone Wild. I created a kraft top folding card base and stenciled coffee beans using a stencil also from Karen Burniston through Elizabeth Crafts. I die cut "wishing you a" from Memory Box and dotted the i's with small blue candy dots. With all the cards I make using Karen Burniston's dies, the best part is the inside:
I love the Cup Pop Up Stand die I borrowed from a friend. The cup pops up when the card is opened. I used the matching stencil to add some pretty color to the coffee cup and plate, and also die cut a silver spoon and some steam. I added a Happy Birthday wish die cut with a Memory Box die.

I am entering this card in the "Make your own Background" challenge at Simon Says Stamp Monday Challenge, and the "For a Special Lady" challenge at Simon Says Stamp Wednesday Challenge.

Friday, March 10, 2017

Be-You-tiful Stencil Card


I had shared earlier that I am really liking the stencils I found at iStencils and I used my favorite one to create this card. This time I applied white stencil paste with a stencil knife through the stencil. After it was dry, I sponged on blue and yellow dye inks over the stencil paste. I layered on a white square card base and added the Be-You-tiful die from Ellen Hutson.

I am entering this card in the "Make your own Background" challenge at Simon Says Stamp Monday Challenge, and the "For a Special Lady" challenge at Simon Says Stamp Wednesday Challenge.

Wednesday, March 8, 2017

Rose Mille Beautiful Butterfly Shaker Card


Do you believe in fate? I invited a friendly looking woman to sit next to me on a very crowded flight from the Minneapolis to Phoenix for the 2017 Creativation (CHA) in January and by the time we landed, we had become friends. Michelle is the owner of Rose Mille, an on line store that features upscale craft goodies such as glass glitter, gorgeous ribbon, flowers and imported embossed paper known as Dresden trims. Rose Mille had a booth at Creativation and I was able to see the beautiful vintage embellishments as well as their line of vintage wallpaper inspired designer papers and I knew I wanted to design with them. A few days ago, I received a box in the mail and this is the first card I designed with the goodies I received.

Shake, shake, shake...Here is a look at my shaker card all shook up. I chose three designer papers from the scrapbook paper line here on the website that are original designs by Michelle for my card. I stamped the "beautiful" sentiment from Fun Stampers Journey in the corner and attached the subtle grey and blue piece to a navy blue card base. I die cut a shaker frame out of navy blue and pink toned striped designer paper using Tonic Studio's Eastern Oyster Layering Die Set. After adding a layer of acetate, I dumped in some of the gorgeous Blush and Ocean glass glitter and sealed it with two layers of mounting tape and a piece of floral Rose Mille designer paper.

I love butterflies almost as much as gorgeous glitter. I chose a white Dresden trim butterfly like those shown here and colored it with Nuvo's Cornflower Blue Embellishment Mousse. The butterfly sparkles after I applied some of the Ocean and Blush glass glitter using Nuvo glue. I added some pretty 3D butterfly stickers I found here on the Rose Mille website to finish the card front. 

I finished the inside of the card with some more of the soft floral designer paper, a Tonic Studio's Eastern Oyster frame and one more 3D butterfly. I had fun designing this card and sharing Rose Mille, my new favorite source for vintage upscale trims and goodies for card making, scrapping or any crafty adventure you chose. 

Thanks for helping me #spread the joy of creativity!


Monday, March 6, 2017

A Fun Foil Card and Discovery


I clicked on a link at a blog post that featured a set of dies I just couldn't resist recently and discovered two more websites I am happy to share with you. The first is Kat Scrappiness where I found some awesome dies and Foilables by Creative Vision Stamps. I am loving the foiled look on my cards using Deco Foils and when I received the Foilables I chose from Kat Scrappiness, I discovered they were from a Wisconsin based company named Creative Vision Stamps.  I contacted them and visited with them this last weekend at the Rockford IL stamp show. Of course I had to buy some more Foilables in their booth and will be sharing them here on my blog soon. Foilables are sheets of patterns or sentiments made out of toner paper so all you need to do to make a beautiful card is lay a piece of Deco Foil over them and run them through your laminator. So easy and beautiful! Here is a link to the Foilables page at the  Creative Vision website.  If you have a laser printer, you can get a download of the patterns and print your own. If not, you want the actual toner sheets. 

I chose a fun Foilable pattern and ran it through my laminator with a piece of Emerald Watercolor Deco Foil. It is hard to capture the shine and different colors of this foil in a photo, but I love the look. I die cut "Hello My Crafty Friend" from Kat Scrappiness, layered it on a Sizzix label die and attached to the card front with pop dots. I couldn't resist the sentiment set from Funny Bones by Riley and Co. that I also found at Kat Scrappiness. I stamped it, attached at an angle and added some black Nuvo Crystal Drops. Here is the inside of the card- and you know the recipient is going to open it:


I cut a strip of the the negative of the Foilable pattern sheet for the inside of the card and will use the rest in another card I design. Love it! I think my crafty friend will too and so will the members of my in home class when I teach it next month.

I am entering this card in the Make Your Own Background challenge at Simon Says Stamp Monday Challenge.

Saturday, March 4, 2017

Spring Colors 4 Kids at Send a Smile 4 Kids


It’s Saturday and time for another fun challenge at Send a Smile 4 Kids! This time our challenge is: Spring Colors 4 Kids! Create and link any card with spring colors appropriate for a child and you could win one of our great prizes.

We have two very generous sponsors for this challenge: Sami Stamps is giving their winner a $12 gift certificate! And the winner from Dies R Us receives a $15 gift certificate! TEAM S.A.S will also be choosing their favorite cards for our top three and the winners will receive a blog badge and an opportunity to be a guest design team member on a future challenge.

I featured a sweet digi from Sami Stamps called Pencil Peeps on my spring colored card for this challenge. I started with a green scalloped stitched oval card base die cut with a die from My Creative Time. I printed the digi on pink cardstock as well as on some patterned papers and yellow for paper piecing. I die cut the pink stitched oval with another die from My Creative Time. After I paper pieced the pencil and peeps, I attached the pink piece. I completed the card with some green round embellishments.

Thursday, March 2, 2017

Fruity Hugs Card


I discovered Concord & 9th stamps and dies at Creativation this past January and have placed two large orders with them since coming home. One of my favorites of the dies and stamps I ordered in this HUGS Bundle which includes the "hugs" die that interlocks to close the card and a set of fun "hugs" related sentiments. There are some videos here that show how to cut out and use the hugs and other interlocking dies available there. I followed Jennifer McGuire's measurements and cut the height of my white card base to 5 1/4" so I could layer it onto an orange background piece that was 5 1/2" x 4". I found I could still open and close the interlocking pieces if  I attached the white hugs piece with only one line of two sided adhesive down the back. I stamped and punched out some limes, oranges and lemons, cut the lemon in half and attached the others with mounting tape for dimension. I also stamped the "sending" and "your way" from the Hugs stamp set. I attached another green layer to the "hugs" to strengthen the interlocking letters and add some color. Here is a look at the inside after the interlocking "hugs" is opened:


Is that not just too sweet! I love this set and will be making more cards with it soon.