Thursday, August 30, 2018

Stampendous! Week Continues with Gorgeous Poinsettias


Another gorgeous Christmas stamp from the latest Stampendous! release is the Ponsettia Collage I used on this card. I used my Tonic Studios Tim Holtz Travel Size Stamp Platform to stamp the Poinsettia Collage on three squares of white cardstock attached with temporary tape. With the stamp platform, I could stamp it several times to get the best image. Then I separated the three squares, layered them on dark red cardstock and attached back on the square card base. 


On the inside of the card I continued the poinsettia theme with a pretty patterned poinsettia from the Poinsettia Parts set of stamps and dies and another sentiment all from the new Stampendous! release. I added some gold Nuvo Crystal Drops to both poinsettias to complete the card. 

Thanks to Stampendous I have five more cards done for special friends and relatives at Christmas. I hope you check out the new stamps and dies in this release and also watch my video to learn how to make the cards I shared earlier in the week.

I am entering this card in the Anything Goes challenge at Simon Says Stamp Wednesday.

Thanks for your visit and for helping me #share the joy of creativity!

Tuesday, August 28, 2018

Merry and Bright Stampendous! Impossible Card


This "merry and bright" snowman from Stampendous! is sure to bring a smile to the persons who receive this card! I created a 5 x 7 portrait landscape impossible card out of two sided Christmas cardstock. When I first started playing with the impossible fold, I found this blog post and video by MayMay that shared templates for all different sizes of the impossible fold card. I chose the last template she shows in her blog post, but increased the side smaller pieces to 1 1/4 inches wide. Making that change made the card sturdier and created a pop up that was the perfect size for the cute Smiling Snowman from Stampendous. I paper pieced his wardrobe and added an oval "Merry and Bright" from the Christmas Bright set of dies and stamps. 


On the back side of the 5 x 7 impossible card, I added a tag for my signature with another cute Stampendous snowman and some snowflakes.

Monday, August 27, 2018

Video - Stampendous! Stamps and Masking for Three Very Different Looks


I recently received many of the stamps in the Stampendous fall and Christmas release and had so much fun designing with them that I will be sharing Stampendous! cards all week on my blog. Today I am featuring the cards I show in my latest video all of which feature the new Buck Scene stamp, different masking looks and many new Christmas sentiment stamps. The first card above is my favorite and it combines the Black Ice technique with masking of the gorgeous Buck Scene on copper foil paper and I show how to make this card in the video. I did some layering and added a lovely "peace" die cut from Quietfire Design. On the inside of the card is a perfect sentiment from this set of stamps.


The card above is the 2nd card I show how to make in this video. I stamped and masked the Buck Scene and then I stamped the Silent Night background stamp using my Tim Holtz Travel Size Stamp Platform. I added some red pearls and some Nuvo Fresh Snowfall Glitter Accents for snow on the roof, fence and mountains. The beautiful Stampendous! sentiment on the inside of the card is from this set of stamps called Snowman Wishes.


My last Stampendous! masked card was very easy to make using an oval mask after stamping the Buck Scene, and then sponging with blue distress oxide ink. I  cut the oval mask and the "merry" with an oval die from this set of stamps and dies. The oval die I chose was stitched and after I removed the mask, it is was fun to see that the stitching from the mask transferred to the cardstock. The sentiment on the inside of this card is also from the Snowman Wishes stamp set.

We all need to stretch our crafting budgets and one great way to do that is to find different ways to use the same stamps and dies. I hope you will take a few minutes and watch this video, and then come back later this week when I post more cards using stamps and dies from the fall and Christmas Stampendous! release. 

Friday, August 24, 2018

Harry Potter Back to School Card


It's back to school time and I made this card for my grandson who loves Harry Potter with new stamps from Crackerbox Palace/So Suzy Stamps and some cool marbled Park Lane cardstock I found at Joann Fabrics. I typed up the sentiment and continued the thought on the inside of the card:


But what makes this card really special -besides the awesome Harry Potter stamps- is what happens when he pushes where it says "Press Here:"


Isn't that neat? I used some Chibitronics LED lights and copper tape and a battery to create the light up star. Brilliant! I think Nate will love it. 

I am entering this card in the Back to School challenge at Simon Says Stamp Monday.

Thursday, August 23, 2018

A Mermazing Foiled and Alcohol Ink Card


I love the wonderful sentiment and mermaid dies on this card from Impression Obsession! Aren't they just perfect? I created the lovely background with alcohol inks on Yupo paper and then pressed down silver Deco Foil on the sticky parts for all that gorgeous sparkle. The mermaids were also cut out of colored and foil pieces - I just love that look! 

Tuesday, August 21, 2018

More Sparkly Cards Without the Mess of Glitter!

I love this card and it was so easy to make as I show in my newest video here. I simply sponged autumn or sunset colors on ink blending them and then applied Versamark and Nuvo Glitter Embossing Powder (Shimmering Pearl) all over the background and heat set with my heat gun. No mess and lots of sparkle on that background! I die cut Memory Box's Enchanted Deer Collage and rounded all the corners before attaching both to a gold card base. I used a favorite Quietfire Design die on the center of the card: 


The sunset scene on this sidestep card was created the same way- sponging and blending inks, then adding Nuvo sparkly embossing powder. I started with a pre-scored and cut side step cardbase from The Paper Cut. The Cat-tail Sunset and Dancing Dragonfly Collage dies are from Memory Box, the Congrats die is by Stamploration and the stamped sentiment is from Gina K Designs. Here is a close up look at the sparkle and a side view of the side step card fold:


To see how easy it is to create the sparkle without the glitter mess, come watch the newest video here, and thanks for helping me #share the joy of creativity!

I am entering the first card in the current challenge at Scrapy Land.

Monday, August 20, 2018

Video: Backgrounds with the Sparkle of Glitter But No Mess!


If you are like me, you love the sparkle of glitter on our cards but not the mess, right? I know people who do not even want to receive a card that was made with loose glitter because of the possible mess and sometimes even breathing problems. In my newest video, I share a way to get the sparkle of glitter without the mess of glitter. IRL this card is very sparkly but that is hard to show in a still photograph. Be sure to watch the video here to see step by step how to make this card and the sparkle of that background. I sponged and blended three colors of Distress Oxide and then applied Versamark ink and Nuvo glitter embossing powder (Shimmering Pearl) to make this gorgeous sparkly background. Then I die cut and attached a lovely Sue Wilson Santa frame and perfect sentiment. I believe! On the inside I stamped a new stamp from Stampendous and it is my wish for you:


Thanks for watching, sharing and subscribing and also for your visit here today. Thanks, too, for helping me #share the joy of creativity!

I am entering this card in the current challenge at Scrapy Land.

Saturday, August 18, 2018

Humorous or Slimy Cards 4 Kids or Anything Goes 4 Kids at Send a Smile 4 Kids


It’s Saturday and time for another fun challenge at Send a Smile 4 Kids! This year, all challenges at SAS4Kids are Anything Goes 4 Kids! We will often have an alternative theme that you can choose to follow, but are not required to. Create and link any card that is appropriate for a child and your card could be chosen as one of our top three cards and you could join us as a guest dt member on a future challenge.


The theme for this challenge is: Humorous or Slimy Cards 4 Kids OR Anything Goes 4 Kids. Some of us on TEAM SAS are featuring slime on our cards and here is the funny story why: I was visiting a blog of a frequent player in our challenges and I noticed she had our blog badge on the side of her blog promoting our challenge and cause, and of course I was thrilled to see that. But in her title, she made a small error in the spelling of “Send a Smile” and it read: Send a SLIME 4 KidsJ  What a difference mixing up just two letters resulted in! It cracked me up and I shared with the blogger so she could correct it after we laughed about it. I also shared the laugh with my dt members and we decided to use the “slime” and humor in a challenge. Kids love humor and slime, so accept our challenge and see what you can come up with.

I created a slimy Halloween non-scary card for a child for this challenge. I used some older dies and punches to create a cute Frankie over a sponged embossed spider web. On the inside I continued the slimy theme with a fun sentiment.


 Be sure to check out the rest of the cards from TEAM SAS here and we would love it if you entered our challenge. 

Thursday, August 16, 2018

Doodles Paper Playground August Release Blog Hop


There are six new Sparkle Blend sequin mixes in the August release from Doodles Paper Playground and I am participating in a blog hop to show you the new Sparkle Blends and some great projects made with them. I was totally inspired by the new Something Wicked Sparkle Blend to make my first card above. Here is a look at this fun sequin mix: 


Isn't that perfect for Halloween cards? Here are a couple more looks at my card: 


I created the shaker with a Witch Hat die from Tonic Studios and the new Brutus Monroe Deco Foil Brush Strokes Clear Designer Toner Sheet and Gina K/Therm O Web Dazzling Orange Foil. Then I embossed the black card front with an embossing folder from Darice and die cut the spider and two Halloween sentiment dies also from Tonic Studios out of another piece of orange foiled Brush Strokes Designer Toner Sheet.


The second new Doodles Paper Playground Sparkle Blend I am using in my cards today is named "Be-Leaf in Yourself" and available now here at White Rose Crafts. It is full of little leaves and different sizes of autumn colored sequins and inspired me to make this thankful fall card using a stamp and die set from Stampendous. I stamped the leaf in fall colors behind the matching leaf opening and dumped in the beautiful "Be-Leaf in Yourself" Sparkle Blend. I added a pretty "thankful" sentiment cut with a Gina K. Designs die. Here is a look at this card all shook up:


The new Sparkle Blend mixes in this release are 15% off at White Rose Crafts LLC with Code DOODLES15 (Valid Friday - Sunday.)  

Doodles Paper Playground & I hope that you've enjoyed seeing my projects for the August 2018 release Blog Hop today! If you would like an opportunity to win the full August Release, be sure to comment on everyone's blog post! One winner will be chosen at random to win full size packages of all 6 of the August Sparkle Blends. Please provide a current email with your comment, as that is how the winner will be contacted. We will also announce the winner on the Doodles Paper Playground blog.

The next stop in the blog hop is: EKgorman Designs at  https://ekgormandesigns.com/…/sparkle-blend-release-blog-hop

I am entering the first card in the current challenge at Scrapy Land.

Wednesday, August 15, 2018

Did Someone Say Bibbidi Bobbidi Booze?

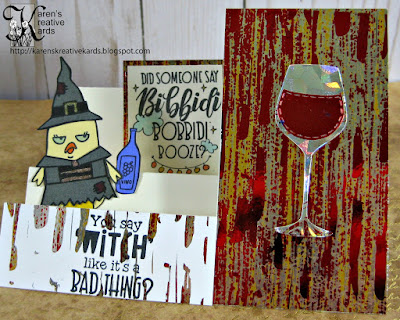
I have been having so much fun designing cards with new stamp sets from Taylored Expressions and new foils and Designer Toner Sheets from Brutus Monroe and Deco Foil! I am in love with the boozy Sarcasti-Chick dressed in her Halloween witch costume  and the LOL sentiments from Taylored Expressions! I added them to a side step card created with pre-cut and scored cardstock from The Paper Cut. I foiled the Brush Strokes Designer Toner Sheets with Sunrise Deco Foil and then added red foil to the negative foiled sheet. That process is very easy to do and I show how on my video posted here. I added a glass of wine cut out of more foil with a die cut from My Creative Time. Here is another look at the boozy Sarcasti-Chick witch:


Hope this card puts a smile on your face and the face of the person I send it to. Like Taylor and I like to say - Share Joy! 


I am also giving away two huge prizes exclusively on Instagram so be sure to click one or both of the pictures on the right side of the blog before 8/18/18 at midnight to go to the posts and learn how you can win there!

Tuesday, August 14, 2018

Celebrate You Foiled Fun Fold Card From Newest Video


I love fun folds and the newest foils and Designer Toner Sheets from Brutus Monroe and Therm O Web and I had so much fun designing with them for my latest YouTube video here. I show in the video how to add rainbow foil to foiled pieces made with the Brutus Monroe TOW Marble Designer Toner Sheets and Dry Brush foil and this is one of the cards I designed. I started with a pre-cut and scored Slider Die Cut card from The Paper Cut so making this fun fold card was super easy. The "Celebrate You" die cut was cut out of glittery Sugar Coated felt from Taylored Expressions and more rainbow foil. I had to buy the matching Celebrate You die and stamp set from Neat & Tangled because I loved the message and also supported a great cause. Just look at some of the matching sentiments from Neat & Tangled in the inside of this pull up slider card: 


I love these sentiments! Wouldn't this card be perfect for a friend or family member going through a tough time with a sickness or other troubles? I added some punched stars out of more of that foiled rainbow paper to the card. The stamps and dies from Neat & Tangled and the rainbow and Dry Brush marbled foil from Brutus Monroe and Deco Foil combine for a beautiful card and I love how it turned out! 

Check out my latest video for more foiled fun folds.

I am also giving away two huge prizes exclusively on Instagram so be sure to click one or both of the pictures on the right side of the blog before 8/18/18 at midnight to go to the posts and learn how you can win there!

Monday, August 13, 2018

Video - Foiled Fun Fold Cards with Brutus Monroe and Therm O Web!

In my newest video, I am sharing how to make this fabulous foiled pull up accordion card with foils and Designer Toner Sheets from a new collaboration by Brutus Monroe and Therm O Web. My favorite of the new Designer Toner Sheets in this awesome collection is the Marble and I made this fun fold card with those Designer Toner Sheets, (both clear and white) and the red Sunrise Brutus Monroe foil and another version with the blue Dry Brush foil:

The pull up accordion or lantern card folds flat to mail and then the recipient pulls on the cord to reveal 4 sides of birthday wishes and gorgeous foiled pieces. It is difficult to photograph when open, so I suggest you watch the video here to see many ways to use the new Brutus Monroe/Therm O Web products and a step by step tutorial on how to make this fabulous fun fold. Here are a few more pictures of the two cards from different angles: 


In the video, I may not have been clear about one of the steps to make this pull up accordion card. After scoring the 8 x 11 inch piece of cardstock at the 2, 4, 6, 8 and 10 inch lines, turn the piece and cut into two inch strips. Those strips are folded accordion style with the first and last fold being mountain folds. 

I also used alphabet dies from Karen Burniston, stitched rounded square dies from My Favorite Things, birthday stamps from Suzanne Cannon for Elizabeth Crafts and balloon dies from Avery Elle to make my pull up accordion birthday cards.

I  am also announcing the winner of my huge anniversary prize package in this video, so if you left a comment, be sure to watch and see if you won.  

I am also giving away two huge prizes exclusively on Instagram so be sure to click one or both of the pictures on the right side of the blog before 8/18/18 at midnight to go to the posts and learn how you can win there!

Thanks for watching, subscribing, following on Instagram and sharing and thanks, too, for helping me #share the joy of creativity!