Tuesday, June 30, 2020

More Cosmic Shimmer Opal Blaze Polish Easy and Gorgeous Cards


It took me about 5 minutes to make this lovely card and believe me the shimmer in the background is even more gorgeous IRL and in my new video here. I simply used an old brush to swipe on Teal Raspberry Cosmic Shimmer Opal Blaze Polish on a black cardstock piece. Then I added some white die cuts from Gina Marie Designs and Crafter's Companion. 

This card started with a piece of Iridescent Marina Mist Mirror Card from Tonic Studios with brushed on Teal Raspberry Opal Blaze Polish. Then I brushed on the Sunset Orange Opal Blaze Polish on a Frantic Stamper Fishing Scene diecut. It was so easy to make and really sparkles IRL! 

To see more cards and how easy it is to make your cards shimmer and sparkle with the Cosmic Shimmer Opal Blaze Polishes, watch the new video here. (Remember to use my code KARDS to get free shipping at Ecstasy Crafts when you get your Opal Blaze Polishes and to check out the new Touch Tip style too.)

I am entering the first card in the Anything Goes challenge at Simon Says Stamp Wednesday.

Monday, June 29, 2020

Video - Cardmaking with Cosmic Shimmer Opal Blaze Polish, Dies and Stencils


I love discovering new unique products for cardmaking and sharing them with you on YouTube and here on my blog! Cosmic Shimmer Opal Blaze Polishes are my newest discovery and in my new video I share eight cards I made in just one day with this shimmery polish. If you click the link to the Opal Blaze Polishes, you will go to Ecstasy Crafts where I was able to find all the colors of the polishes and now all the colors of the new Touch Tip Opal Blazes as well. For FREE SHIPPING on any purchase over $50, use my code KARDS.

I show how easy it is to make all three of the cards in this blog post in the video and then share many other cards as well. The gorgeous shimmer on the Simon Says Stamp leafy frame die cut was created by simply applying Gilded Avocado Opal Blaze Polish with an inexpensive makeup sponge. The layered sentiment was cut with a die from Sue Wilson and Creative Expressions. 

Isn't the sunset scene behind the Memory Box Enchanted Deer Collage gorgeous? I simply used old brushes to swipe on Teal Raspberry, Sunset Orange and Pink Blueberry Opal Blaze Polishes on a black cardstock to get that look. Still pictures do not do justice to the sparkle of these Opal Blaze Polishes, so be sure to watch the video here.


Adding Sunset Orange Opal Blaze on glossy black mirror card from Tonic Studios that was embossed with an embossing folder from Crafter's Companion is another lovely way to use the Cosmic Shimmer Opal Blazes. The heart die and sentiment strip on this card are from Simon Says Stamp.

To see more cards and how easy it is to add glorious shimmer and shine to your cards, watch the new video here.

I am entering the first card in the Anything Goes challenge at Simon Says Stamp Wednesday.

Saturday, June 27, 2020

Papercrafters Unite Against Racism Blog Hop


I am proud to be participating in the Papercrafters Unite Against Racism blog hop. The goal of this hop is to come together to stand behind our crafty sisters and brothers of colour not just in the art industry, but also show our support in the never-ending fight for eqality all over the world. Justine Hovey has organized this hop as well as a video hop and Instagram hop, and all of our projects will promote Anti-racism/Black Lives Matter, Unity, Friendship and/or Support. To find out more about this and the other hops, visit Justine's blog here.


The front of my card features black and white hands together forming a heart for love and black, white, red and brown loves in different fonts. The hands are part of a die set from i-Crafter and the heart stencil is from Gina Marie Designs.


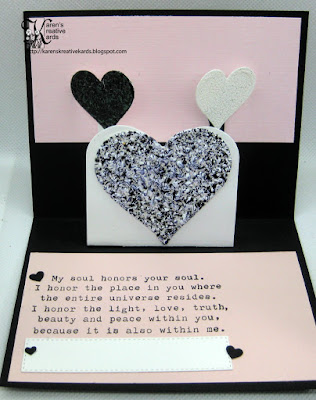
The inside of my card features two hearts that come together to form one heart under them with a mix of black and white embossing powders. The larger heart was created with Dalmation Super Thick Embossing Powder from Glitters Galore and the smaller hearts also are covered with black and white embossing powders. The interactive die is from i-Crafter and is called Heart Hands. Here is a close up of the beautiful sentiment from Impression Obsession:


To see the black and white hearts come together as the card opens, watch this short video: 


I am proud to be a small part of this hop to support our crafty sisters and brothers of colour and hope you will check out all the inspirational projects in this blog hop as well as the videos and Instagram posts. 

I am entering this card in the Anything Goes challenge at Simon Says Stamp Wednesday.

The next stop on the blog hop is: Char at:  https://glitterinmykitchen.blogspot.com/2020/06/papercrafters-unite-against-racism.html

Tuesday, June 23, 2020

Pinkfresh Studio's "Forever In Our Hearts" Stamp and Die Set Cards From My Newest Video

In my newest video I share 6 different cards with different techniques all featuring Pinkfresh Studio's "Forever in our Hearts" stamp set and matching butterfly die. The butterfly on this card is inlaid on the cardfront and I paper pieced with several colors of patterned paper. The  bottom of the navy piece was die cut with a Penny Black border die and the sentiment is from the Pinkfresh Studios set. 

On this card I created a stencil with the butterfly die and brushed yellow ink to color the stamped butterfly. Then I masked the butterfly and brushed on the background of hearts using a stencil from A Colorful Life Designs. The stamped sentiment on this card is from Reverse Confetti. I don't usually use the color combination of red and yellow, but I found out they are the colors for Covid 19 Awareness so I featured that color combo on several of my cards in the video. 

I had fun creating all the cards for this new video with the gorgeous Pinkfresh Studio's "Forever in Our Hearts" stamp and die set and hope my cards have encouraged you to try some of the ideas I shared. 

Monday, June 22, 2020

Stretch Your Supplies Series - 6 Cards With Pinkfresh Studio's "Forever In Our Hearts" Stamp and Die Set


Stamps and matching dies can get expensive so we all need to find ways to stretch our supplies, and in my newest video which is part of my ongoing Stretch Your Supplies Series, I share 6 different cards and ideas with Pinkfresh Studio's "Forever in our Hearts" stamp set and matching die. I heard about this set from Jennifer McGuire and when I read this on their website, I knew I had to bring this set home:

This stamp set was created in honor of, and to benefit Layton's Legacy. Layton, the son of Lea Lawson (Pinkfresh Studio's marketing director), lived his entire life in a NICU before passing away. Lea experienced first hand how hard it is to be a parent in the NICU, and this is where Layton's Legacy was born. To honor his memory, Layton's Legacy holds a fundraiser and card drive event each year. All funds raised are allocated towards purchasing items & donating to charities that help NICU families feel like they are not alone. To help this great cause, we will donate $5 from every sale of this special stamp set to Layton's Legacy.


This is the card I make in the video and it is slimline card featuring the letter substitution technique- the beautiful butterfly from Pinkfresh Studios takes the place of the A in "Peace". I paper pieced the butterfly with red and yellow papers and popped it up on pop dots. The rest of the letters in Peace were cut out of the patterned yellow background with Kat Scrappiness Alphabet Dies, popped up on white fun foam and placed back (the eclipse technique.) The front stitched piece was cut with a slimline die also from Pinkfresh Studios. 


Here is another version of the card using the same techniques and paper but the butterfly replaces the o in You. The "wishing" die is from Memory Box and the "peace" die is from Tonic Studios. 

This is another beautiful card from the video featuring the Pinkfresh Studios "Forever in our Hearts" stamp set and matching butterfly die. The butterfly frame is cut out of the card front and the butterfly can be seen through that opening and on the inside as shown here:

I also punched some hearts out of the same multi-colored cardstock I used for the butterfly.

I share many more cards and ideas using this gorgeous butterfly stamp and die set in my newest video here. I hope you will watch it and thank you for your support both of my blog and YouTube channel.

Saturday, June 20, 2020

3 Cards with a New Embossing Folder and Info on Dies and Stamps For Sale Very Reasonably Priced

When I saw the Old World Paper embossing folder in the new Stampin' Up catalog, I knew I had to design with it as soon as possible so it was the first item I ordered. It is a 3D embossing folder and creates great texture as you can see on the card above. I simply embossed dark brown cardstock with it and then added a die cut coffee cup and the perfect sentiment.

(The coffee cup is part of a set of 4 that is for sale here in case you are interested. I have lots of dies and some stamp sets for sale very reasonably in that Facebook group so scroll through here if interested and check back often to see more listed. If not a member, you will have to join the Facebook group first, but that is easy to do.)


I embossed a text cardstock with the embossing folder and then brushed on distress ink for the background of this card. The wreath cover die is a favorite from Taylored Expressions and the sentiment strip is from Simon Says Stamp.


Here is another CAS card started with a text cardstock embossed with the Old World Paper embossing folder with distress ink brushed on to highlight the embossing. The stack of books is an older die from Die-versions, the heart is from Sizzix and Tim Holtz and the sentiment strip from Simon Says Stamp.

Thursday, June 18, 2020

Direct Comparison Cards With Nuvo Crackle and Expanding Mousse


In my newest video I show many cards made with both Nuvo Crackle and Expanding Mousse. For the first two cards here I used the same Gina K Designs stencil and Ken Oliver cardstock. 

Which do you like better? The top card has gold Nuvo Crackle Mousse that I mixed with Nuvo green from an Aqua Flow pen and after it cracked, I added some Nuvo Midas Touch gold on top. The butterfly is a new die from Poppystamps and the sentiment die is from Gina K Designs. 

The second version has Nuvo Bramley Apple Expanding Mousse through the same stencil and a thank you die from Karen Burniston. On clear advantage of the Expanding Mousse is that you can heat it immediately to expand it with great texture. The Crackle Mousse cannot be heat set and you need to be very patient for the fun crackles to appear. I like them both..

Here is one more sample card from my newest video. I made this mixed media card with a stencil by Seth Apter and several colors of ink. I mixed the Nuvo Crackle Mousse with some distress inks to change the color and applied it through the center of the stencil. After it dried, the cool cracks appear. 

Tuesday, June 16, 2020

Nuvo Crackle Mousse VS Nuvo Expanding Mousse Comparison and Cards From My Newest Video


I had great fun making cards with favorite stencils like this one from A Colorful Life Designs and Nuvo Crackle or Expanding Mousse for my newest video. I applied black Nuvo Crackle Mousse through the stencil and waited very patiently for it to crack. That does take quite a while- at least 4 hours, but just look at those cool cracks! One of the tips I share in the video is to spray the cracked mousse with a fixative like Matte Finish Rustoleum so the mousse does not crack off. The stamp is part of a beautiful set from Waffle Flower. 
If you look closely at the bottom left of this card you see why I suggest spraying the crackle mousse after it has cracked with a fixative so pieces do not fall off. I created the cracked waves on this card with a stencil from Ranger and blue Nuvo Crackle Mousse. The sentiment and mermaid dies are from Impression Obsession and the mermaid tail die is from Taylored Expressions. 

The new video shows comparisons between Nuvo Expanding and Crackle Mousse and I have more colors of the Expanding Mousse. I used Red Leather Expanding Mouse through a stencil from A Colorful Life Designs and was able to heat and expand that mousse right away for this cool look. The sentiment die is from Tonic Studios and as with all the samples, the pretty designer paper is from Ken Oliver. 

I hope these cards inspire you to watch the video here and try either or both of these Nuvo products. 

Monday, June 15, 2020

Video - Nuvo Crackle Mousse VS Expanding Mousse Comparison and Tips


I recently received my first colors of the new Nuvo Crackle Mousse and in my newest video I show comparisons of that and Nuvo Expanding Mousse along with many card samples and tips. 
 
This slimline card is the one I make from start to finish in the video and shows both types of the Nuvo mousse and also how to change the color of the crackle mousse by adding liquid color of some kind- I added green liquid color from a Nuvo Aqua Flow Pen to the gold crackle mousse to create the green feather. I used a feather stencil from A Colorful Life Designs for both of the cards shared today. As I explain in the video, the blue feather was created with Boatyard Blue Expanding Mousse which expands when you dry it with a heat gun and so is ready as soon as that is done. I also added some Chunky Metallic Seasons Embossing Enamel from Stampendous for some fun highlights. The green feather at the top was created with Nuvo Crackle Mousse and after applying the crackle mousse it has to be set aside to dry at least 4 hours or so and the cracks will appear magically. 


This is another favorite card I share in the video using both types of Nuvo Mousse on pretty paper from Ken Oliver. The gold feather was created with Nuvo Gold Crackle Mousse through a feather stencil from A Colorful Life Designs. When it had dried and cracked I stenciled a smaller black feather on top. Here is another view:

I die cut "you" with letter dies from Kat Scrappiness out of the Ken Oliver paper and then applied Nuvo's Boatyard Blue Expanding Mousse through another feather stencil and heated it so it bubbled up and expanded. I attached the letters to black fun foam letters to attach. "Thinking of" was cut with dies from Spellbinders. 

I share many more cards and lots of tips in my newest video showing comparisons between the Nuvo Crackle and Expanding Mousse. Thanks for your visit here and your support of my YouTube channel.

Tuesday, June 9, 2020

Experimenting with Mixing Embossing Powders For My Newest Video

I had great fun recently mixing embossing powders to make cards for my newest video here. I mixed three embossing powders - two Stampendous Aged Enamels and a green glitter - to create the background on the card above. I sprinkled the mix onto a sheet of Scor-tape and melted it with my heat gun for the textured mix of green and gold. The wreath cover die is a favorite of mine from Taylored Expressions and the circular "thank you" was created with a die from Impression Obsession. 


I purchased some super thick embossing powders over a year ago and meant to experiment with them but never did until now (and now have ordered more to create a video with them!) I mixed the super thick Pink Cheeks embossing powder with the WOW Bright Lady pink embossing powder to create the unique butterfly. And look at what happens when I simply add the super thick pink embossing powder to a scor-tape strip and melt it with a heat gun! Watch for more mad scientist experiments with this type of embossing powders soon! (The link above takes you to Glitters Galore who sells the super thick embossing powders and the Pink Cheeks thick embossing powder- there are many other colors available there too.)


The die cuts on this card were created by attaching different widths of scor-tape to a piece of white cardstock and then sprinkling on different mixes of glitter embossing powder and then melting them with my heat gun. I die cut "hello" using a die from Bright Rosa and punched and die cut butterflies out of the colorful striped embossed paper. Then I added my favorite gems from Gina Marie Designs. I continued the colorful striped theme on the inside of the card:


To see more cards and how easy it is to stretch your supplies by creating new embossing colors by mixing them, watch the new video here.

Thanks for your visit here and your support of my YouTube channel!


Monday, June 8, 2020

Video - How to Make New Embossing Powder Colors With Additives and Mixes


As part of my ongoing video series Stretching Your Supplies, in my newest video I show how to take one or two colors of embossing powder and make new colors with mixatives and mixing. Science was not my favorite subject in school, but I sure have fun experimenting with embossing powders and other crafty supplies! 

This slimline card shows 4 different versions of the same Stampendous purple embossing powder on the feathers! I die cut the feathers with a die from Kelly Purkey from cardstock covered with scor-tape. The bottom one was covered with just the purple embossing powder melted with my heat gun. I recently discovered WOW's Changers Lightening Effects Kit which includes 3 additives you can add to your embossing powders to lighten or change them. On the upper feather in the bottom three, I added WOW's Glisten for the lighter sparkly look. 


Here is a closeup of the top three feathers. The back one was created by adding WOW's texture and sheen changers and for the front one I mixed the regular purple embossing powder with Stampendous Aged Wine Embossing Powder. I also die cut 3 vellum feathers and added a Happy Birthday sentiment from Crafter's Companion.

I created the ombre background on this card for my new video with three new WOW colors and a mix of Deep Sea Embossing Powder from Seth Apter with the Sheen and Glisten WOW Changers for the 4 colors you see. They were all sprinkled on a piece of a scor-tape sheet and heated with my heat gun  for the lovely textured look. The animal silhouette die is from Gina Marie Designs and the sentiment is a die from Crafter's Companion. 

I sure had fun mixing and playing with embossing powders and additives for this video and hope my cards inspire you to have some mad scientist fun too. 

I am entering the second card in the Masculine challenge at Simon Says Stamp Wednesday.

Saturday, June 6, 2020

Cards 4 Teens and Tweens OR Anything Goes 4 Kids at Send A Smile 4 Kids


It’s the first Saturday of a new month and time for another fun challenge at Send a Smile 4 Kids! Again this year, all challenges at SAS4Kids are Anything Goes 4 Kids! We will often have an alternative theme that you can choose to follow, but are not required to. Create and link any card that is appropriate for a child and your card could be chosen as one of our top three cards and you could join us as a guest dt member on a future challenge. We are also continuing as a monthly challenge so new challenges will be posted on the first Saturday of every month and you will have a whole month to make and link your cards.


The theme for this challenge is: Cards 4 Teens OR Anything Goes 4 Kids. Cards for teens and boys are one type we often need. However, be sure to check the current needs page before sending any cards and stay safe and healthy. 

I made my card for a special teen using a sneaker die from Tonic Studios and painter’s tape. The background die is from Dee’s Distinctively and the sentiment from Spellbinders.

Be sure to check out the rest of the cards from TEAM SAS here and we would love it if you entered our challenge.

I am entering this card in the Masculine Challenge at Simon Says Stamp Wednesday.