Monday, September 30, 2024

No Time to Make Holiday Cards and Tags? Rub-on and Go!


There is so much to get done to prepare for the holiday season not to mention busy family and work lives that we might not have enough time to make our own holiday cards and tags. In my new video here I share a product that solves that problem - 49 and Market Rub Ons along with their two sided cardstock. Above is the fun fold card I made step by step in the video. I added rub ons to all the layers of this book binding z-fold card in just seconds. No need to use the stick to rub on these in the traditional way- I share a tip to get perfect rub on placement with just one run through your die cutting machine. 

Here are the measurements (all in inches) to make a Book Binding Z-Fold like the one above that I made in the video: Card base is 5 1/2 x 11 and scored at 2 1/8, 4 1/4 and 5 1/2. Fold the first scored line up in a valley fold and the rest mountain fold. Glue the right side 1 1/4 inch together to fold book fold. (See video as that shows this clearly.) Top cover center piece is 5 1/4 x 3 and two sided pieces are 1 x 5 1/4. Inside center piece is 2 7/8 x 5 1/4. If you want to cover the inside left cover, that piece is 1 3/4 x 5 1/4. I cut a piece of the packaging for these rub-ons that matched the ones I chose for my card. 


This beautiful Christmas card took just minutes to make. The stars in red and green, the sentiment and the pine branch are all 49 and Market Rub Ons and all the two sided cardstock is also from new collections from 49 and Market. Here is another one I made with 49 and Market Rub Ons and two sided cardstock:


I love that sentiment and I picked this two sided cardstock from the new Evergreen Season collection because the sentiment had the same red checked pattern as the back of the cardstock. In the new video here I share many other projects including tags and postcards made in just a minute or two. 

Wednesday, September 25, 2024

49 and Market Evergreen Season Bundle Secret Boxes


I purchased the 49 and Market Evergreen Season Bundle from my local stamp shop, Let's Create and have been having so much fun creating cards and tags with all the awesome products in it. I am a card maker and not usually a box maker, but when we purchased the bundle, we also received membership in a Facebook group where all the stores involved are posting many projects we can make with it. Scrapbook Super Station posted a video and excellent instructions on how to make boxes with secret drawers to put little presents in. Here is a look at the red and green box open:


I received 49 and Market cardstock and decorative elements like the laser cut elements shown on this box. I am almost out of the 49 and Market Evergreen Seasons Mini Laser Cut Elements as I used them on the cards I shared here earlier. So I purchased another larger set of the 49 and Market Evergreen Laser Cut Elements. Here is another look at this box:


The 49 and Market paper I used on the second box could be used for a holiday project or not and I made another box for a birthday not Christmas. I added 49 and 49 and Market Acetate laser cut pieces from another collection . Here is another look at this one open:


Monday, September 23, 2024

Booo-tiful Wrinkly Texture Without Embossing Folders


In my newest video, I am sharing a new technique that creates awesome wrinkly texture with two very common household items and no embossing folders needed. I also share many cards and make the one above step by step. All you need to create the wrinkly texture shown is parchment paper and common white glue. I attached the wrinkled parchment paper to black cardstock for the outside strips and to white cardstock for the center strip before I added orange Staz-on ink direct to paper just on the wrinkles. The adorable ghost and sentiment is from Spellbinders and is called Dancin' Ghost.

If you apply the wrinkled parchment paper to white cardstock without adding any ink, these textured backgrounds are perfect for winter cards. But I am in the mood for fall and Halloween, so I created the next two cards:


You can choose to add black ink to the wrinkles and that creates a look similar to a spider's web so I used that theme on the first card. I suggest not using a dye ink as that did not want to dry at all even after hours and heat setting. You could try a fixative, but I recommend using a permanent ink like Staz-on. 

I made the 2nd card with wrinkled parchment paper over orange cardstock and put it in a shaker packet before adding an alphabet sticker "hey" and "boo" from Kat Scrappiness. I do not bake so have parchment paper only for crafting. I did discover after making these cards that parchment paper also comes "unbleached" which is a light brown color. I bought some and made this card:


Over dark brown it looks somewhat golden and is another way to use parchment paper to make cool backgrounds. The leaves are 2nd generation hot foiling using Fall Leaves Press Plate from Spellbinders.

To see all the cards I made and how easy this technique is to do creating great wrinkly texture, watch the new video here. 

Friday, September 20, 2024

New Christmas Cards with Last Year's Purchases


I saw a gorgeous card last year created with Hero Arts Northern Lights Polar Bears Bundle and couldn't resist buying it. But I ran out of time before Christmas and put it away unloved. I found it again recently and made this lovely card with easy inking for the Northern Lights. 


I am Norwegian and love the Nordic look that Poppystamps has been sharing in many of their dies. I bought these Nordic Doves and Nordic Tree Toppers last year and pulled them out to star on this card. The background was created with a snowflakes embossing folder and raised on adhesive strips. The Nordic Doves were glued down to the navy blue card front in the holes created with the shadow dove dies. 

Wednesday, September 18, 2024

3D Beauty Plus Dies, Inks and Stitching


In addition to the brand new 3D Norwegian Rosemaling Embossing Folder and floral die sets that are part of the Winter's Grace Garden from Spellbinders and Susan Tierney-Cockburn, I recently purchased the Spellbinders Stitched Starfilled Background. I share all of them in my new video here. I thought it would be fun to combine the stitched background with embossing and on the card above I didn't stitch any of the background. I embossed the blue vellum vase and cut out embossed leaves for inside the vase.


I brushed on gold ink to the embossed areas of this card and stitched stars only on the unembossed areas of this card. On the card below, I stitched some of the stars and the white embossing is subtle for a pretty look:


One 3D embossing folder inspired me to make many different cards and I share them all in this video. 

Tuesday, September 17, 2024

49 and Market Evergreen Seasons Laser Cuts and Penny Black Images


I love 49 and Market rub-on transfers and have created many cards with them. I hadn't played with 49 and Market's Laser Cut Elements until I received them as part of the 49 and Market Evergreen Season Bundle and now I can't wait to find some more! They are delicate gorgeous laser cut images and I had so much fun creating cards and tags with them. I combined them with Penny Black Masterpieces Made Simple Christmastime images to make all the cards and tags I share here. The cardinal image inside the chipboard frame is from Penny Black. I added all the greens, the sentiment and floral images to decorate this card. The inside sentiments are also from the Evergreen Seasons Bundle. 


I framed this lovely Penny Black image with a chipboard frame and added some trees, a Christmas pickup, a sentiment and a lantern all from 49 and Market. 


Here is another pair of cards I made and decorated with 49 and Market's Evergreen Season Mini Laser Cut Elements. This Penny Black cardinal image is framed with a Penny Black snowflake frame and decorated with more Evergreen Season Laser Cut Elements. The inside sentiment is another from the cardstock in the Evergreen Seasons Bundle. Here is one more card I made with a Penny Black image and more laser cut elements from 49 and Market:


I also added Evergreen Seasons rub-on transfers to the center of this card:


I also made some tags by cutting the Penny Black Masterpieces Made Simple Christmastime images with a Crealies tag die and then added dimensional laser cut elements:


I also made a bunch of gorgeous Christmas cards and postcards with many of the rub-ons in the 49 and Market bundle and will be sharing those in a video and here on the blog soon. 

Monday, September 16, 2024

Start With Rosemaling and Let Your Creativity Soar!


Oh my- the new Spellbinders Norwegian Rosemaling 3D Embossing Folder is so gorgeous that is was easy to make card after card with it as I show in my new video. This lovely 3D embossing folder is part of the new Winter's Grace Garden release from Susan Tierney-Cockburn and so are the flowers and vases you see on many of my cards. This is the gatefold card I made step by step in the video showing more of that white embossed beauty:


The Stitched Hi die is also from Spellbinders but I chose not to stitch it. I simply glued it on and emboss it as part of the whole white card front piece. Her are a couple more cards I shared in the video showing different ways to create with the same embossing folder:


The vase is part of a new Susan Tierney-Cockburn called Paper Whites with Glass Vase and I chose to die cut it out of mirror card and embossed it. I also embossed the background with the same 3D embossing folder, but then ran it through the die cut machine again so now there is a very subtle embossed background. 

I had so much fun designing with the 3D Norwegian Rosemaling Embossing Folder I kept playing and have even more cards to share with you in my new video. I hope my cards encourage you to give some of the ideas and products a try!

Wednesday, September 11, 2024

September Shaped Cards For Class


The theme of the classes I taught this month at Harts n Scraps was shaped cards and these are the four cards we made. If you are local, we would love to have you join us! 

Monday, September 9, 2024

Crealies Tags That Pop and Surprise

Happy Monday everyone! Today I am sharing some tag cards which pop up with surprises when they are opened. The new Double Card Tag die set from Crealies combines the idea of tags with cards, and I had great fun creating some pop up surprises for my newest video here. Here are two of the tag cards I created:

            
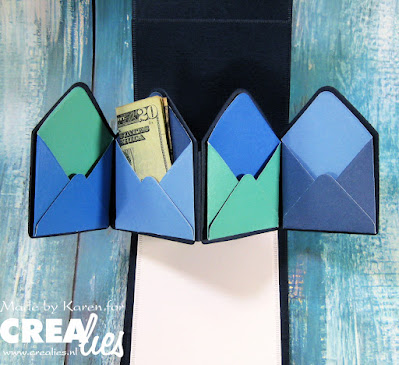
One is for Christmas and one is for my grandson. The new Twist and Pop Concertina Panels were created to twist and pop so here are the surprises with these are opened:


I show how to make these cards in my new video. The new Open Envelopes on each of the panels will be filled with secret messages and cash gifts or gift cards. I also created two more fun cards with this Double Card Tag die set:


The orange happy birthday card opens to show many panels with a gift card and message:

The candles yellow tag card opens to reveal a mini twist and pop with balloons popping up and gift card in an Open Envelope.

I am happy to share that Crealies dies shown can be purchased either on the Crealies website OR in the United States at the Frantic Stamper website.