Tuesday, June 30, 2015

Hello Friend Raindrop Card


I love playing with the water droplets stamps from Designs by Ryn and this card was the result of an idea that came to me one night. I keep a pen and paper by my bedside for ideas that pop into my head before falling asleep. I stamped the raindrops with several colors of blue ink and highlighted most of them with white enamel accents. I die cut 4 colorful umbrellas out of polka dotted dp using a new die from Memory Box. Then I die cut the top again and popped the second layer up with pop dots. "Hello Friend" is a die from Spellbinders and I cut it out with the blue polka dotted dp. I added a gem to dot the i.

I am entering this card in the Anything Goes challenges at Simon Says Stamp and Craft Your Passion.

Monday, June 29, 2015

Cherish is the word...


"Cherish is the word I use.." - remember that song from the 60s? Guess I am dating myself by admitting that I do:) But it was a very pretty song. I like the word and used my new set from Tim Holtz for Sizzix for the uplifting sentiment on this card. I die cut the large butterfly (also from Sizzix) out of two sided adhesive paper by Sookang. Then I removed the top paper to expose the sticky tape and covered each wing of the butterfly with a different color of fine glitter. I also  put the sticky adhesive paper behind the small butterfly die cut openings (Memory Box die) and sprinkled a rainbow of glitter butterflies along the edge. I also die cut some small white glittery butterflies with the Memory Box border die.

I am entering this card in the Simon Says Stamp and Word Art Wednesday challenges.

Sunday, June 28, 2015

Embossed You are my Happy Card


One day when I was playing I decide to see how embossing with an embossing folder on a piece of glossy paper that was colored with Brusho Coloured Crystals would look. I embossed the Brusho piece with an embossing folder from C Gull, then cut it diagonally with the sentiment stamped diagonally on the white card base. I sanded the embossed areas just a bit and then raised the embossed pieces with pop dots when attaching to the card base. I die cut "Happy" and attached on the diagonal opening. The die cut and sentiment are from My Creative Time. I added a couple of punched butterflies to complete the card.

I am entering this card in the Anything Goes challenges at Simon Says Stamp and Creative Moments (with the option of using embossing.)

Saturday, June 27, 2015

In Loving Memory


I am sharing a CAS card I made with Bister crystals and saran wrap on watercolor paper. I have posted many cards made with this technique on glossy paper which results in a much more dramatic background, but this time I tried it on watercolor paper and the background is very subtle which is perfect for a sympathy card. After the background dried, I simply sponged black distress ink through a lovely leafy branch stencil from Stencil Girl and stamped the beautiful sentiment from Rubbernecker.

I am entering this card in the Anything Goes challenges at Simon Says Stamp and Wonderful Wednesdays.

Friday, June 26, 2015

Happy 4th of July Fireworks Card on Crackerbox Palace Friday


It's Crackerbox Palace Friday and today I am sharing a card I made with Crackerbox Palace’s awesome stamps and Color Burst from Ken Oliver Crafts. It’s almost time to celebrate our nation’s birthday, so I decided to make a colorful 4th of July card. I heat embossed “4th of July Kids” and Design 4 stamps with black embossing powder on watercolor paper. Then I sprinkled red and blue Color Burst powders and spritzed with water. It is that simple to get these gorgeous bright colors. I rounded the bottom corners on a white card base and on the card front before attaching.

I am in love with the brilliant colors and awesome backgrounds and looks easily achieved with this new product from Ken Oliver Crafts! Crackerbox Palace is now carrying all six colors of Color Burst powders and they are on sale right now for 10% off! They can be found at the bottom of the main website page while on sale and in the accessories section here. All you do to get the beautiful colors for your project is sprinkle a little of the concentrated powders onto a piece of watercolor paper and spritz with water. Just a little goes a long way and new colors are being released in July!

**As a present to you from Crackerbox Palace, all the CBP stamps  on these cards will be 20% OFF for one week! So the stamps and Color Burst are on sale! Free shipping on all orders over $45 too!! Great deals- Check it out!**

I am entering this card in the Anything Goes challenges at Simon Says Stamp and Penny’s Paper-Crafty.

Wednesday, June 24, 2015

Sketch Challenge on What If? Wed. at Repeat Impressions


Happy Wednesday everyone! It's time for another fun sketch challenge at The House that Stamps Built and we are challenging you to make a card using the sketch below and link it up for a chance at some great Repeat Impressions rubber! For all the details on what you can win and to see the other Rock Stars cards using this sketch, please visit our blog.

I won some cool designer paper from Ken Oliver Crafts recently and used that as the background on this card. I stamped RI’s small quilt squares on three dp scraps and cut out. I stamped the center square on another dp scrap, cut out and attached with pop dots to raise. I layered them on a black strip and added a couple strips of black glitter tape. Then I stamped the perfect sentiment from Repeat Impressions, cut it out with a small Nestabilities die and attached.


Here is the sketch for you to follow when you create a card for our challenge. You do not need to use Repeat Impressions stamps to enter our challenges, but you get an extra chance to win if you do!

I am entering this card in the Anything Goes challenges at Through the Craft Room Door and Craft Your Passion.

**Don’t Forget: for a 10% discount on any size order at Repeat Impressions, make a note of my discount code (rr10kh), click on the blog badge on the side of my blog and go to the website here to shop and save!**

Tuesday, June 23, 2015

Mixed Media Layered Christmas Card

I have been playing with mixed media in my cards lately and this is a Christmas card I made. Not sure if I like it or not? I started with water color paper and shades of green Brushos in the background. I applied red 3D stamp paint (by Viva) through a poinsettia stencil, but it lost some of it definition due to seepage. I stamped parts of a Hero Arts Christmas words stamp in a couple areas and added a couple matching raised strips on the right side of the card. I stamped :Christmas on another matching raised strip. The Christmas Joy die cut and sentiment are from a set by Papertrey. I attached the thin die cut with glue dots under some pearls.

Lots of Layers is the challenge at That Craft Place and Anything Mixed Media is the theme at Love to Create.

Monday, June 22, 2015

Brusho Bokeh Stars and Dreams Card


I saw this sentiment stamp from Rubbernecker recently and knew I had to get it. I loved the font and what it had to say. I heat embossed the sentiment onto watercolor paper with black embossing powder. Then I sprinkled on yellow and blue Brusho Crystal Colours, spritzed with water and let it dry. I punched a star in acetate and applied white pigment ink through the star opening for a starry bokeh background.

I am entering this card in the Anything Goes challenge at 613 Avenue Create and the "use a stamp, not a digi" challenge at Allsorts. 

Sunday, June 21, 2015

Playing with Yupo Paper and Color Burst and Brushos


As you can see, I have been having fun  playing with the mixed media look again. I saw a gorgeous piece created with BBCB on Yupo paper and I recently bought some, so I thought I would try to see what I could come up with. Here is a picture of of the two Yupo paper backgrounds I made:

To be honest, I was very disappointed in how they turned out. Nothing like the gorgeous piece that was posted to our BBCB Facebook page. I knew the Color Burst and Brusho mixed with silver Glimmer Mist would not soak into the coated Yupo paper, but was hoping it would stay in place long enough to create a cool looking background. But it did not- it flowed off the paper and pooled on the sides. I was able to create this card using part of the piece on the right hand side in this picture, but am still disappointed in the results of this experiment. I know I could use alcohol inks on Yupo paper, but was hoping to use BBCB with it, so any advice you can share about this paper with BBCB would be appreciated.

I mixed some purple Color Burst with Dreamweaver pearlescent embossing paste and then added some purple sand from Mudd Puddles to  give the paste even more texture. Then I applied the purple paste with a stencil knife through a stencil by TCW. While the paste was still wet, I sprinkled on some more purple sand and then let it dry. I applied purple ink through another TCW stencil, and punched a butterfly out of another purple Color Burst scrap. I die cut "Happy" three times and layered them together for great dimension. I stamped the "You are my" on a white scrap and slipped that under the "Happy". Both the Happy die and the sentiment are from a set by My Creative Time. I added some purple dots to complete the card.

I am entering this card in the Anything Goes challenges at Sister Act and Simply Papercraft.

Saturday, June 20, 2015

Animal Cards 4 Kids Challenge at SAS4Kids


It’s Saturday and time for another fun challenge at Send a Smile 4 Kids! This time our challenge is Animal Cards 4 Kids!  Create and link any card with animals for a child, and you could win one of our great prizes.

We have three very generous sponsors for this challenge:  Crackerbox Palace is giving their winner 3 digis of their choice!  All Dressed Up Stamps is giving their randomly picked winner 2 digis!  And Dee Dee’s Digi’s winner gets a $15 gift certificate! TEAM S.A.S will also be choosing their favorite cards for our top three and the winners will receive a blog badge and an opportunity to be a guest design team member on a future challenge.

My first card above features a flying horse from Crackerbox Palace. I paper pieced the horse with purple and yellow designer papers after stamping him on a white cardbase. I punched a bunch of circles from scraps of watercolor paper I had colored with Brusho Colored Crystal and Glimmer Mist sprays. I also die cut the "hey" from Paper Smooches from those colored scraps. I cut the circles in half and attached on blue pieces cut diagonally. Then I attached those pieces with pop dots to raise them.


My second card features a sweet digital stamp called Little Treasures from All Dressed Up. As usual, I paper pieced the image with designer paper. I created a card front with green checked dp and white cardstock and cut it out with a stitched rectangle die from Lil Inker. I cut out a white square, attached a green dp half square and rounded the corners before attaching the sweet teddy with his friend. The "hooray" die is from Penny Black.


I am entering these cards in the Anything Goes challenges at Fresh Brewed Blog and Penny's Paper-Crafty.

Friday, June 19, 2015

Enjoying Playing with Color Burst and Crackerbox Palace Stamps


It's Crackerbox Palace Friday and today I am sharing a card I made with Crackerbox Palace’s awesome stamps and Color Burst colored crystals from Ken Oliver Crafts. I heat embossed Crackerbox Palace’s seaside scene on watercolor paper, then painted the sea and the log pier with Color Burst mixed with water. I wanted a sunset look to the background, so I sprinkled on some red, purple and orange Color Burst and spritzed with water. I made a mistake by the seagull, so I embossed that part again on a part of the prepared watercolor paper. Then I punched it out with a circle punch and raised it with pop dots over the scene that I cut into tiles before attaching on a black piece. I stamped a sentiment from CBP and added two border braids from Dee’s Distinctively also die cut from Color Burst watercolor paper.

I am in love with the brilliant colors and awesome backgrounds and looks easily achieved with this new product from Ken Oliver Crafts! Crackerbox Palace is now carrying all six colors of Color Burst powders and they are on sale right now for 10% off! They can be found at the bottom of the main website page while on sale and in the accessories section here. All you do to get the beautiful colors for your project is sprinkle a little of the concentrated powders onto a piece of watercolor paper and spritz with water. Just a little goes a long way and new colors of Color Burst are being released in July!

In the upcoming weeks I will be posting more cards on the two blogs featuring Color Burst and Crackerbox Palace stamps. You really should give this new product a try- you are going to love what you can do with them!


**As a present to you from Crackerbox Palace, all the CBP stamps  on these cards will be 20% OFF for one week! So the stamps and Color Burst are on sale! Free shipping on all orders over $45 too!! Great deals- Check it out!**

I am entering this card in the Anything Goes challenges at Crafting from the Heart and Wonderful Wednesdays. 

Thursday, June 18, 2015

Favorite Technique and Product at Simon Says Stamp Challenge


The theme this week at my favorite challenge, Simon Says Stamp, is to showcase our favorite technique and/product. My favorite products right now are my colored powders from Brusho, Bister and Color Burst. And my favorite technique to do with those products is to use cling wrap (or saran wrap) on glossy paper after wetting the colored crystals or powders. Sometimes the technique results in very dramatic lines but sometimes the result is more subtle like in this background. Here is a picture of the background close up: 
I sprinkled blue and green Brusho Colour Crystals on a glossy piece, and spritzed with a gold Shimmer Mist, then applied scrunched up cling wrap and let it sit for about 15 minutes. I love how it turned out. Then I die cut Tim Holtz's new Mixed Media corner (from Sizzix) out of vellum, and a couple of pennants (also from Sizzix.) The sentiment is from Precious Remembrance. I attached the vellum with glue dots under some funky square sequins.

I am entering this card in the challenge at Simon Says Stamp and the Anything Goes challenge at Crafty Sentiments Designs.


Wednesday, June 17, 2015

Inspiration Photo Challenge at Repeat Impressions


On the third Wednesday of every month at Repeat Impression’s blog, The House that Stamps Built, the challenge is going to be an Inspiration Photo challenge. I find it fascinating to see each stamper’s take on a card based on the same inspiration photo. This is this month’s Inspiration Photo:


Will you be inspired by the colors or the objects or shapes in the photo? It is up to you to pick out what inspires you and make a card, then enter it for a chance to win some great Repeat Impressions rubber. Be sure to check out the RI blog for the inspiration based cards by the other Rock Stars. I have seen them and you do not want to miss them!

I was inspired by the colors and objects in the inspiration photo to make the card above. Nowadays, when I want color and artistic impressions I turn to my BB or CB (Brushos, Bisters or Color Burst powders.) I heat embossed Repeat Impression’s Daisies and Butterfly onto watercolor paper and then sprinkled on several blue Brusho Crystal Colours. I spritzed the powders with gold Shimmer Mist which IRL results in the whole card becoming all sparkly. I sprayed the corner of the card front with a gold spray from Heidi Swapp as in the inspiration photo. I stamped the butterfly again on white cardstock, colored in parts of the wings with a black marker and attached with one wing raised by pop dots.

 I am entering this card in the Anything Goes challenges at Crafting from the Heart and Through the Craft Room Door.

Tuesday, June 16, 2015

Sailboat at Sunset Card with Brushos and Cling Wrap


I was playing one day with Brusho Crystal Colours, cling wrap and gold spray from Heidi Swapp on glossy paper and this background was the result. I thought it looked like a sunset so I stamped the sailboat scene from Creative Vision Stamps on the left side of the colored piece. I tried to bleach out the sailboat and then planned on coloring it, but the gold spray from Heidi Swapp would not bleach out, so I paper pieced the sails and boat. The stamped scene is about 4 inches wide so the right side of the card front was blank. I masked part of the stamp and using my MISTI tool, I added some more birds and weeds in just the right place. I am a MISTI newbie but am definitely seeing what all the raves are about. It would be a shame to ruin an almost finished card adding a sentiment or part of the stamped scene and with this handy tool, that does not happen. 

I am entering this card in the Anything Creative challenge at Love to Create and the Anything Goes challenge at Scribble and Scrap. 


Monday, June 15, 2015

CAS Roses Birthday Card


Can I just say- I love this card! No B/B/CB at all and I used designer paper which I rarely do, but I love it! I ordered a sample pack of the designer paper in the new Stampin' Up catalog and this is my favorite. I wish I had way more than just one 6 x 6 piece and will have to order the whole package now. In my opinion, the new SU catalog does not display the dp well enough to convince anyone to buy it. I certainly would not have ordered this pack of dp until I saw the samples in the package that an SU demonstrator was selling on line. I don't think the demonstrator I bought from is still doing it, but many on line and maybe your local demonstrator are selling the sample packs.

The paper is black and grey and creme colored and I simply sponged some pink on the roses. I die cut "happy" in black and out of the roses card front and slipped the black happy and the inside pieces back in the negative opening (inlaid die technique.) Both the happy die and the "birthday" are from a set of dies and stamps from My Creative Time. I punched a butterfly, sponged it pink and attached with the wings popped up by tiny pieces of mounting tape.

I am entering this card in the Flower Power challenge at Allsorts and the Anything Goes challenge at Kraftin' Kimmie Stamps.

Sunday, June 14, 2015

Friends Shaker Card


The challenge theme this week at my favorite challenge (Simon Says Stamp Wednesday Challenge) is Friends or Super Hero, and so I am sharing this fun friends shaker card I made recently with outline stickers and some new dies. I found a set of outline stickers from Krazy Kreations that included drink glasses and accessories and I paired them with an "oh so true" sentiment from So Suzy Stamps. I applied the fancy drink sticker to a white piece, cut out the inside shape with a craft knife and sponged a little pink color on the piece. I attached acetate behind the opening, created a "well" with two layers of mounting tape and dumped in some sequins for the shaker element. I attached the orange slice and drink umbrella to two sided sticky paper, added fine white glitter and colored with bright Copics. I die cut and attached a wine glass full of wine (from My Creative Time) and my card for a friend and therapist is done.

In addition to the challenge at Simon Says Stamp, I am entering this in the Anything Goes challenge at Simply Papercraft.

Saturday, June 13, 2015

A Mixed Media Newbie Masculine Card


I am very new to Mixed Media type cards, but am having fun experimenting. I saw in a video someone put gesso on a brightly colored dp to tone it down, then added paint. I don't own any paint but I use my B/B/CB (Brushos, Bisters and Color Burst) powders for color instead of paint, so I tried that after the gesso dried on this piece of polka dotted dp. Not much happened, because the gesso prevented the colored liquid from soaking in and it mostly sat on top. However, I used a silver iridescent glimmer mist and blue Brushos and the card front is sparkly and has a tint of blue. I stamped some words from a background stamp by DRS Designs in several places. I used a gold texture paste through a stencil for some great texture and dimension. I created a black spray with black soot distress ink and water and sprinkled it on with a small paint brush. And I added some more color and texture with bottle and container caps dipped in blue Stamp Paint from Viva. I stamped the sentiment from My Favorite Things on a matching scrap, layered on black and attached. The headphone die is also from My Favorite Things. I layered the completed card front onto a square black card base.


I have these cool new dies from Tim Holtz for Sizzix that I had not used yet, so continued the Mixed Media theme inside the card by simply die cutting the side of the white piece.

I am entering this card in the Texture Take It Make It challenge at Craft Stamper Magazine and the Masculine challenge at Anything But Cute, which is a new Mixed Media challenge I was turned onto by one of my readers. I am a newbie but am having so much fun you will see more of this side of my cardmaking in the future for sure.

Friday, June 12, 2015

Warm Wishes Color Burst Crackerbox Palace Card


It's Crackerbox Palace Friday and today I am sharing a birthday card I made with Crackerbox Palace’s awesome stamps and Color Burst for a very special person. I sprinkled a rainbow of Color Burst powders on a piece of watercolor paper and spritzed with water to release their brilliant colors. Every time I do this, the results are different. I die cut the negatives of some feather dies from Spellbinders and stamped the warm wishes sentiment on the bottom of that piece. I also stamped CBP’s feather stamp on a Color Burst scrap and cut it out. I attached the CB colored piece to a white cardbase and then attached the open feather piece on top.

I am in love with the brilliant colors and awesome backgrounds and looks easily achieved with this new product from Ken Oliver Crafts! Crackerbox Palace is now carrying all six colors of Color Burst powders and they are on sale right now for 10% off! They can be found at the bottom of the main website page while on sale and in the accessories section here. All you do to get the beautiful colors for your project is sprinkle a little of the concentrated powders onto a piece of watercolor paper and spritz with water. Just a little goes a long way.

In the upcoming weeks I will be posting more cards and art projects on the two blogs featuring Color Burst and Crackerbox Palace stamps. You really should give this new product a try- you are going to love what you can do with them!

**As a present to you from Crackerbox Palace, all the CBP stamps  on these cards will be 20% OFF for one week! So the stamps and Color Burst are on sale! Free shipping on all orders over $45 too!! Great deals- Check it out!**

I am entering this card in the Anything Goes challenges at Crafting from the Heart and Wonderful Wednesdays. 

Thursday, June 11, 2015

Dreaming Big with Textures and Brusho Colour Crystals


I am venturing into new territory with my card making and loving the results. I never considered myself a Mixed Media crafter, but after discovering B/B/CB and getting inspired by our Facebook group members, I am trying new things and having lots of fun. I did some searches on the internet, watched some videos and took a couple classes. I highly recommend the "Inventive Ink" class at Craftsy here, and it is on sale right now. I also discovered a new magazine called Craft Stamper and this month's issue is full of ideas on how to use Brushos! I am entering this card into their monthly challenge at the Craft Stamper Blog to use texture techniques.

I started with a piece of watercolor paper larger than what I needed for an A2 card front, and sprinkled on grey, orange and gamboge Brusho Colour Crystals. What is gamboge you ask? So did I, so I looked it up and it is a golden yellow color tone. I spritzed the page with Iridescent Gold Glimmer Mist releasing the beautiful colors. I cut the dried piece into a card front and also played with the extra piece, adding my texture and dimension. I layered gold and black stencil paste through circle holes in two stencils. I  put some blue 3D Stamp Paint (from Viva) on a craft mat, and created circles with various sizes of caps from soda bottles and containers I found in my craft room and kitchen. Then I spattered black dots created with black Bister powders and glimmer mist before sponging black distress ink on all edges. Several of those ideas came right from the Inventive Ink class I took.

I stamped "Dream Big" from Repeat Impressions on another matching scrap, sponged the edges and attached on a strip which was raised with pop dots. I completed the Mixed Media card with a Sketchy Rings die from Memory Box held in place with a couple gems.

Even the mistakes on this card look good- so I am liking Mixed Media for that reason! I tried some Gesso as a resist before adding my Brushos, but it really didn't show. However, there are a few areas where the white Gesso added a little more texture and interest to the card like in the upper right corner. There are no mistakes in MM crafting, just opportunities to add another layer and play some more.

I am also entering this card in the "spots and dots" challenge at Love's Rubberstamps.

Wednesday, June 10, 2015

Fresh and Fruity DCC Challenge at Repeat Impressions


It’s another Designer’s Choice Challenge at The House that Stamps Built, Repeat Impression’s blog. It is Melissa’s turn and she is challenging the team and you to create a “Fresh and Fruity” card. Why don’t you join us in this challenge and enter your project for a chance to win some awesome Repeat Impressions rubber? Please visit the blog for all the details and to see the other Rock Star's projects for this DCC challenge. I have seen them and you do not want to miss them!

I created a cardbase with a top folding green card and an embossing folder from Darice. Then I cut 4 squares and rounded off two corners on each. I stamped the fruits on colorful scraps and paper pieced each. Then I stamped the perfect sentiment from Repeat Impressions to finish the CAS card.

I am entering this card in the Anything Goes challenges at TTCRD and 613 Avenue Create.

And don’t forget: For a 10% discount on any size order at Repeat Impressions, just make a note of my discount code (rr10kh), click on the blog badge on the side of my blog and go to the website here to shop and save!

Tuesday, June 9, 2015

Sup? Masculine Card


What's sup? I used my favorite new embossing folder from Spellbinders to make this masculine card recently. I started with a dp that looks like fabric, then embossed with the Fabric Weave embossing folder and rubbed black ink over the top of the raised parts. Love the look! I layered it on a black card base and attached the Contemporary Circles die cut also from Spellbinders. "Sup" is a fun stamp from Paper Smooches.

I am entering this card in the Masculine challenge at Simon Says Stamp, the texture challenge at Cards 4 Guyz and the Anything Goes challenge at 613 Avenue Create. 

Monday, June 8, 2015

Black Tie Card for Dad


I love this Father's Day card I designed for a recent stamp camp I hosted with a friend. It would be perfect for any guy and can be used for a birthday card or a congrats card too. I started with a black A2 card base, a white piece and a sparkly white piece both cut to 5 1/4" x 4". I cut the V neck out of the sparkly piece and embossed with a Sizzix embossing folder. I attached the shirt and vest pieces and added a couple pearls for buttons. The black suede tie was created with my envelope punch board (We R Memory Keepers) using directions I found on Pinterest. The lapel piece was cut to 2" x 5 1/2" and then I folded down the lapel. I cut a square pocket and attached the #1 Dad (dies from Die-Versions and Spellbinders.)

I am entering this card in the Masculine challenge at Simon Says Stamp Wednesday Challenge and at the Father's Day challenge at Polkadoodles.

Sunday, June 7, 2015

Believing in So Suzy Stamps!


I am very excited today to be a guest dt member at the So Suzy Stamps blog!  I discovered So Suzy Stamps when my friend Vicky from Crackerbox Palace recommended I check them out and I am so glad I did! After I received my first order of SSS high quality rubber cling stamps, I was asked by Suzy to be a guest dt member and I was thrilled to accept.


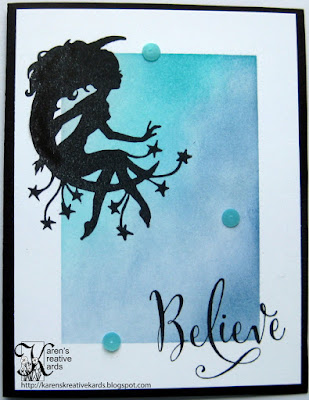
I chose to design with Suzy's Moon Fairy and Believe stamps. To make the card above, I heat embossed both stamps with black embossing powder on watercolor paper. Then I sprinkled yellow and turquoise Brusho Colour Crystals on the watercolor paper and spritzed with water. The water activates the color crystals and the colorful background is the result. I cut the piece to 5" x 3 3/4" and layered on a yellow piece and then onto a black A2 card base. I added a couple punched stars (Tonic punch) to complete the card.


I was having way to much fun with So Suzy's beautiful stamps to stop at just one card! I masked off 4 edges of a white card front with temporary tape and sponged several shades of blue Distress Ink in the center rectangle. After I removed the temporary tape, I simply stamped the Moon Fairy and Believe with black Archival Ink from Ranger, added a couple sequins and layered onto a black card base.

Here is a link to a few more cards I have designed with So Suzy Stamps. I highly recommend you go to the So Suzy Stamps website and check out her whole line of stamps and other products.

I am entering these cards in the Anything Goes challenges at Sister Act and Simply Papercraft.

Saturday, June 6, 2015

For the Girls Challenge at Send a Smile 4 Kids


It’s Saturday and time for another fun challenge at Send a Smile 4 Kids! This time our challenge is For the Girls!  Create and link any card for a girl, and you could win one of our great prizes.

We have three very generous sponsors for this challenge: Flat Friends Boutique is giving their winner 6 digis of their choice!  The Paper Shelter is giving their randomly picked winner 3 digis!  And Bugaboo’s winner gets 7 digis of their choice! TEAM S.A.S will also be choosing their favorite cards for our top three and the winners will receive a blog badge and an opportunity to be a guest design team member on a future challenge.

My first card above features a sweet colored digital stamp called "Sophie in the Country" from The Paper Shelter. I printed her and cut her out with a rectangle stitched die from Lil Inker. I cut another stitched rectangle frame and attached that to the blue cardbase. I punched a bunch of flowers from a colorful scrap made with Brusho Colour Crystals and glossy paper. Then I put pop dots on the back of the sweet girl piece for dimension.


My second card features a beautiful princess called "Cinders" from Flat Friends Boutique. I used my rectangle stitched dies from Lil Inker again (loving those dies!) and created a frame inside a white piece that I embossed with a floral embossing folder from Couture Creations. I printed Cinders twice and one of the digital prints is the background on the card under the frame with her castle and shoe. I colored the blue skies with my Gelatos and a baby wipe. I cut out "Cinders", colored her hair and paper pieced her dress. Then I popped her up with pop dots over the inside frame. 

I am entering these cards in the Summer Colors challenge at Cute Card Thursday and the Anything Goes challenge at Brown Sugar.

Friday, June 5, 2015

Shades Easel Grad Card on Crackerbox Palace Friday


It's Crackerbox Palace Friday and today I am sharing one more graduation card I made with Crackerbox Palace’s awesome stamps. I started with a yellow card base and added layers of black and white cardstock. I die cut Memory Box’s small Circle Burst Die for my “sun”. I stamped CBP’s sun in shades and graduation hat with black ink, cut them out and popped them up with pop dots. Then I stamped the perfect sentiment also in black ink.

This card is an easel card, so the front folds down and is held upright with the green piece on the bottom of the inside which is also popped up on pop dots. I stamped another perfect graduation sentiment from Crackerbox Palace on that piece.

**As a present to you from Crackerbox Palace, all the CBP stamps  on this card will be 20% OFF for one week! What a deal! **

I am entering this card in the Anything Goes challenges at Penny’s Paper-Crafty and Wonderful Wednesdays.

Thursday, June 4, 2015

Layered Vellum Friend Card


I love the subtle look of several layers of vellum with stamped images on each layer. I stamped a new Penny Black scenery stamp in black on the first layer of vellum and orange for the second layer and attached both to a white card base. I covered up the adhesive with a pretty washi tape and stamped "friend to friend" from Rubbernecker to complete the CAS card. I am entering this card in the Anything Goes challenge at Loves Rubberstamps and the Vellum challenge at Live Love Cards.

Wednesday, June 3, 2015

Beautiful Days Color Challenge Card


The first Wednesday of each month at Repeat Impression’s blog, The House that Stamps Built, is going to be a color challenge. We give you the color inspiration, and you can make a card using those colors to possibly win a great prize of Repeat Impressions rubber! Here is the color palette chosen this month:

The purple and green of this color combo reminded of my favorite part of this time of the year- the flowering bushes and trees. I decided to re-create the look with Repeat Impression’s Beautiful Days Hydrangea.  I stamped the oval stamp several times on purple patterned paper, on green and on a blue cardstock piece. I die cut an oval frame out of the front of a cream colored card base and embossed “happy birthday” wishes on the whole card with an embossing folder by Embossalicious.  I cut out the blue stamped oval and paper pieced the flowers and leaves. I decided I wanted a few more flowers at the top of the oval on the inside and outside, so I covered up the bee that is part of the original stamp. Here is a look at the card from the inside:


I am entering this card in the Anything Goes challenges at 613 Avenue Create and Through the Craft Room Door.

Tuesday, June 2, 2015

Another Brusho Disaster Saved


One thing I love about B/Bor CB (Brusho/Bister or Color Burst) pieces of art is even if they seem to be a disaster, they can usually be saved or re-purposed and the result is still a lovely card. I had this idea a while back to stamp floral watercolor stamps with water and distress markers and then do a Brusho background around them. The flowers were overwhelmed by the Brusho background (see the purple flowers and greens?) So I overstamped the Penny Black flowers with black ink and I liked it much better. I cut the floral piece into tiles and attached them to a white cardbase. Then I die cut a pretty border (Dee's Distinctively) and added some pearls at each intersection. I ended up loving the result.

I am entering this card in the Anything Goes challenge at Scribble and Scrap and Lil Patch of Crafty Friends.

Monday, June 1, 2015

Brushos, Cling Wrap and Repeat Impression Stamps


Happy Monday! Today is my turn to share a Project of the Week at my blog and Repeat Impression's blog. I recently discovered a fun technique that results in super cool backgrounds like the one on the card above. The first thing I did to create this look was to raid my kitchen for some cling wrap or saran wrap. We also need glossy cardstock and Brusho Colour Crystals (or other water soluble color powders.) And of course Repeat Impression's great stamps and a good black ink (I use black Archival Ink from Ranger.)

First I cut off a large piece of cling wrap and crinkled it all up. I laid it down on my craft mat but left in the crinkles. I sprinkled some turquoise and cobalt blue Brusho Colour Crystals on the cling wrap and wet them with Blue Skies and Gold Glimmer Mist. Water can be used to activate the Brushos for this or any technique, but I have found using Glimmer Mist results in even more beautiful sparkly results. I placed my piece of glossy cardstock face down in the colorful mess and folded the sides on the cling wrap around the piece. After flipping it, I crinkled the cling wrap up again moving the colors and crinkles until I liked the look. Here is what it looked like:


I waited about 10-15 minutes and removed the cling wrap. At that point, the lines from the cling wrap and Brushos are complete, but the piece is still very wet. I allowed the piece to dry, but it can be heat set with a heat gun. The finished look reminded me of water, so I stamped Repeat Impression's fish, sea weeds, bubbles and "happy hello" with black Archival Ink. I decided to make one of the fish a silhouette and colored him in with a black marker. I attached the completed piece to a white card base.


I was having way too much fun with my cling wrap, Brusho Colour Crystals and RI stamps to stop at one card, so I made this card too. This time I used vermillion, purple and crimson Brushos in my crinkled cling wrap and sprayed them with Sugar Maple and Gold Glimmer Mist to activate and enhance the colors. I placed a piece of glossy cardstock in the mixture and wrapped it up, then waited 10 minutes and this unique background was the result. I decided to cut a couple colorful strips for the card and attached them to the left side of a purple card base. Then I stamped Repeat Impression's dandelions and dreams sentiment and attached the completed piece to the card. This technique is so easy to do and the results are beautiful and unique every time! Thanks for letting me share my cling wrapped Brusho RI cards with you!

I am entering these cards in the Anything Goes challenge at Simon Says Stamp and 613 Avenue Create.