Showing posts with label Cherry Lynn Designs. Show all posts

Thursday, February 4, 2016

Hearts and Dies Love Card


It is the time of year when we see hearts all over and "Have a Heart" is the theme this week at one of my favorite challenges at Simon Says Stamp Wednesday Challenge. I used a hearts embossing folder from Darice and the Faux Textured Metal technique I learned about here to make this Love card. I masked off the sides of the front piece with temporary tape, then applied Pickled Raspberry and Fired Brick Distress Ink in the center. I brushed the colored rectangle with Iridescent Gold Pearlex Powder. Then I removed the mask and embossed the whole piece with the hearts embossing folder. I die cut Love from a die by Cherry Lynn. The Penny Black rose was die cut from two sided sticky paper and I colored it with ultra fine red and green glitter.

I am also entering this card in the Anything Goes challenge at Scrapy Land (I used Penny Black and Cherry Lynn dies.)

Monday, September 21, 2015

Brusho, Color Burst and Deep Impressions Butterfly Card


This is one of those cards that looks so much better IRL than it photographs. The background was created with  Brusho and Color Burst powders sprinkled on watercolor paper and spritzed with iridescent gold Shimmer Mist spray. After it was somewhat dry, I embossed with a beautiful WeR Memory Keepers embossing folder. The background has wonderful embossed texture and the debossed lines are gold from the Shimmer Mist spray.  I wanted to use Stampendous' beautiful butterfly die and stamp with their Deep Impressions technique on this card. There are three sizes of butterfly dies and stamps in this Stampendous set, and it was kind of like the three bears story- the largest was too big, the other two were too small. Then I saw a brilliant card on Pinterest that featured just half of a large butterfly, and decided to try that. I die cut the largest butterfly die out of chipboard and cut it in half. I layered many layers of beautiful embossing powders on both halves and stamped with the butterfly stamp while it was still molten. I was only going to use one half, but decided I liked the dimension of one layered on top of the other. Here is a close up look of the gorgeous butterfly:

I die cut the Live Love Laugh from Cherry Lynn out of a black embossed paper and added some gold glitter paste from BoBunny lightly with my finger. Here is how that looks close up:


Love the sparkle! I am entering this card in the Die Crazy challenge at Simon Says Stamp Wednesday Challenge and the Paper Artsy Pigment Powders Challenge. 

Sunday, April 12, 2015

Celebrate Spring Card

I think it is finally officially Spring in Central Wisconsin. We woke up to 5 inches of snow unexpectedly yesterday, but it is all gone already and the sun is shining. I am celebrating with a card I made with some neglected pieces that were laying on my bed in my craft room. I was playing with mixing my Brusho Crystal Colors with my Bisters and this piece was not my favorite. But I decided to tear the edges off, sponge with a teal ink and attach to a purple card for a colorful background. I had previously cut the flowers from Memory Box and the Celebrate from Cherry Lynn Designs so I attached them for a simple but pretty celebration card.

I am entering this card in the "Recycle Something" challenge at Open-Minded Crafting and the Spring Flowers challenge at Simon Says Stamp.

Tuesday, March 3, 2015

Celebrate Card for TTCRD Challenge


It’s Tuesday and time for another Through the Craft Room Door challenge. As always the theme is my favorite, Anything Goes! There is a new challenge every Tuesday at TTCRD. I am on Team A and this week is our turn to post our cards. The sponsor this week is That Craft Place. Check out the TTCRD blog for all the details and great cards by the rest of the dt.

For this challenge, I created a card featuring “Catwalk Calli”, a digital stamp from That Craft Place. I stamped her on cream cardstock, did a little coloring and cut her out. I stamped her dress on purple velvet paper, cut it out and embossed it with an embossing folder from Lifestyle Crafts.

I made a card at my local stamp shop with this ombre look die cut background and decided to recreate it on this card. I cut a piece of cream cardstock and applied temporary tape on both sides. I sponged very light purple (Shaded Lilac Distress Ink) on the bottom and sponged darker towards the top (Dusty Concord Distress Ink.) Then I removed the temporary tape masks and cut two pieces off the top with Spellbinders A2 Bracket Borders wavy die. I attached all the pieces to the cream cardbase with mounting tape to raise them. I attached Calli and a “Celebrate” sentiment cut out with a Cherry Lynn Die. I didn’t have any purple sequins, so I colored some clear sequins with my purple Copic and attached.

**Don’t Miss It! The brand new March/April 2015 issue of Through The Craft Room Door magazine is available for your viewing pleasure in the "Subscribers Only Area" of the TTCRD website.  It is loaded with over 100 pages of paper craft tutorials, tons of inspiration and projects you can create. Plus free digis, two articles by me (CHA review and Zentangle tutorial) and 3 of my cards among dozens of great cards. Come check it out! If you do not currently subscribe to the magazine you will need to go to the top of the page and click on the Subscription/Renewals tab. I highly recommend everyone get a subscription to this great on line magazine!**


I am entering this card in the Anything Goes challenges at Scribble and Scrap and 613 Avenue Create, and the Design Team Showcase.

Tuesday, February 24, 2015

Sneak Peak of Wedding Stamp Camp Card


I think white on white is such an elegant look for a card. I designed this card for a stamp camp my friend Jane Luxem and I are hosting on May 16th. More information will be posted on the stamp camp later. This wedding card features my favorite die cut - the leafy flourish from Cherry Lynn Designs and their challenge this week is Anything Goes so I am entering this card. I started with a 6 x 4 1/2"  folded card base and cut off the right side of the front with a large oval die. I embossed the side of the front and inside with an embossing folder by Sizzix. I attached the leafy die cut (Cherry Lynn Designs) and the Congrats die cut (Penny Black). I embossed some punched butterflies in the Swiss dots embossing folder (Cuttlebug) and attached them with some pearls.

I am also entering this card in the Anything Goes challenge at Scribble and Scrap.

Friday, November 7, 2014

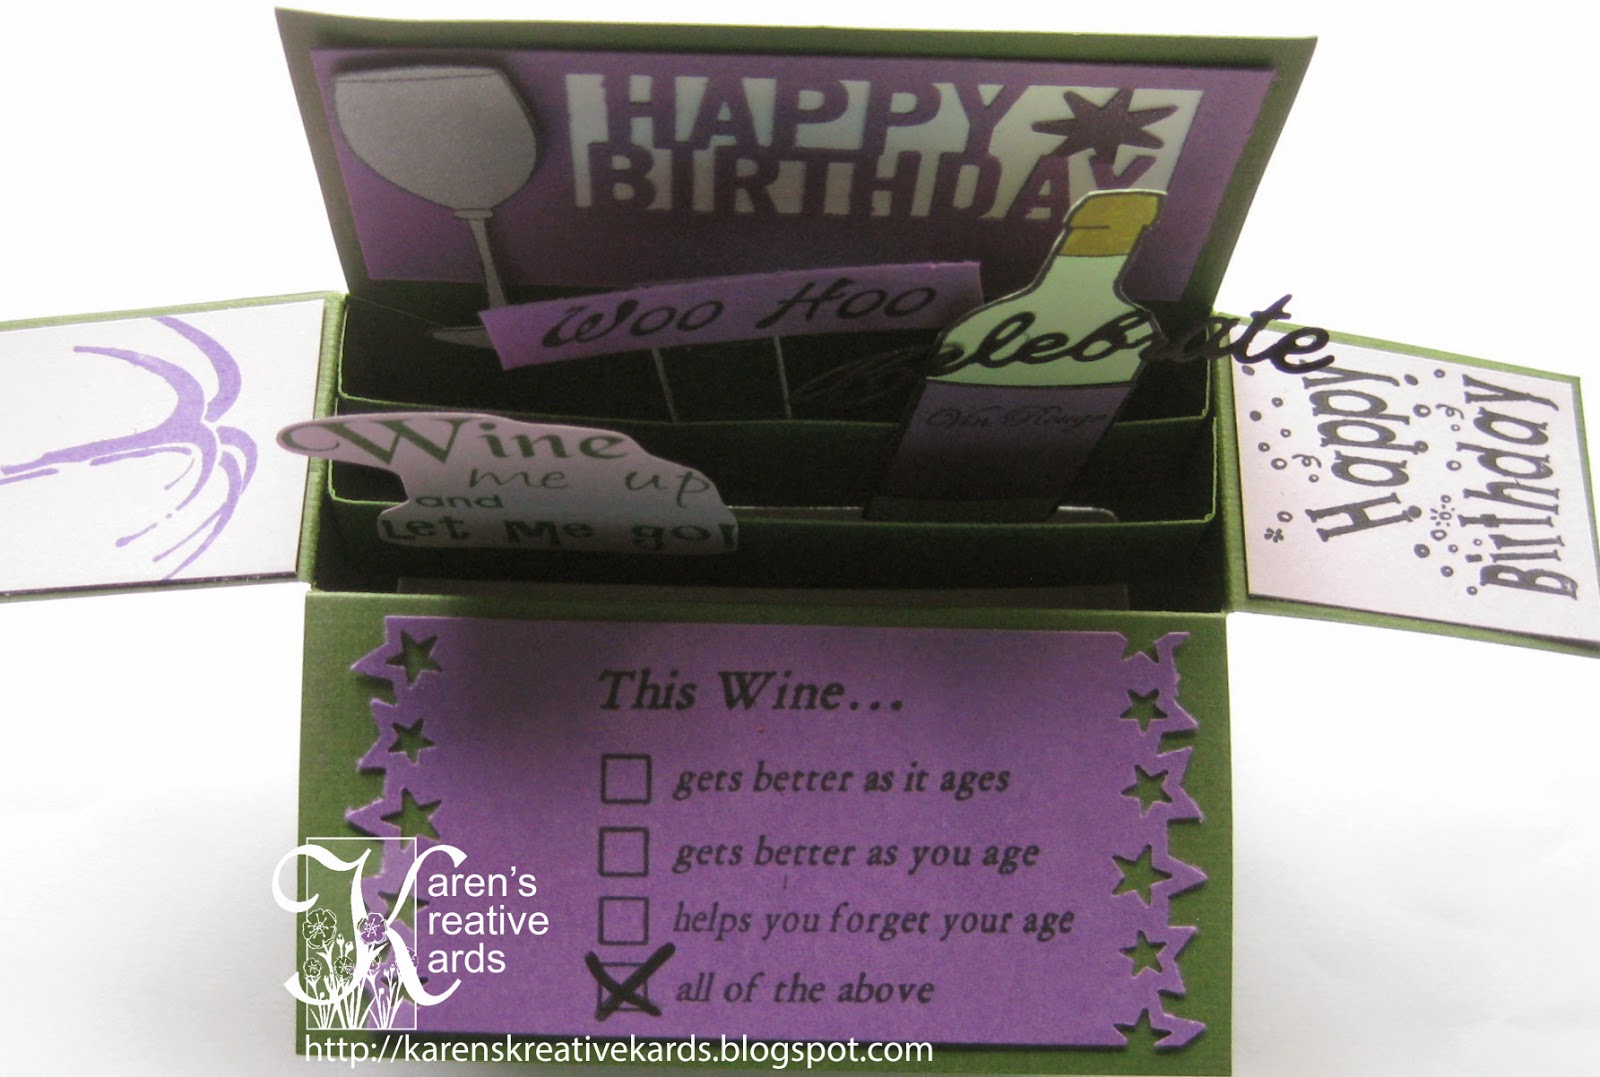
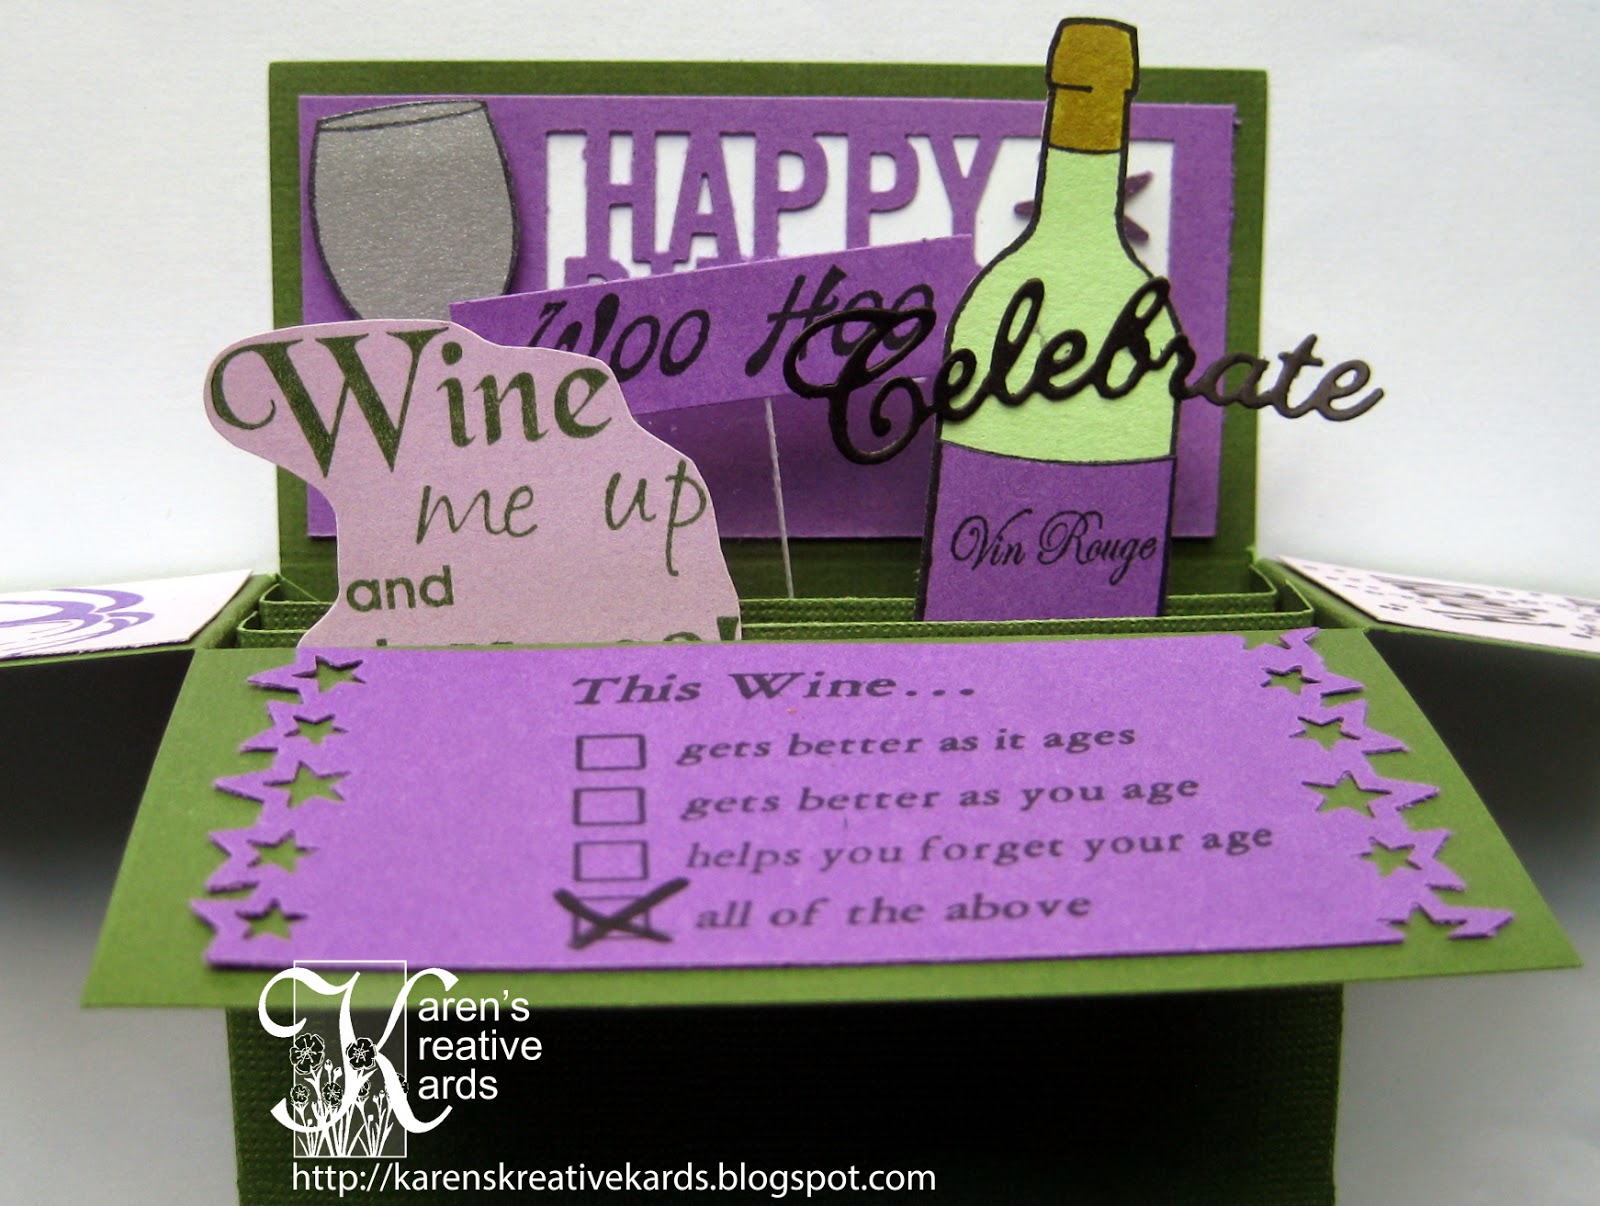
Round Robin Wine Time Card in a Box


Happy Crackerbox Palace Friday everyone! I am excited because tonight I get to see my buddies Vicky and John from CBP, and I am sharing this Wine Time Card in a Box with 70 stampers at a local Round Robin stamp event. There will be 7 tables with projects and 10 stampers per table will have 30 minutes to make each card before moving to the next table and project. I decided to share this card in a box for a wine lover's birthday that folds to fit into an A2 envelope. Crackerbox Palace has a new set of wine stamps that I love (here on their website) and am featuring on this card. I also used a couple Martha Stewart punches and the Celebrate die from Cherry Lynn Designs.

 Here is a few more pictures from the front and back (where the sender would write a personal message.)


I have done much of the cutting and assembly for the participants so they have enough time to stamp a little and put the card together. I think this Wine Time card in a box would put a smile on any wine lover's face and be an unique way to wish them a Happy Birthday!

I am entering this card in the Anything Goes challenges at Papertake Weekly and Love's Rubberstamps.

EDITED TO ADD:  A big HELLO and WELCOME to anyone visiting my blog who made this  card with me Friday night at the Round Robin. I sure had fun and I hope you did too! If you want to see the cards I post (almost) daily here on my blog, you can subscribe on the side and you will get an email every time I post. I would appreciate it if you signed up as a follower too. 

If you want to see all the cards in a box and other cards I have posted with Crackerbox Palace stamps, just click on this link, and scroll down. If you want to see all the card samples from the classes I offer in my home, you can visit my Flickr albums here.  You can schedule a class or stamp camp anytime by contacting me via the contact me on the side of the blog or emailing me at khasheck at gmail dot com. Or give me a call if you got one of my business cards.

Sunday, October 5, 2014

Dragonflies and Butterfly Harmony Card


I am still loving the look of combining Bister powders (from I Brake for Stamps) and beautiful stencils like this one called Dragonfly Harmony from The Crafter's Workshop to make easy but beautiful cards. This one might be my favorite- 'course I have said that before:) I simply attached the stencil to watercolor paper with low tack tape, sprinkled on blue, yellow and natural colored Bister powders and spritzed with water. The beautiful colors appear where the stencil is not and this background is done. I added a butterfly from Memory Box and a "Celebrate" sentiment from Cherry Lynn Designs and the card is done.

I am entering this card in the Anything Goes challenges at Sister Act and Anything Goes with a Twist, and the Stencil challenge at Addicted to CAS. 

Monday, September 29, 2014

Celebrate NBUS Card

I am still having fun with Bister powders and for this card I experimented with embossing the watercolor paper first, then adding various Bister colored powders and spritzing with water. This created another fun background. I had some new (never before used schtuff) dies sitting on my bed, so I die cut the daisy, butterfly and dragonfly (all from Penny Black) out of another mostly red bister sheet, then added Wink of Stella brush colors to each. IRL they are sparkly and pretty, but it is hard to capture the sparkle with the camera. The celebrate die is a new one from Cherry Lynn Designs.

I am entering this card in the Anything Goes challenges at Treasured Times and Suzy Bee's (with a twist of Red. There is red bisters in my background and on the flower and butterfly, as well as red Wink of Stella highlights.)

Monday, July 14, 2014

A New Technique with your Stencils

I have been having fun designing with my new Cutting Edge Stencils and recently I found a new technique here and a beautiful card using the technique here. Basically, you color around the opening in the stencil with your Copics (or other alcohol based markers), then pull in the color to the paper with a paper towel slightly damp with Copic colorless blender fluid. It results in a chalky look which is quite lovely. I tried it with the hummingbird stencil from Cutting Edge Stencils and then cut it out with a white border. I attached it with mounting tape over a background stamp by Hero Arts and a leafy flourish from Cheery Lynn Designs cut in aqua vellum. I also tried the technique with a stencil I created with a die and acetate, and will share the results of that later this week.

I am entering this card in the Anything Goes challenges at 613 Avenue Create and Scribble and Scrap.

Tuesday, April 29, 2014

Floral Tile Card

I have been playing with my new 3D Stamp-Paint from Viva and am loving this product! There are many ways to use it and this time I embossed a piece of black cardstock with a Stampin' Up embossing folder and then applied silver 3D Stamp Paint all over the piece before cutting it into 1 1/4 inch squares. Those squares were attached to a white card with space in between them to look like tiles. Then I die-cut and attached greens from Cherry Lynn, flowers from Elizabeth Flowers and hello from Paper Smooches.I added some clear gems to complete the card.

I am entering this card in the Anything Goes challenges at That Craft Place and 613 Avenue Create.

Thursday, March 27, 2014

Red, Black and White Card in a Box for Classes


I made one more card in a box using one of my favorite color combos - red, black and white. This one will be taught in the individual class in my home where you could learn how to make this fun card that folds flat to mail. I used flowers, butterflies, leafy flourish and word dies and punches to create the card. Here are some additional photos showing it  from the front and also laying flat from the back:

I love using positives and negatives of dies and that is what I did on the side flaps. The dies and punches are from Memory Box, Martha Stewart, Cherry Lynn, Paper Smooches, Tim Holtz and Stampin' Up.

I am entering this card in a box in the Anything Goes challenges at Through the Craft Room Door and Party Time Tuesday.

Tuesday, March 4, 2014

Hello Spring Card in a Box


I am still having fun making Cards in a Box and using bright spring colors. Scroll down my blog if you want a link on how to make these fun cards. Or if you are local to Wausau/Schofield WI., contact me for details on a class I will be offering on how to make these really cool cards including this one.

I started with a two sided cardstock from Stampin' Up and then added flowers (Tattered Florals die by Tim Holtz), butterflies (Martha Stewart, Stampin' Up and Memory Box), greens (Cherry Lynn), and a new "hello" from Paper Smooches. Here is a picture where you can see the front better and also the inside of the box where some of the elements are attached:


And here is a picture of the card laying flat so it can be mailed and where you can write a message:
Too fun! I am entering this card in the Flowers Galore challenge at Come and Get It, and the Anything Goes (with optional Use your Stash and I have not used my Tattered Florals in a long time), at 613 Avenue Create.

Saturday, February 22, 2014

Couture Creations Design Team Application Round 2


I am thrilled to share I have made it through to the second and final round of the Couture Creations Design Team Call! For this round we are to design and blog a new project featuring a Couture Creations embossing folder, our choice of dies and Core'dinations Cardstock if we have it.

I have a whole collection of Core'dinations cardstock since it is my favorite, and have chosen two kinds of Core'dinations Cardstock to create my card with. The card base is made with Core'dinations Vintage Collection, and the heart was cut from Core'dinations Gemstones Cardstock. I experimented with several different shades of blue Core'dinations Cardstock for the heart, and tried sanding them to highlight the embossing. Core'dination's core cardstock is perfect for that technique, but I decided I liked the Gemstone cardstock without the sanding the best for my embossed heart.

I embossed a 5 1/4 inch white cardstock square with Couture Creation's Butterfly Hugs embossing folder. I also embossed the heart (cut out with a Spellbinders Nestabilities die) in the Butterfly Hugs folder, as shown in the picture below:
I attached the heart to the white embossed cardstock with pop dots to raise it, and then attached the completed piece to the front of the card. The real magic of the card happens when you open it. Take a look:


The butterflies pop up and appear to be floating when the card is opened! The technique is called Floating Image and this is how you create this fun effect:

Cut two pieces of matching cardstock 5 1/2" by 6", and score each at 5 1/2" on the 6" side. Apply strong two sided adhesive tape to the two 1/2 inch tabs and line them up together. (I chose to make my card a 5 1/2" square card. If you wanted to create an A2 size card, cut two pieces of cardstock 4 3/4" by 5 1/2" and score at 4 1/4" on the 4 3/4" side. You want an half inch tab in the center of the two pieces.)

Next you will want to decide what you want to pop up when the card is opened. I chose to die cut a polka dotted butterfly with a beautiful large butterfly die from Cherry Lynn Designs, and two smaller butterflies cut out of white cardstock with a die by Memory Box. They are attached to pieces of acetate cut 1/2 inch wide and to the height you want your floating images to be. I chose to place the larger butterfly on a piece 2 1/4 inches high and the two smaller ones on a 3 inch acetate piece. Lay your pop up elements inside the card so they do not extend beyond the sides of the card as shown here:

When you are happy with the placement, remove the outer protective cover of the two sided adhesive on one of the 1/2 inch folds and attach the acetate strips and die cuts pieces. They will pop up and appear to be floating in the air. (As is the designer's prerogative, I changed my mind and placed the two smaller butterflies on one acetate strip in the finished card.) Remove the other adhesive cover and attach the front of the card to the back in the center as shown here:
For the inside of the card, I die cut Memory Box's Grand Happy Birthday on the top of a 5 inch square piece of white cardstock. I also cut out the negative of the Kaleidoscope Butterfly by Memory Box and attached the positive of the same butterfly in the opening.

I think the surprise of the pop up floating butterflies in this card would delight anyone celebrating their birthday. I enjoyed sharing this technique and my card with you, and thank Couture Creations for the opportunity to participate in Round Two of their Design Team Application process.

Thursday, January 30, 2014

Christmas Stencil Card


In the classes I teach in my home (new sessions starting in March), we do one holiday card each month. So I decided to play with creating my own stencil using Spellbinders ornament dies and the sponging and stamping inside as we were taught in the one of the lesson videos this weekend in the Stenciled Class and this is what I came up with. The sentiment stamp is from Prickly Pear and the flourish and greens dies are by Cherry Lynn Designs.

I am entering this card in the Anything Goes challenges at Party Time Tuesday and Through the Craft Room Door.

Stamping smiles, Karen

Tuesday, January 28, 2014

More Stencil Cards?


OK, I lied. I thought the Monday session of our on-line stencil class was a wrap-up and the gallery was closing, but that is happening next Monday. Instead we got more great videos and some bonus extras that totally inspired me. So I pulled the stencils back out along with my distress inks and made a couple more cards. I was so busy making cards and avoiding the 40 below windchill outside, I forgot to get a new blog post set up for today, which is why this is a little late.

I learned today we can use the new plastic stencils to emboss. I knew you could do that with brass stencils and the No More Shims thick embossing pad, but it never occurred to me to try the new thin plastic stencils that way. The video showed using two thin rubber mats and that works great too. But I like my thick No More Shims mat and I also learned recently to lightly spray the card stock first and the embossing is more crisp. I just loved the card sketch Jennifer McGuire used in her bonus tutorial and also the fun idea of using different colors of cardstock to frame the  card. It just had never occurred to me to do that.

I embossed the background with a Tim Holtz stencil and while it was still attached, sponged on a couple colors of distress ink. I attached a little green to the bottom and some blue to the top before attaching at an angle on a top folding aqua blue card. I stamped my favorite "hello" from Paper Smooches and added a large butterfly diecut from Cherry Lynn.
I made another card with the same sketch and colors. This time I used another plastic stencil from Tim Holtz which I embossed (with my Big Shot and the No More Shims thick embossing mat.) I sponged on the same colors and framed the sides with blue and the bottom with green. I like that this course has encouraged me to pull out some die cuts I have not used much, like the pretty flower from Memory Box. I die cut it twice and sponged on some color on the top one. I layered both the flower and the "With Love" (by Dee's Distinctively) with a black layer before attaching. The wooden butterfly from Recollections was sponged and I added a bunch of thread under it before attaching it with a glue dot. Another fun idea that had never occurred to me until one of the instructors shared it.

One more stencil idea is swimming around in my head and since it is just as bitterly cold today in Wisconsin and I am not going anywhere, I think I will play some more.

Stamping smiles, Karen

Tuesday, August 20, 2013

Monochromatic Purple Haze


Monochromatic color schemes is the theme this week at Simon Says Stamp and Anything Goes at 613 Avenue Create.  I used shades of purple for this card, I started with a two sided purple cardstock for the base. The die that covers the front is from Cherry Lynn Designs. I stamped the sentiment (from SU), then cut and embossed with a Spellbinders fancy circle. I added a purple flower gem to complete the card.

Stamping smiles, Karen

Monday, August 12, 2013

Prickley Pear Thank You Card


I recently purchased a beautiful set of flowers and sentiments with matching dies by Prickley Pear and I couldn't wait to design a card with them. The sketch for the card was cased from a card I saw on Pinterest. I started with a two sided orange floral paper for the card base. I stamped the Prickley Pear flowers in orange ink on an off white panel and also on scrap paper, then cut the smaller ones out with their matching die. I attached the smaller flowers over the larger ones, and layered that piece over a green card stock piece. The "thanks for your kindness" sentiment is from the same set by Prickley Pear. The dotted circle die is by Memory Box and the greens were cut with a Cherry Lynn die. I added some gems to the flowers and sentiment to complete the card.

I am entering this card in the Anything Goes challenges at Paper Take Weekly and Sister Act.

Stamping Smiles, Karen

Friday, May 3, 2013

Simon Says Stamp and Party Time Tuesday Challenges


"Just Because" is the theme at Simon Says Stamp this week and Anything Goes at Party Time Tuesday. I am sharing a card I made recently playing with some floral doily dies by Spellbinders and a leafy flourish die by Cherry Lynn. I started with a fun striped dp and added a nice sentiment I picked up recently. I layered the floral doilies raising each with mounting tape and added a pearl to complete the card.

Stamping smiles, Karen

Saturday, December 29, 2012

Delightful Challenges and Charisma Cardz Challenges


Anything Goes at Charisma Cardz and Delightful Challenges this week- my favorite kind of challenge! I am sharing a card I made with some new dies I have recently purchased. I made a mask with the A2 Frame Die from Cherry Lynn Designs and sponged pink distress ink on a white piece. I stamped a new favorite sentiment from Serendipity Stamps. The Poppy die is from Memory Box and I cut it out in black and burgandy and layered them. The ribbon is the final touch and is from Stampin' Up.

Stamping smiles, Karen

Tuesday, August 14, 2012

Robyn's Fetish, OSAAT and Whoopsi Daisy Challenges


Anything Goes is the theme at One Stitch at a Time and Whoopsi Daisy this week and monochromatic is the theme at Robyn's Fetish. Lately I have been making more and more monochromatic cards for some reason- I guess I just like the look. I played with a whole bunch of dies and punches for this card. The leaves are from Cherry Lynn Designs, the branch from Memory Box and the bird punch is from Fiskars. The sentiment on the inside is by Hero Arts. I love to use the positive and negative of dies and punches and did so on the bottom of the inside of the card which shows as the front was cut down. I used a variety of shades of green and added some gems and pearls to complete the card.

Stamping smiles, Karen