Friday, January 31, 2014

Are You Ready for Some Football?


It's Crackerbox Palace Friday and I am sharing a couple football cards in honor of the Super Bowl. I am a huge Packer and Badger fan and know many others who are as well, so I was happy to see CBP recently came out with some great football stamps. The G and W are available from Crackerbox Palace on special order. The fronts of the cards were designed to look like a film strip. But the fun really happens on the inside: 

I found this floating image card tutorial and decided to try making a couple. The images are attached to acetate and pop up when you open the card. Here is the inside of the Badger card: 

Thanks for stopping by my blog. The CBP website is being upgraded currently, but you can always email or call them if you want any of the stamps I share.
I am entering these cards in the Anything Goes challenge at Crafty Girls and the Something New (all the stamps are new) challenge at Cute Card Thursday.

Crackerbox Palace smiles, Karen

Thursday, January 30, 2014

Christmas Stencil Card


In the classes I teach in my home (new sessions starting in March), we do one holiday card each month. So I decided to play with creating my own stencil using Spellbinders ornament dies and the sponging and stamping inside as we were taught in the one of the lesson videos this weekend in the Stenciled Class and this is what I came up with. The sentiment stamp is from Prickly Pear and the flourish and greens dies are by Cherry Lynn Designs.

I am entering this card in the Anything Goes challenges at Party Time Tuesday and Through the Craft Room Door.

Stamping smiles, Karen

Wednesday, January 29, 2014

Here Kitty, Kitty DCC at Repeat Impressions

It’s another Designer’s Choice Challenge at The House that Stamps Built, Repeat Impression’s blog. It’s Cheri’s turn and the theme of her challenge is “Here Kitty, Kitty.”  After you make your card with a kitty on it somewhere, you can enter it for a chance to win some awesome Repeat Impressions rubber! Please visit the blog for all the details and to see the other Rock Star's cards for this DCC challenge. 

If you follow my blog, you know my husband and I are kitty lovers and so are the owners of Repeat Impressions. They have dozens of awesome kitty stamps to choose from. I chose Cat Nap and a perfect sentiment to make this card. I was in charge of the sketch challenge at my local stamp club this month and I shared this sketch I found somewhere in blogger land. I embossed  the grey card with an embossing folder by Stampin’ Up and added a border punched with an ek success punch. I cut three round shapes in one of my favorite color combos and embossed with another embossing folder by SU. I stamped, cut out and attached the sweet sleeping kitty.

I am entering this card in the Anything Goes challenges at Created with Love and Scrapbook Stamp Society.

Stamping smiles, Karen


Tuesday, January 28, 2014

More Stencil Cards?


OK, I lied. I thought the Monday session of our on-line stencil class was a wrap-up and the gallery was closing, but that is happening next Monday. Instead we got more great videos and some bonus extras that totally inspired me. So I pulled the stencils back out along with my distress inks and made a couple more cards. I was so busy making cards and avoiding the 40 below windchill outside, I forgot to get a new blog post set up for today, which is why this is a little late.

I learned today we can use the new plastic stencils to emboss. I knew you could do that with brass stencils and the No More Shims thick embossing pad, but it never occurred to me to try the new thin plastic stencils that way. The video showed using two thin rubber mats and that works great too. But I like my thick No More Shims mat and I also learned recently to lightly spray the card stock first and the embossing is more crisp. I just loved the card sketch Jennifer McGuire used in her bonus tutorial and also the fun idea of using different colors of cardstock to frame the  card. It just had never occurred to me to do that.

I embossed the background with a Tim Holtz stencil and while it was still attached, sponged on a couple colors of distress ink. I attached a little green to the bottom and some blue to the top before attaching at an angle on a top folding aqua blue card. I stamped my favorite "hello" from Paper Smooches and added a large butterfly diecut from Cherry Lynn.
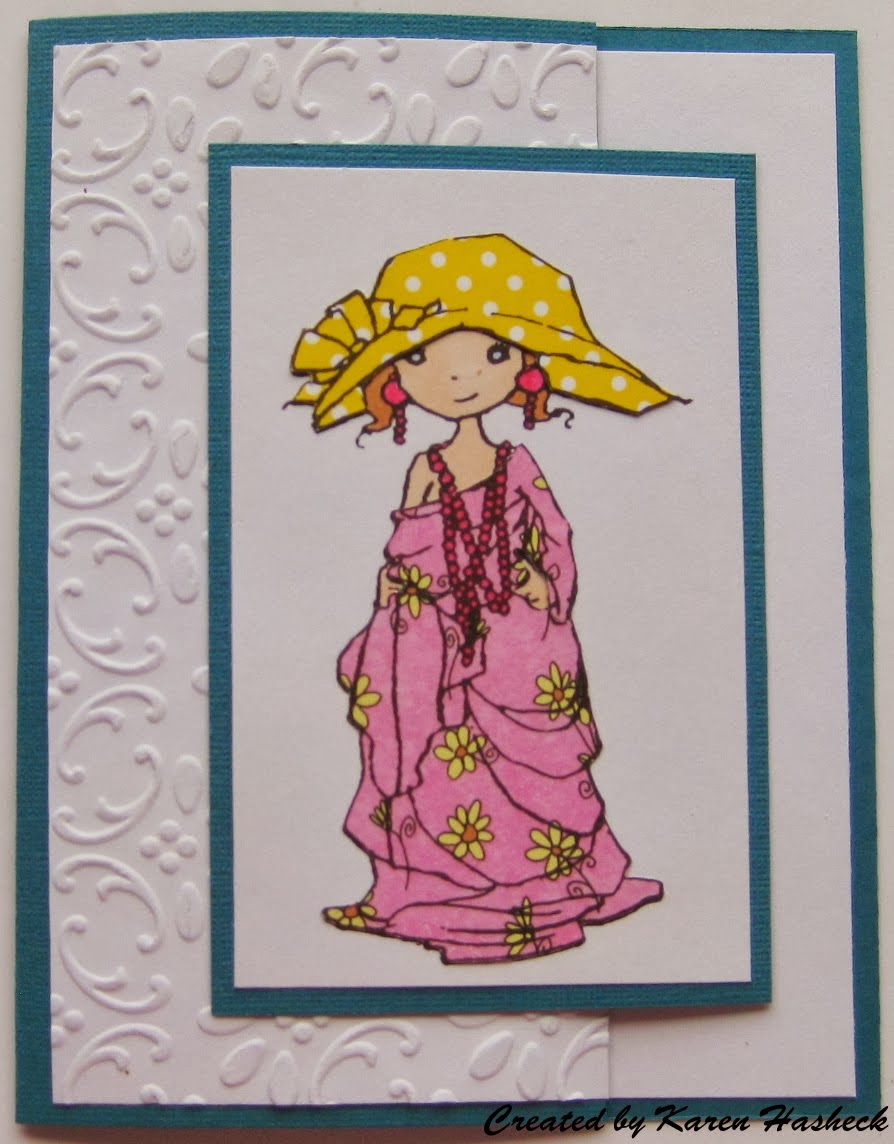
I made another card with the same sketch and colors. This time I used another plastic stencil from Tim Holtz which I embossed (with my Big Shot and the No More Shims thick embossing mat.) I sponged on the same colors and framed the sides with blue and the bottom with green. I like that this course has encouraged me to pull out some die cuts I have not used much, like the pretty flower from Memory Box. I die cut it twice and sponged on some color on the top one. I layered both the flower and the "With Love" (by Dee's Distinctively) with a black layer before attaching. The wooden butterfly from Recollections was sponged and I added a bunch of thread under it before attaching it with a glue dot. Another fun idea that had never occurred to me until one of the instructors shared it.

One more stencil idea is swimming around in my head and since it is just as bitterly cold today in Wisconsin and I am not going anywhere, I think I will play some more.

Stamping smiles, Karen

Monday, January 27, 2014

Day Three of Stenciled Class Card

Day three of our Stenciled class was all about texture and different kinds of embossing paste techniques. I never thought we could use our new plastic stencils with embossing paste, but sure enough it works great. And the instructors had many cool ideas of what you could add to the embossing paste. I have tried heating the pearlescent embossing paste with a heat gun and perfect pearls, but one of the videos suggested putting embossing powder on the wet pearlescent paste, waiting 15 minutes and then heating with a heat gun. I have some cool glittery embossing powders I have never used, so I tried it. I applied the pearlescent embossing paste with a stencil knife, then sprinkled on aqua, black and dark blue glittery embossing powders. I waited the 15 minutes and heated it. There is more height to the embossed areas,  but to be honest, using the paste and the embossing powders were very very messy. One of the videos showed how to apply Versamark through the stencil, then add embossing powder and emboss. I think the result would have been just as nice and much less messy. Just my opinion, but I am not a huge fan of the mess of embossing paste anyway. I added a fun sentiment I cut out with my Silhouette to the front of the card.
The stencil I chose to use for this technique was from Dylusions and had the curved checkerboard edge and some funky circles too. I cut some of the circles and added them to the center of the card.

I am thrilled with what I learned in this Stenciled class from Online Card Classes. The live interactive part of the stencil class is now over, but you can still take the course and learn everything from the videos and lessons on an independent study basis. I highly recommend it and will be taking more courses from them too.

Stamping smiles, Karen

Sunday, January 26, 2014

The rest of this weekend's stencil cards...

Except for one scheduled for tomorrow- I promise:) I decided to play with stencils and embossing folders on this one. I sponged blue ink on a kraft piece using a round version of a stencil I made with a cutting file from Get Silvered and my Silhouette in some earlier blog posts. Then I embossed the piece with a birthday embossing folder from Embossalicious. I sponged the whole piece with brown distress ink and attached to a black card.
I cut an abstract shape with my Silhouette using a Silhouette America cutting file and taped it down on a white piece. I masked the center and sponged the outside openings with pink distress ink and then stamped with a lined background stamp from A Muse. Then I masked those and sponged the center aqua blue distress ink and stamped with an old star stamp from Santa Rosa. The super cool vertical Thanks is from Crackerbox Palace. I rounded the edges and layered on pink and then on black.

The black piece I had used as a stencil was just too fun to toss, so I turned it over and layered on a white card. I added a silver border sticker from Tim Holtz and a "love" I die cut with a die from Dee's Distinctively.

I had fun making and sharing all these cards, and hope you enjoyed them too.

Stamping smiles, Karen

Another Stencil Day Two Card

I wanted to try stamping with a word background stamp inside the stencil and this is the result of that experiment. The word background stamp is by DRS Stamps and is a combination of three beautiful sentiments. I cut a shell stencil with my Silhouette and stamped and sponged the inside of the hole with aqua blue ink. Then I masked the shell and stamped again, this time with a very light blue ink. I stamped it once more on blue card stock with aqua blue ink and cut out my favorite of the sentiments, attaching that with mounting tape to raise.
I love using the positives and negatives of die cuts and so I attached the shell flourish die cut piece in the inside of the card.

Still learning and experimenting, and hoping my frequent posts this weekend aren't driving my subscribers crazy:)

Stamping smiles, Karen

Day Two Stencil Cards


The concept I liked the best from the lessons and videos on Day Two of our online Stenciled class was stamping and sponging inside the space left by an open stencil. I created this heart stencil with a large heart die by Spellbinders. After taping it down, I sponged with pink distress ink. Watching the instructors do the sponging - pulling the ink in from outside the hole and leaving the center a little lighter- was another great lesson I learned from this course. While the stencil was still on, I stamped an old TAC flourish stamp with burgundy ink several times. Then I added the love sentiment (old stamp from Stampin' UP) and a lacy flower that I colored with the burgundy ink. I layered the piece onto a square burgundy card.

Stamping smiles, Karen

Stencils and Fonts on Silhouette Sunday


Still having fun this weekend playing with stencils and techniques and tips I am learning in the online class I am taking. The challenge this week at the Silhouette Blog is to use a favorite font in a new project. I cut the you and me with Expose' Wide font. I knew I wanted to use the fun Ampersand stencil I recently purchased from TCW. I started with a background that I created with a stencil I cut with my Silhouette and a free file I found on line from Get Silvered (see yesterday's blog post for a link.) Did you know that with the Designer Edition software from Silhouette America, you can import tons of free cutting files available on line?

One of the tips I learned in the Stenciled class was to be assertive when spraying with colored misting sprays. Spray with commitment was the phrase they used, and it worked! I was  always so tentative and ended up with blobs and a look I didn't like. I sprayed- with commitment- with purple and light blue Glimmer Mist from Tattered Angels, then let it dry. I sponged the ampersand with black ink and picked up a little extra ink on the right part, so I covered it up with sequins. I attached the "you" and "me", and layered on a black card. I think I will use this for an anniversary card for my husband.

Stamping, stencil and Silhouette smiles, Karen

Saturday, January 25, 2014

More Homework for my Stenciled Class


It is a bitter cold weekend here in Wisconsin and the forecast is for the weather to get even worse in the next few days. Good thing I am taking an on-line course on how to use stencils and I have very fun "homework" to do- play with what we are learning.

The best technique from today's videos for me was the idea of stamping inside of open stencils. Since I do not have any open stencils among the ones I have purchased so far, I made my own with my Silhouette machine and a cutting file called Welded Stars (from the Silhouette store.) Of course you could also make your own stencil with your dies and punches, and I am going to try that next.

This is the stencil I made out of blue cardstock:

And this is the card I made with it: 

I used some favorite stamps from Raisin Boat for inside the stars (Edgy Accents and Splash) and for the sentiment (Strokes of Wisdom.) I taped down my stencil and stamped inside the star cutouts with blue, purple and green Distress Inks. Then I took the edge of the Tim Holtz blending tool and sponged just around the edges with the same ink I had stamped with. I embossed the stars that were cut out of the stencil with an embossing folder from Lifestyle Crafts and attached with mounting tape to raise. Then I attached the completed piece to a navy blue card and used one of the star images in the inside as well: 

Stamping and stencil smiles, Karen 

Double Stenciled Apache Blessing Card


I was playing again with stencils after watching the videos on the on line Stenciled class I am taking this weekend and think the barb wire from TCW might be my favorite of my new plastic stencils I have bought so far. I wanted some more options for stencils to play with, so turned on my magic Silhouette machine and die cut a couple stencils that I downloaded for free from Get Silvered here.  Pam at Get Silvered has awesome free Studio files and great ideas that she shares on her blog. I sponged her floral background on the top with Victorian Velvet Distress Ink and oversponged with the barb wire stencil with Wild Honey Distress Ink. Then I stamped the beautiful Apache Blessing stamp from DRS, rounded the corners and added a wooden dragonfly (Recollections) that I also sponged with pink ink and the barb wire stencil.

I think I like it even with unusual color choices?

Stamping and stencil smiles, Karen

Friday, January 24, 2014

Stenciled Happy Birthday


I am going to blog each stencil card I like this weekend after participating in the on line course on stencils taught by some awesome instructors. You can still sign up and take it anytime here. It only cost $12 and I can say after only one morning on line, I got enough tips to say I got my money's worth!

I am learning as I experiment and not everything is working out like I think it will. This wavy stencil from Memory Box did not want to stay in place when I tried to sponge it like they showed in the video. I taped down the sides and the card piece well, but the stencil itself was too thin between the wavy lines to sponge that way. So I stopped, added a die cut "happy birthday" in two colors (from Memory Box) and a lacy flower that I sponged too. I layered it all on a coral card and I am pretty happy with how it turned out.

Not bad for a stencil newbie:)

Stay tuned for more stencil cards through Monday.

Stamping and stencil smiles, Karen

More Pre-class Stencil Cards


Still playing with my stencils in advance of the on line class I am taking starting tomorrow. I have quite a collection of the new lightweight stencils that all the rage, but other than sponging with them, I don't know what to do with them, so I am excited to learn more this weekend.

I used a large tree stencil from The Crafter's Workshop to make this card. I attached a strip of black card stock to a white card, and sponged with white ink on that part. On the white parts I sponged with black ink and added a simple "hello" to complete the card.


I used a fun border pattern stencil from Dylusions on this card. The Happy BD Eye Chart is by Technique Tuesday and I added some washi tape to finish the card.

I am entering these cards in the Anything Goes challenges at Crafting with Dragonflies, Paper Pretties and Scribble and Scrap.

Stamping smiles, Karen

Thursday, January 23, 2014

Experimenting with Stencils


Not sure if I like this card or not? I have been experimenting with my new stencils and it is a good thing I am taking this class on Stencils on line this weekend because I love them, but don't know what to do with them. I sponged blue distress ink on kraft paper after attaching a tree stencil from TCW (The Crafter's Workshop). The words are a stencil from Wendy Vecchi by Studio 490 and I added a couple lines (just cuz it seemed it needed something under the words) with a Tim Holtz stencil. I added a butterfly and pearl to complete the card.

I like this one better:) Probably because it is cheerier and I am loving the yellow and grey color combo lately. And of course I love butterflies:) The stencil is from Memory Box and the sentiment is from Precious Remembrance shops.

I am entering the second card in the Anything Goes challenges at Through the Craft Room Door and Sweet Stamps.

Stamping smiles, Karen


Wednesday, January 22, 2014

What If? Wed. Sketch Challenge at Repeat Impressions


Happy Wednesday everyone! It's time for another fun sketch challenge at The House that Stamps Built and we are challenging you to make a card using the sketch below and link it up for a chance at some great Repeat Impressions rubber! For all the details on what you can win and to see the other Rock Stars cards using this sketch, please visit our blog.

I like a CAS sketch and I decided to emboss the two toned background to make a Valentine for one of my kids. I stamped the sweet Bear Hug from Repeat Impressions and cut it out with a circle die. I paper pieced each bear to make them individuals and layered onto a dark red circle. I colored the bow and did a little doodling to complete the card.
Here is the sketch for you to follow when you create a card for our challenge. You do not need to use Repeat Impressions stamps to enter our challenges, but you get an extra chance to win if you do!

I am entering this card in the Anything Goes challenge at My Craft Creations and the CAS challenge at Hiding in My Craft Room.

Stamping smiles, Karen

Tuesday, January 21, 2014

Love is in the Air


Maybe it is Valentine's Day approaching, but I am seeing more and more pinks and reds and spring colors with a Love theme out in blogger land. Sure is better than snow and cold! I bought the "No Peeking" stamp by The Artful Stamper on a recent stamping road trip and decided to ink it up for an easel Love card. Of course I paper pieced everything I could and colored the rest. The love is a die from W plus 9 and I cut it twice, offsetting the colored layer with a black layer and attaching with pop dots so it holds the front up.

I am entering this card in the Anything Goes challenges at 613 Avenue Create and Scribble and Scrap.

Stamping smiles, Karen

Monday, January 20, 2014

CAS Butterfly Hello


I am taking a class on February 1st at our local Stamp Shoppe from the artist who created this beautiful butterfly from Susan Louise Arts on special paper that you can sponge with distress ink and then flick water on to create this fun look. This was my first try and I know I will learn much more from her to make this type of background. I think I needed more water or less of a fine mist to make the background better? But I do like how it turned out anyway. The "hello" is from Paper Smooches and the die cuts are Nestabilities.

I am entering this card in the NEW challenge at Addicted to CAS (the butterfly paper from Susan Louise is new to me) and the CAS challenge at Hiding in My Craft Room.

Stamping smiles, Karen

Sunday, January 19, 2014

My Grandson's Despicable Valentine on Silhouette Sunday

My grandson is the light of my life and I would do just about anything for him- even cut out all the pieces so he can make 35 Minion Valentines for his classmates when we watch him for a few days early in February. But only for him would I do that! There are 17 pieces to each card (we are doing the buttons out of paper too) and 17 times 35 is a lot! But with my magic machine (Silhouette Portrait) it was much easier than if I had used punches or die cuts! The shapes are all basic ones (except for the body which I bought for 99 cents) that are free to make any size I want and I can cut as many as fit onto a 8 1/2 x 11 page with one swoop of the Silhouette cutting machine.

When my grandson asked for a one eyed minion for his Valentines (that he will put together with me so they will be made by him), I did a search on Pinterest and found this one that I cased.  This is the inside of the card where Nate will write his message and sign it:
Too fun- we will have fun putting them together and he will be proud of the cards he will be giving to his class mates and loved ones. That is the best gift I can give him:)

I am entering this card in the Valentine challenge at Raisin Boat and the "It's a Boy Thing" challenge at  Charisma Cardz. I am also entering it in the Valentine Challenge at the Silhouette Blog. 

Stamping smiles, Grandma Karen

Saturday, January 18, 2014

Anything Goes 4 Kids at Send a Smile 4 Kids!


It’s Saturday and time for another fun challenge at Send a Smile 4 Kids! This time our challenge is Anything Goes 4 Kids. Create and link any card for a child and you could win one of our great prizes. We have three very generous sponsors for this challenge: A Day for Daisies is giving their winner a $12 gift certificate! QKR Stampede is giving their randomly picked winner 5 digis of their choice!  And Doodle Pantry’s winner gets a $10 gift certificate! TEAM S.A.S will also be choosing their favorite cards for our top three and the winners will receive a blog badge and an opportunity to be a guest design team member on a future challenge.

My first card above features a digi from A Day for Daisies called Mom's Hat. Isn't she sweet? I paper pieced her hat and dress and colored the rest. The front of the card is embossed with a Stampin' Up embossing folder and is cut off so the focal piece hangs off the right side. 


With Valentine's Day coming, I used Doodle Pantry's Heart Sheep to make a Valentine for one of our kids. I printed the pre-colored image twice, cut out both and raised the second layer of hearts up for some added dimension. I embossed the red base card with an embossing folder from Sizzix and the top pink piece with one from Couture Creations. The sentiment is from The Artful Stamper. 

I am entering these cards in the embossing challenge at Simon Says Stamp and the Anything Goes challenge at My Heart Pieces Digital Stamps.

Stamping smiles for our kids, Karen 

Friday, January 17, 2014

FORRRRE the Golfer in Your Life


It's Crackerbox Palace Friday and I am sharing a fun card for a golfer I created with some new sports stamps from Crackerbox Palace. I tore some green paper and sponged it for the grass. I stamped, paper pieced and cut out the cute female golfer and her golf ball. I added the clouds and FORRRRRE to finish the front. I stamped the smiling golf ball in the inside of the card just cuz it made me smile and I hope the golfer who gets this will too.

Thanks for stopping by my blog. The CBP website is being upgraded currently, but you can always email or call them if you want any of the stamps I share.
Crackerbox Palace smiles, Karen

Thursday, January 16, 2014

Sympathy Card for Upcoming Classes


I just love this flower stamp from Stampin' Up and I will be sharing this card in the classes I will be teaching in my home starting again in March. The flower was stamped in navy blue, medium blue and white moving it slightly each time. So easy, but so effective. The sympathy sentiment is also from SU, and the navy piece behind the kraft front piece was embossed with a SU embossing folder.

I am entering this card in the Anything Goes challenges at Through the Craft Room Door and Crafty Sentiments Designs.

Stamping smiles, Karen

Wednesday, January 15, 2014

Sweet Treats DCC at Repeat Impressions


It’s another Designer’s Choice Challenge at The House that Stamps Built, Repeat Impression’s blog. It’s Melissa’s turn and the theme of her challenge is Sweet Treats.” After you make your card with something sweet, you can enter it for a chance to win some awesome Repeat Impressions rubber! Please visit the blog for all the details and to see the other Rock Star's cards for this DCC challenge. 

I started this card with the triangle corner in patterned paper that I stamped the “sweet” sentiment on and framed it with a diecut circle. I stamped the ice cream treats and paper pieced them to make chocolate and strawberry flavors. I rounded one corner of the white piece and pierced a border before attaching to the aqua blue card.

I am entering this card in the Anything Goes challenges at Card Mania and My Craft Creations.

Stamping smiles, Karen 

Tuesday, January 14, 2014

Pinterest Inspired Tri-Shutter Card


I tried a Tri-shutter card recently with all new stamps and I am sharing it with my stamping club this week and in upcoming classes. Look at what it looks like open:


I was inspired by this video on Pinterest and if you have not tried one, you will see it is not hard to do. The Frankly My Dear sentiment is from CAS-ual Friday Stamps and all the other stamps are from Precious Rememberance Shop. Three very cool sets of new stamps I just love! And the embossing folder is by Couture Creations.

I am entering this in the Pinterest inspired challenge at Amusing Challenges and the Something New challenge at Hobby Cutz.

Stamping smiles, Karen

Monday, January 13, 2014

Partial Die Cut Class Card


This is a card I shared in a class in my home last session that taught how you can cut just part of a die cut in our Big Shot or other cutting machines, and also the emboss resist technique. Did you know that if you put the top glass over just part of a die cut on your card stock, the part that is not under the top glass will not cut? I cut a kraft square card and attached a Spellbinders label die with temporary tape to the front. I placed the card with the die on my glass plate, then put the upper glass just on the right two thirds of the die and ran it through the Big Shot to create the card base here. I added a strip of cream paper I punched both sides of with a Martha Stewart border punch. The trees (from Stampin' Up) were stamped in dark brown, then stamped again without re-inking for the lighter trees, and then embossed with white embossing powder. Then I sponged all three trees with a lighter brown ink.

If you are local to Wausau WI and are interested in taking classes in my home, new sessions will be starting in March. I am busy gathering new ideas and techniques to share, so send me an email at khasheck at gmail dot com if you want more information or to sign up.

I am entering this card in the New Stuff (stamps are new to me) challenge at The Squirrel and the Fox and the Anything Goes challenge at Sister Act. 

Stamping smiles, Karen

Sunday, January 12, 2014

Happy Heart Day on Silhouette Sunday


I was inspired by the sketch and chance to win a Cameo at Die Cut Crazy here to make a Valentine using my Silhouette Portrait and several cutting files from Silhouette. I love my smaller Portrait, but if I could have afforded one, I would love the larger Cameo even more.

I started with a fun circle heart background cutting file, then added a strip of black before layering on a white card. I cut the Happy and day from cutting files and added a couple of small hearts I die cut with a Memory Box diecut.

I am also entering this card in the Celebrations challenge at MilkCoffee and the Anything Goes challenge at 4 Krafty Girlz (or is it Crafty Girls? I am so  confused on their name.)

Stamping and Silhouette smiles, Karen

Friday, January 10, 2014

Tattoos and Washi Tape Card for My Daughter


It's Crackerbox Palace Friday and I am sharing a fun Thinking of You card I designed for my daughter with this beautiful lady with a tattoo from Crackerbox Palace. I embossed her with white embossing powder on a kraft card and simply colored her tattoo. I framed her with a white piece that I raised with pop dots and layered several washi tape at angles on the bottom. I also punched out a couple flowers from the washi tape to highlight the sentiment on the side.

Thanks for stopping by my blog. The CBP website is being upgraded currently, but you can always email or call them if you want any of the stamps I share.
I am entering this card in the Anything Goes challenges at Creative Moments and Penny’s Paper Crafty.
 Crackerbox Palace smiles, Karen

Thursday, January 9, 2014

Quilting and Stain Glass Blog Hop and Word Game


Hello blog friends!

This is so exciting!!  Wendy and Bill of Repeat Impressions  (The HouseThat Stamps Built Blog) are releasing another fabulous new stamp set called Quilting and Stain Glass and you could WIN the whole set by playing our word game.

Each Rock Star has been given a letter which spells out a secret word. All you have to do is collect all the letters on each blog along the route, unscramble them, then send the secret word to Wendy (wendy@repeatimpressions.com) and you'll be entered to win the gorgeous new Quilting and Stain Glass stamp set.  

Send Wendy the secret word no later than 5pm eastern time on Sunday, January 12th. The winner will be announced on Monday January 13th on Repeat’s blog and Facebook page.

Here is the order of the blog hop:


I made three cards with this awesome new set. I love the quilt look and the sentiments that go along with the quilts are perfect. Stained glass cards are great too, and here is a card I made featuring the stained glass look:


My letter is N. Have fun blog hopping and collecting the letters and good luck on the prize draw!

Stamping smiles, Karen


Wednesday, January 8, 2014

What If? Wed. Sketch Challenge


Happy Wednesday everyone! It's time for another fun sketch challenge at The House that Stamps Built and we are challenging you to make a card using the sketch below and link it up for a chance at some great Repeat Impressions rubber! For all the details on what you can win and to see the other Rock Stars cards using this sketch, please visit our blog.


This juggling snowman from Repeat Impressions just makes me smile. I paper pieced him and his snowballs and cut him out with an oval Nestabilities die. I started with a white card base, attached the navy pieces and then embossed the whole thing with a Spellbinders embossing folder.


Here is the sketch for you to follow when you create a card for our challenge. You do not need to use Repeat Impressions stamps to enter our challenges, but you get an extra chance to win if you do!

I am entering this card in the Anything Goes challenge at Glitter n Sparkle and the Sights of Winter challenge at 613 Avenue Create.

Stamping smiles, Karen