Wednesday, October 27, 2021

Kat Scrappiness Shaker Ornaments for Tags and Non-Christmas Card Too


As you saw in my video this week, I love to make shakers and today I am sharing easy to make shaker tags and a card made with the Kat Scrappiness Christmas Shaker Ornaments Die Set. The tags were made with an awesome Tags Essentials Die Set that gives you so many options for different tops, decorative bottoms and the holes for ribbons. The debossed background on the circle ornament tag was created with the Kat Scrappiness Stitched Winter Swirl Background Die.


Of course these ornament shaker dies do not have to be for Christmas. I did a little surgery and made a star shaker for this encouragement mini-slimline card. I even made a matching mini-slimline envelope with this awesome Kat Scrappiness die. I love the unique shape of the Happy Mail Mini-slimline die but if you prefer, there is a traditional envelope die available as well. Did you notice the "glow in the dark" part of the Moonlight Glow Sprinkles above? Just look at this: 


Isn't that cool? I got these Moonlight Glow Sprinkles from Kat Scrappiness last year for Halloween and had them stored until now. At first they didn't glow, so I asked and was told to simply place them in direct light for awhile and then check at night in the dark and sure enough, they glow lime green as you can see in this picture. 

I am entering the tags in the Anything Goes challenge at Simon Says Stamp Wednesday. 

Monday, October 25, 2021

Video - Christmas Card Countdown - Easy Holiday Shaker Cards


I love to make shaker cards and in my newest video in my Christmas Card Countdown series, I share how to make easy shaker cards like this gorgeous card:


I started with a lovely Pine Frame die from W Plus 9. I die cut out the center oval with a Kat Scrappiness Stitched Oval die and raised that up over a Clear Views transparency picture. I used glass glitter for a snowy shaker effect. 


But an even easier way to make shaker cards is to use a new product from Tonic Studios called Shaker Pockets as I show in the new video. I made this slimline card in just minutes with a snowman border die from Creative Expressions, some snowflake sequins, a sentiment strip from Simon Says Stamp and a slimline shaker pocket from Tonic Studios.


This is the easy shaker card I show how to make in the new video with an A2 shaker pocket. I started with a light blue cardstock cut just slightly less than 5 1/2 x 4 1/4 inches and embossed on the desert "sand" with sand embossing powders. The cute little Christmas Cactus stamps are from Impression Obsession. The glitter musical notes were made with dies from Dies...to Die For. After the card front was done, all I needed to do was slide it into the Tonic Studios A2 shaker pocket, fold the sides in and dump in some red and green sequins and seed beads. Here is a look at this card "all shook up": 


Do you know anyone living in Arizona or a snowbird who spends Christmas there? If so they would love this card as I know my sister will. I hope my video and these cards inspire you to give some of these ideas and products a try! 

Thursday, October 21, 2021

Sending Quilted Paper Hugs Cards


I used my new Divinity Designs Flower Petal Quilt die for spinning cards in my video this week and while the die set and extra pieces were laying on my desk, I made a couple pretty quilt cards with it. I love that all the "quilt" flower petal pieces fit in any opening (some quilts are hard to figure out with many different size pieces.) "Sending Paper Hugs" is a new favorite sentiment die from Kat Scrappiness and the rest is on the inside of the card: 


I made this peach "paper quilt hugs" card for a dear friend and she should have it by now. Paper hugs are not as good as the real thing but still should bring a smile to the special recipient's face when received. 

Tuesday, October 19, 2021

More Spinner Cards From My Newest Video


After getting inspired by Jennifer McGuire to try some easy spinner cards I decided to try to make one with a new die I just received from Divinity Designs called Flower Petal Quilt Die. The flower petals spin around the center for interactive fun as I show in my new video here. The background was created with a favorite debossing die from Altenew. The spinner is created with a circle die cut out of the middle and a button. Because I had the matching patterned circle, I used that for the top of the spinner. I used the same dies and idea on this cheerful yellow version: 


I made one more spinner card with a new circle die from Concord & 9th which I paper pieced, a wonky heart die from Kat Scrappiness, a background die from Memory Box and a sentiment die from Lawn Fawn. 

I had great fun creating spinner cards for my new video and hope my cards inspire you to try some of the ideas and products.

Monday, October 18, 2021

Video - Die Cut Crazy Series - Easy Spinner Cards Inspired By Jennifer McGuire


I recently watched a video by Jennifer McGuire in which she taught an easy way to make spinner cards and I was inspired to make a bunch of easy spinner cards with my favorite dies for a new Die Cut Crazy video. I love all the cards I created, but wanted to step it up to make a shaker spinner and this is the card I show how to make in my video here:

I am proud to share that I am now an official "influencer" for Kat Scrappiness and have used all Kat Scrappiness dies in this fun interactive Christmas card. As I show in the video I started with a square card base and added the pretty Ornament Strip die along the side. My favorite Kat S dies are the Wonky Wavy dies like I used on the sentiment strip and on the squares- they are so much more interesting that plain squares or rectangles! I show how to make the shaker spinner in the video and here is another photo showing the Shaker Ornament "spinning":


Here is another favorite of the spinner cards I share and you are going to want to watch the video here to see this one spin. I cut Lawn Fawn's Stitched Snowflake die out of holographic cardstock and it just sparkles when spun! The debossed background was created with a Kat Scrappiness Stitched Winter Swirl Background Die, "joy" is from Impression Obsession and "Christmas Wishes" is from Creative Expressions. 

Here is another pretty spinner card I was inspired by Jennifer McGuire to make. I love the Lawn Fawn Magic Iris Fall Leaves Add On and that is the part that spins. The background is copper mirror card debossed with a pretty die from Taylored Expressions and the "thank you" circle die is from Impression Obsession. The kraft "wonky wavy" circle was cut with my favorite Kat Scrappiness circle dies. 

I had so much fun making spinner and shaker cards for my new video and hope my cards inspire you to try some of these ideas and products.

Thursday, October 14, 2021

49 and Market Interlocking Panels Card


I was having fun playing with a new fun fold and with 49 and Market's Vintage Artistry Rub-On Transfers for my newest video and decided to make one more card. The beautiful pink flowers and butterfly on the front of this card are rub-on transfers from 49 and Main that easily blend right into the cardstock. 


I show how easy it is to make this fun fold in my new video this week. I added some more 49 and Main rub-on transfers, a sentiment from Sue Wilson and some designer paper to easily finish this fun card. 

Wednesday, October 13, 2021

Double Stenciling with ARTplorations Slimline Stencils


I have a subscription for slimline stencils from ARTplorations (a division of STAMPlorations) where I get 3 brand new slimline stencils for only $18.00 on a regular basis. You can choose monthly, bi-monthly or quarterly and it is such a great deal! I hadn't had a chance lately to design with my new slimline stencils, so I took a day to play and created these cards all with double stenciling ideas. The "Trees" slimline stencil from ARTplorations is one of my favorites and I first brushed on brown distress ink, then moved the stencil over and added Therm O Web Deco Foil Aged Copper Metallix for this textured look. The sentiment was created with dies from Karen Burniston.


Here is another slimline card I created with double stenciling and a pretty slimline stencil called Bloom Sprinkles. I first brushed on Mahogany Distress Ink and then added Gina K Designs Glitz Glitter Gel for this pretty sparkly look. I die cut out the shadow of the Hello die (also from Gina K Designs), raised it up on fun foam and placed back into the card front for the eclipse look and then glued on the "hello" sentiment. 


Of course we don't have to make slimline cards with slimline stencils. The A2 card above was created with inked double stenciling on the cardstock that I cut out with new Tim Holtz Leaf Fragments dies. The background die is from Taylored Expressions and the sentiment die is from Gina K Designs.

I used the same slimline stencils on both of these cards (Whimsy Leaves and Leaves All Over.) On the mini-slimline card, I brushed on orange, yellow and red inks first and then sprayed on a Nuvo gold spray for the second layer. 


I used Cosmic Shimmer Airless Misters in two colors and two ARTplorations slimline stencils to make this fun colorful card. I cut out the front and the inside with stitched slimline dies from Kat Scrappiness.

I think cutting out shapes with stitched dies adds so much interest to our cards and the wonky stitched dies are my favorite. You will see me using Kat Scrappiness dies more and more now as I am now proud to be an Influencer for them. I also like to use scraps from whatever I am working on both on the inside with these strips and on the front with the punched butterflies. 

Tuesday, October 12, 2021

More CAS Christmas Cards with Penny Black and 49 & Market


Do you like to make quick to make beautiful Christmas cards? If so you need to get some Penny Black Masterpieces Made Simple pictures as I show in my newest video here. It took me less than 5 minutes to cut out the Penny Black picture and layering dp piece with Gina Marie Designs stitched rectangle dies, sponge on some distress ink and Stickles, and attach to the cardbase. But I love this card! 


Here is another 5 minute card. I started with some lovely dp from Stampin' up cut out with the same Gina Marie Designs rectangle die. I rubbed on 4 Vintage Artistry rub-on transfers from 49 and Market and added a matching embellishment sentiment.


Here are two more cards made with the same designer paper and frame die set from Dies...to Die For. The top one frames a Penny Black scene and the bottom one has a smaller framed scene with 49 & Market deer, trees and sentiment. As with all the cards I share in the new video, these were quick and easy to make but I think the recipients will love them. 

I hope my cards and video will inspire you to give some of these ideas and products a try! 

Monday, October 11, 2021

Video- Christmas Card Countdown - East Fast Cards With Penny Black and Rub-on Transfers


I love finding products that make my holiday cards so easy to create and gorgeous and in my newest video, I share two such products and a bunch of cards I made in no time at all! 


I love Penny Black scenery stamps but confess I am no good at coloring them, so I was thrilled to find their new Masterpieces Made Simple packages of 4 gorgeous holiday scenes in sizes that layer up beautifully on our cards. I simply die cut a snowy cabin scene and a green layer with frame dies from Gina Marie Designs and layered on a gold cardbase. I added a sentiment sticker and some Stickles for a little sparkle on the snow. 


Here is another lovely CAS Christmas card made in minutes with the same frame die as above and 49 & Market Vintage Artistry Rub-on Transfers and matching accessories. 


I combined both of those products in this card I make in the video. On the front of this interlocking panels fun fold card is another Penny Black Masterpieces Made Simple snowy scene. But look what happens when the card is opened: 


I show how to make this card with more 49 and Market Rub-on Transfers in the video. I learned this fold from AntonioMakes on YouTube and here is a link to his video. I cut mine down to a 5 inch square card and here is my template as I promised to share in my video: 


Of course I show step by step how to make the card step by step in the video which I hope you will watch.

Friday, October 8, 2021

Many More Cards from the Crop and Create Delivered Cardmaking Weekend of Classes


One of my favorite sets of dies, stamps and stencils we received from Scrapbook and Cards Today in our huge box for the recent Crop and Create Delivered Cardmaking weekend was this unique Tree of Kindness set from Brutus Monroe. I made the cards above from our Lunch and Learn for upcoming special birthdays, and then made two more without sentiments for others. I added some texture to these two with a background debossing die from Taylored Expressions: 


I also loved these dies and stamps from Concord and 9th and added some interest to each of these backgrounds with a stitched die from Gina Marie Designs. The "thinking of you" die is from Creative Expressions and the layered "friend" was an extra one cut for Gina K's class with her dies. 


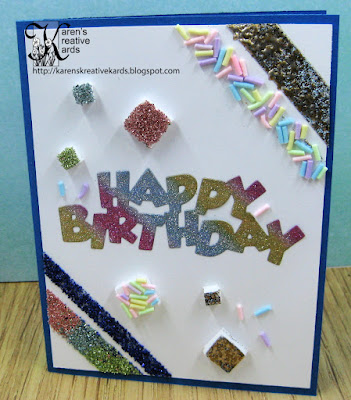
On Friday there was a whole day of Marketplace presentations about cardmaking products and one of those was done by Sue Doherty of Therm O Web. She showed Therm O Web's adhesive strips and pop up squares and inspired me to try them with embossing powder, glass glitter and Kat Scrappiness Pastel Spinkles and make this fun kid's birthday card. Here are a couple more cute birthday cards I made with a sets of stamps and dies from Doodlebug Designs and Photo Play:


And here is one more fun mini slimline card I made with extra pieces from some of the classes as well as dies from Kat Scrappiness and Karen Burniston: 


I am definitely signing up for the March 25-27, 2022 Crop and Create Cardmaking weekend and highly recommend you watch their Facebook page for more information. If you are not an alumni, the sign up starts on October 21st and this opportunity fills up fast (2400 participants this time!) Happy Birthday to me next March! 

#sctmagazine   #cropandcreatedelivered    #cropandcreatedeliveredcardmaking