Showing posts with label The Greetery. Show all posts

Wednesday, May 29, 2024

2 Ways to Easily Attach Napkins For Inexpensive Vintage Looking Cards


In my new video here I share two ways to attach napkins to cardstock before making vintage looking cards like this split front card. The center layer was cut with The Greetery's Aida Cloth Texture Plate and I die cut the napkin piece with a wonky stitched rectangle die from Gina Marie Designs. I added some Vintage Photo ink and a green strip before attaching with adhesive foam strips to raise them. 

The napkins on these cards were attached with Mod Podge in an easy technique I learned how to do at Let's Create in Wisconsin Rapids and show in the new video. Here is a book binding twisted easel card open and laying flat to mail I made with that way of attaching napkins:


I show a second way to attach napkins in the new video which is even easier and my favorite, so be sure to watch for all the cards and techniques.


Wednesday, August 30, 2023

More Sew Special Slimline Cards with The Greetery Dies and Stamps


I saw the new Notionable die set from The Greetery with the tomato pin cushion and had to buy it immediately because of the wonderful memories of my Mom at her sewing machine with the pin cushion always beside her. I loved the stitched SEW stamp too and this is the first card I designed with them. I created the textured background with Altenew's Rustic Linen stamp and added some other die cuts from the die set and the word "loved" cut with an old alphabet die set. This card is for my sister's upcoming birthday and I know she will smile with those same memories. Here is a look at the inside of this card with a stamp from the Altenew stamp set:


After I bought those sets and made this card, I saw a video from The Greetery with the Aida Cloth Texture Plate and the Stitched Sentiment Dies and I placed a second order for them. The Greetery's fantastic service meant both sets came within just a few days, and I created 5 cards that I share in my newest video here. All of the cards are slimline, and here is a mini-slimline thank you card I made:


The Stitched Sentiments Stamp Set has so many clever sewing related sentiments and this card says: "Thanks Doesn't Cut It" with a scissors that can open and close. The mini-slimline dies are from a set by Karen Burniston. Here is another slimline card I made and share in the video:


This thank you slimline card has an oval wooden frame that lifts up to share a handwritten message in. I love how all these cards turned out and know I will be spreading smiles and memories when I send them out to special people and sisters. 

I am entering the first card in the Anything Goes Challenge at Simon Says Stamp Wednesday.

Monday, August 28, 2023

Sharing Sewing Memories on Special Slimline Cards


The memory of my mother at her sewing machine with her red tomato pin cushion brought a smile to my face when I saw the new Handiwork Collection release at The Greetery. I knew I wanted to share those memories with my sisters, and immediately bought that die set as well as several others in the release and am featuring them in my newest video here.


This is the slimline fun fold card that I show how to make step by step in the video. My favorite die from the collection is the tomato pin cushion as I can see it in my memory of my Mom at her sewing machine. I do not sew with a sewing machine, but did do counted cross stitch on Aida cloth, and the new Aida Cloth Texture Plate from The Greetery brought back those wonderful memories too. The scissors in the Notionable die set look so realistic and can be opened and closed if made with a brad as I show. Here is a look at this fun fold slimline card opened:


The scalloped stitched rectangle dies used are from Gina Marie Designs and Karen Burniston. Here is another slimline fun fold card I share in this video:


The tomato pin cushion, movable scissors, thimble, pins with colored heads in a pin holder, needle and thread as well as the spool of thread are all from the Notionable die set at the Greetery. This easel card also features the Aida Cloth Texture Plate which I easily extended for the slimline size, and the Stitched Sentiment die and stamp sets. I know my sister is going to love this birthday card! 

The new video also shows many other slimline cards I made with the wonderful dies and stamps in this release at The Greetery, and I hope my cards will encourage you to try some of the ideas and products for yourself!

Wednesday, April 12, 2023

More Spirelli Thread Art Cards


This is one of my favorites of the cards I made for my newest video featuring Spirelli string art with newer products such as pinwheel dies and metallic thread. The more detailed pinwheel dies on the center pieces are from The Greetery and the sentiment dies are from Spellbinders. I love this copper and blue color positive and negative combination! 

 
This Spirelli Christmas wreath was so easy and fun to make using two Spellbinders scalloped dies that I am going to teach how to make this card in a local Christmas in July class where I have students of every level of experience.


The circular spirelli embellishments reminded me of flowers so I made this slimline card with an embossed stems and leaves background and 4 string art circles with various dies and strings. 

I had great fun making these cards with a forgotten technique that I did years ago and now updated with today's products for my newest video here.  

Wednesday, December 28, 2022

More Non-Christmas Cards Made With Christmas Dies and Embossing Folders


I couldn't resist many of the new Christmas dies from The Greetery but when I got them my Christmas cards were done. I didn't want to put them away until next holiday season so I used them for cards for the New Year showing ways to stretch the use of Christmas dies for my newest video here. I made this slimline card with The Greetery's Round About Winter Foliage and Small Stripes Ribbon Maker as well as their Paper Ribbon. 


Isn't this Penguin Mug card adorable made with dies from Pixie Dust Designs? I used new Christmas embossing folders from Sizzix and Simon Says Stamp as well as layered stencil sentiments and matching dies from Pinkfresh Studios:


In the new video I also shared this idea for making a paperweight to set on liquid glue as it sets with the large acrylic blocks we no longer use since getting stamp positioners:


To see many more cards made with Christmas dies that are not Christmas cards and a fun fold,  watch my newest video here. Happy New Year! 

Monday, December 26, 2022

Design with Christmas Dies Into the New Year!


I am done with Christmas cards, decorating and shopping for this year but have a bunch of Christmas dies and embossing folders I haven't played with yet. There is no law that says we can't make cards well into the New Year with our Christmas dies, right?  I share many such cards and a new fun fold in my newest video here. 


I learned how to make an A2 Bridge Card with a Window from Frenchie in her tutorial here. I used my new Frosty Corners and Small Stripes Ribbon Maker from The Greetery along with a sentiment die from Sue Wilson on this A2 Bridge Card with a Window. Here is a look at the back of this bridge card where I will sign and write a message:


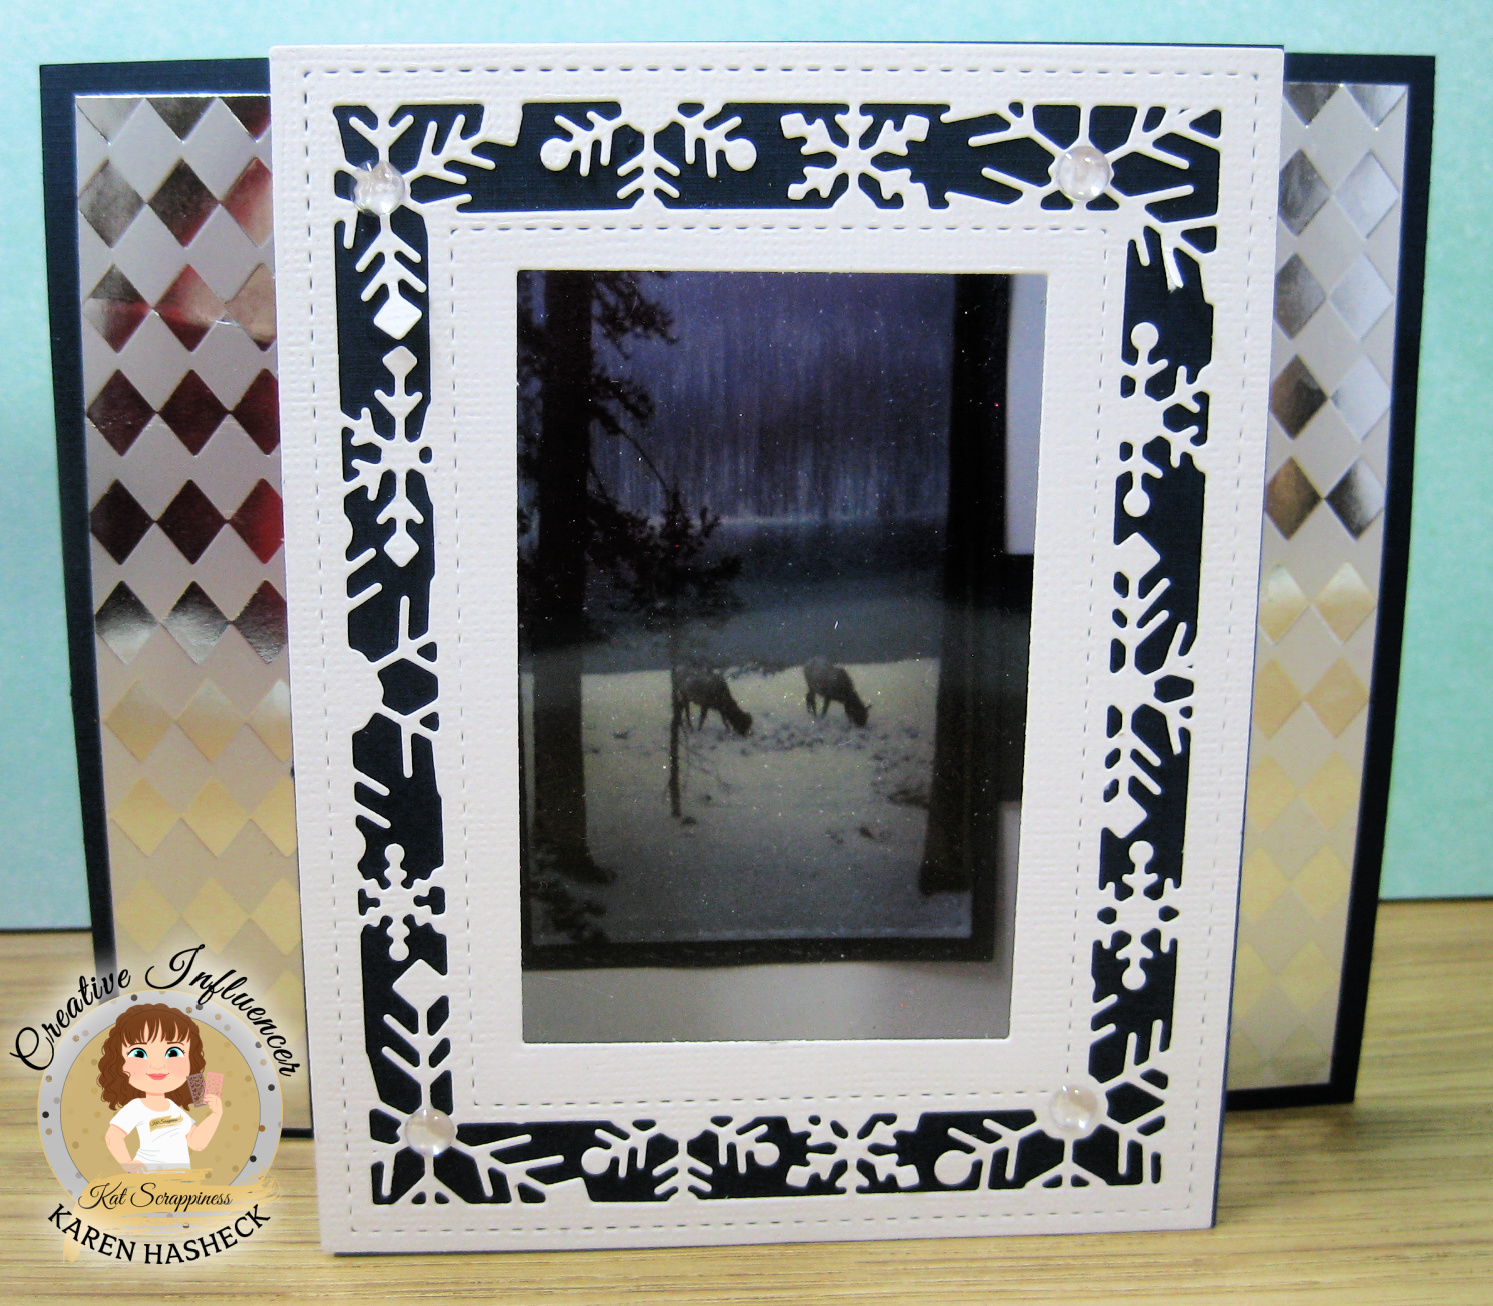
I really wanted to use a larger Snowflake Frame Backdrop Die from Kat Scrappiness on a Bridge card with a Window, so I adjusted the size to accommodate that die as I show in the new video:


Inside the pretty snowflake frame is a Clear Views Transparency from The Mark - It Place I purchased at Let's Create in Wisconsin Rapids. In the new video I show how to make another size of this fun fold step by step illustrating how we can adjust fun folds to accommodate the dies we want to use. 


The beautiful Clear Views Transparency snowy scene is framed by Penny Black's Snowflake Frame and I added patterned mirror card strips and a snowflake also from Penny Black. Here is a look at the back of this Bridge Card with a Window I show how to make in the new video:


The stenciled "Birthday Wishes" was made with a layered Brushed Sentiments stencil and matching die set from Pinkfresh Studios. Here is another version of this size of bridge card with a window that I made with the same products:


Of course all of these cards could be Christmas cards with the right sentiments but I wanted to show how to use Christmas dies in to the new year and needed some special thank you and birthday cards. 

I hope my cards encourage you to watch the new video and give some of the ideas and products a try. 

Wishing you all a healthy and joyful New Year!

Monday, May 9, 2022

On The Edge Cardmaking With Edger Dies and Patterned Papers


I recently discovered the Made To Surprise Creative Cuts Collection by Sam Calcutt at the Paper Wishes website and had so much fun creating cards with these edger dies and patterned paper for my newest video! There are so many ways to create unique cards with these edger dies and I share many tips for cutting them in the standard 6 inch platforms on most die cutting machines. The easiest way to add unique borders on a card is to simply cut, tuck and attach a strip of two sided paper as I did in this card I made in the video:


All of the two sided patterned paper on my cards in the video are from 6 x 6 paper packs available here at Paper Wishes. This paper pack is called Blue Persuasion and I cut the strip on the side with the Tall Arrows Creative Cuts die. I also show how to make the floating elements circle in the video which I attached over an embossed background. The sentiment die is from Tonic Studios and the leafy sprig die is from Gina Marie Designs. 


These edger dies from Made To Surprise can be cut in the center of a piece of two sided paper and folded in half to create a unique border on our cards. I made two mini slimline cards that way with 6 x 6 paper which does fit through my diecutting machine. I again used the Tall Arrows set on the card above and added a bow and sentiment from The Greetery on both cards. I also created a blue mini-slimline envelope with a die from Kat Scrappiness. The mini-slimline card below features the Circles Creative Cuts die on the edge:


I love how these cards turned out and show how to make them as well as many other cards with edger dies in my new video here. I hope you find time this week to play and be creative and then send some joy out into the world. 

I am entering the 3rd card in the Feminine challenge at Simon Says Stamp Wednesday. 

Thursday, January 28, 2021

Layered Stencil Fun Fold Cards and Giveaway Reminder


I love this layered love easel card created with a new layered Bokeh Hearts Stencil set from Newton's Nook with the second layer of hearts done with white pigment ink for a true bokeh look. I added another layer on this card with a beautiful A Colorful Life Designs stencil called Heart Hug and Iridescent Glitz Glitter Gel from Gina K Designs and Therm O Web. The "I Love You" is also a stencil from A Colorful Life Designs called Lovely Words. This card and many others with layered stencils and fun folds are featured in my newest video here.


This is the front of my seasons four fold card I learned how to make in this video tutorial. The layered season words shown are dies from Dies...To Die For. Here is why I call this a seasons card:


Can you just see Spring, Summer, Fall and Winter in the layered trees created with a stencil set from The Greetery called Fir and Foliage 1? Just beautiful and easy to create with layered stencils. Thinking of You is a die from Sue Wilson. 

I had so much fun creating fun fold cards with layered stencils and you could win a complete Pinwheel layered stencil set and matching stamp set from The Greetery and me by commenting on my newest video per instructions in the video before February 14, 2021. 

I am entering the first card in the Anything Goes challenge at Simon Says Stamp Wednesday.

Monday, January 25, 2021

Video - Cardmaking Ideas With Layered Stencils and Fun Folds and Prize Giveaway!


Stencils are great for creating unique backgrounds on our cards and in my newest video, I share many fun fold cards made with layered stencils from favorite companies of mine. 


I learned how to make a Vertical Easel Fun Fold card from this tutorial on Splitcoast Stampers  and this was the first one I made featuring a Layered Leopard stencil from A Colorful Life Designs. The amazing sentiment box die is from Impression Obsession and moves back and forth. Here is a look at the inside of this card where you can see the texture of this stenciled background with colors of brown and black Metallix Gel from Deco Foil. 


I decided to step up this new fun fold and make the front piece that moves back and forth into a shaker and this is the card I show how to make from start to finish in the video. The background on the scored front was created with a Layered Dots stencil set from A Colorful Life Designs, peach ink and Turquoise Sea Glitz Glitter Gel from Gina K Designs and Therm O Web. Because of the dots theme, I chose a Rectangle Dots Layer Die Set from Birch Press Designs for my shaker frame and on the inside of the card too:


The sentiment dies on the front and inside are all from Dies...To Die For at Shop Scrapbook101.com. To see how fun and easy it is to make this card and how the seed beads move in the shaker box, be sure to watch the new video here


I am featuring Pinwheel Party Stencils and the matching die set from The Greetery on this simple Backwards Fold fun fold card. The pinwheels sparkle with a second layer of Glitz Glitter Gel from Gina K Designs and Therm O Web. Here is a look at the fun fold I learned how to make in this blogpost


I created more colorful pinwheels so easily with the brilliant layered Pinwheel Party stencil set from The Greetery on the inside fold of this card, and you could win your very own Pinwheel Party Stencil Set and matching stamp set by commenting on my video here following the instructions in the video. You have until February 14th, 2021 and must have a USA mailing address to qualify to win this prize from The Greetery and me. 

I also share many other cards in the new video with layered stencils and fun folds, so be sure to watch the new video here. 

I am entering the first card in the "Make your own Background" challenge at Simon Says Stamp Wednesday.