Tuesday, July 30, 2019

More Taylored Expressions Sarcasti-Chicks Cards From My Newest Video


In my newest video here, I share many funny Sarcasti-Chick cards with fun folds and little or no coloring. Last week's video showed how to make A2 cards with this fun arrow fold, and this wine lovin' chick is made out of Deco Foil's yellow Flock Transfer Sheets so she is soft and textured with flock and I didn't have to color her. I did a little paper piecing too on her hat and top. When the card is opened, the recipient will laugh at another Taylored Expressions Sarcasti-Chick sentiment:

In the new video I show the best way to paper piece and promised to share another card made with the Mama chick I made. 

Poor Mama Chick used to be a redhead but now is all grey keeping up with the chicklets. Check out the lol sentiment on the inside from the same Sarcasti-chicklet stamp set from Taylored Expressions: 

Ha Ha! I love making cards that will make the recipient laugh and hope you enjoyed my no coloring funny cards in the newest video too.

Monday, July 29, 2019

Video - Fun Folds, Sarcastic Chicks and Little or No Coloring


I love fun folds and using humor in my cards, but I have to admit I do not like to color or shade. I avoid coloring my stamped images, but in my newest video here I share three different ways to add color to our stamped images and three different fun folds with Taylored Expression's Sarcasti-Chick stamps. Here is the fun fold Sarcasti-Chick card I show how to make in the video:

I "colored" my Mama chick using inks and smaller make-up brushes and attached her to a pull Sunny Studio Sliding Window door. On the door you see Mom, Mom, Mom over and over and when the pull tab is pulled:

That sentiment from Taylored Expression's Sarcasti-Chicklets set is just hysterical! Click on the picture to make it bigger or watch the video on how I made this card with these awesome stamps and the Sunny Studio Sliding Window die.


I also share this birthday tri-fold card in the new video and my favorite way of "coloring" my stamped images - paper piecing. Mama Chick is a fun polka-dotted yellow and her apron is blue checked and I could never do that with markers or other coloring mediums. 


The Taylored Expressions chicklets and balloons (cut with Karen Burniston dies)were all paper pieced with scraps of designer papers. Happy Birthday on the top was made with an older Martha Stewart punch. To see how easy it is to "color" with paper piecing and other ways, watch the new video here. 

Thanks for your visit here and for your support of my YouTube channel and videos too! 

Thursday, July 25, 2019

Video - Easy and Elegant Christmas Cards with Clear Views Christmas in July Video Hop


Do you know what is 5 months from today? Christmas! I am so happy to be joining some crafty friends for a Christmas in July Video Hop and if you hop along, you can get ideas for your Christmas cards and maybe win some fantastic prizes! If you are the lucky commenter on my video here, you could win three Christmas dies from Tonic Studios and the card I create in the video! (USA mailing addresses only.)
In my video I am sharing how easy it is to use Clear Views Transparencies and favorite dies to make easy and elegant Christmas cards. I purchase my Clear Views Transparencies at Let's Create and if you wish they will also add sticky back paper so the clear views picture is super easy to attach to glittery or other paper. If you click on the link, choose the Clear Views you want and then call the shop at 715-424-1343 to complete your purchase. I show how to make this card in the video so click this link to watch and be sure to comment for a chance to win. Here is a picture of old St. Nick close up with his sparkly background: 


The ornament die is from Quietfire Designs and Merry Christmas is a die from Tonic Studios. Here is another card I share in the video: 


As I show in the video it is so easy to put a pretty Clear Views Transparencies on a glitter card, frame it with a die cut and add a sentiment. Here is another example doing just that:


The sentiment dies are from Tim Holtz and Creative Expressions and the frames are from Lil' Inker Designs, Memory Box and Gina Marie Designs. To see all these cards and how they were made, watch the Christmas In July Video Hop video here and be sure to leave a comment for a chance to win my prize. Then hop on the video hop for more inspiration and prizes!

Tuesday, July 23, 2019

A2 Sized Arrow Fold Cards with Tarnished Foil Embossing from My Two Most Recent Videos


The cards I am sharing today combine the arrow fun fold I share in this week's video along with the updated tarnished foil technique from last week's video. I wanted to make my arrow fun fold cards in the A2 size so I figured out the measurements to use and share them in the new video here.

I embossed Tonic Studio's new copper foil sheet with a 3D Sizzix Tim Holtz foliage embossing folder and applied embossing powders as is done in this double embossed technique. I added a punched copper flower and some pretty gems from Gina Marie Designs. Here is a look at the inside of this arrow fold card with a "thinking of you" die cut sentiment from Creative Expressions:


My second card again combines the arrow fun fold, tarnished foil, a 3D embossing folder and favorite dies. I used to only use aluminum foil for the tarnished foil technique but now can make gorgeous backgrounds starting with Tonic Studios copper and gold shades of foil card. They have pretty silver foil too. The 3D leaves embossing folder is from Sizzix and the leafy flourish die is from Cheery Lynn Designs.

On the inside of this arrow fold card I stamped a thankful sentiment from Gina K on a Gina Marie Designs leaf. If the A2 arrow fold intrigues you, find out how easy it is to create this look by watching my newest video here. And if you missed last week's video on updated looks using the Tarnished Foil technique, watch this video.
Monday, July 22, 2019

Video - How to Make Easy A2 Sized Arrow Fold Cards


I was reminded recently of the fun arrow fold after watching a video by Mixed Up Crafts and decided I wanted to make my arrow fold cards in the A2 size. I played around with the measurements and in my newest video, I share a template and many samples of A2 sized arrow fold cards.  
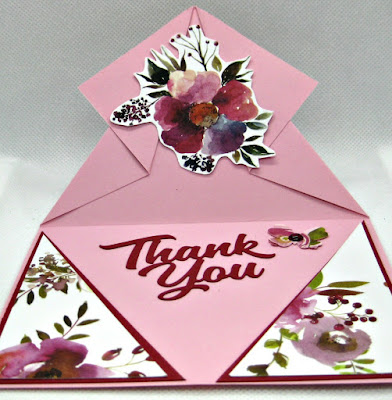
I love the look of Altenew's wide washi tape and I used the Floral Flurries wide washi tape to create the floral triangles on this card as shown in the video here. Here is a look at this arrow fold card on the inside:

I cut out a pretty floral image from the washi tape covered cardstock and added a butterfly and a thank you message cut with a die from Karen Burniston. 

In the video I also share this card with another Altenew wide washi tape over blue woodgrain cardstock. I punched some flowers out of the washi tape covered cardstock for some pretty highlights on the "wings". 

When I was making these arrow fold cards for my video I needed some special cards for thank yous so I used the pretty thank you die from KB again. I like to add something to the top inside of the arrow fold so this time I added a floral circle die cut with a Gina Marie Designs stitched circle die. 

It is not hard to make these unique fun fold cards in the A2 size and you can see the template, instructions and many samples by watching the new video here. Thanks for your visit here and for watching, subscribing and sharing my videos and for helping me #share the joy of creativity! 

Friday, July 19, 2019

First Train Pivot Panel Card With Karen Burniston's New Dies

I love to make cards for kids especially my grandsons and so the first cards I made with this fabulous new die release by Karen Burniston were cards for them. My grandson Evan loves loves loves trains and so the Train Pivot Panel and Train Elements die sets are perfect for cards for him. The front of this square card features some of the dies in the Train Elements set. But as with most of the cards made with KB dies, the real magic happens when the card is opened: 


The train pops up and has a pig engineer (made with the new Chicken, Pig and Lamb and Tiny Accessories 3 die sets). There are 4 cars and an engine on the pivot panels. I added "Evan's Love Train" with alphabet dies from Spellbinders and some punched hearts. 


I am busy designing more cards with this fabulous release and will share some videos soon.

I am entering this card in the Anything Goes challenge at Scrapy Land.

Thursday, July 18, 2019

Rainbow Bridge Cards with Waffle Flower and Tarnished Foil Technique


I recently purchased a stamp and die set from Waffle Flower that is just perfect for sympathy cards when a beloved pet passes over the rainbow bridge. I know that poem and the cards sent to us when we lost our Lucky meant so much. As I show in my newest video here, I created the rainbows on both of my rainbow bridge cards with many colors of StazOn and embossing powders. My cat sympathy card features a hearts embossing folder from Darice. On the inside I stamped a perfect sentiment from the Waffle Flower set and added a pet love die from Kat Scrappiness:


I used the same colors and technique on my puppy Rainbow Bridge card and chose a pawprints embossing folder from Darice. Another perfect sentiment and pawprint heart are on the inside of this card:
I had fun playing with the Tarnished Foil technique again to make the cards I shared in the video and here on my blog this week. It is fun to revisit older techniques and update them with newer products. I hope you give it a try!

I am entering the 2nd card in the Make Your Own Background challenge at Simon Says Stamp Wednesday.

Wednesday, July 17, 2019

First Triple Flip Card with New Karen Burniston Dies


I just received all the fantastic new dies in the latest Karen Burniston release and couldn't wait to start playing with them! The first card I made (after watching her die assembly video which you want to do for every one of her die sets!), I made this card for my grandson's upcoming birthday with the Triple Flip and the Space Charms Die Sets. The "hey dude" is an older stamp from Kim Hughes. Just watch what happens when the recipient pulls on the arrow:

The panels flip over - isn't that cool? I love interactive cards and this Triple Flip die set makes that so easy! The space man is from the Space Charms die set and the "Happy Birthday to you!" is also from Karen Burniston. "You Rock" is from an older stamp and die set from Die-Namics. I decided not to have an opening card base but will put our personal birthday message on the back:

Celebrate Big and the Stitched Rectangle dies on the back are from Cutplorations. I love all the new dies in the recent Karen Burniston release and will design some more cards for several videos as soon as I can. 

Tuesday, July 16, 2019

More Tarnished Foil Beauties from My Newest Video


Now that I have many more color options for the foil as well as for the StazOn and embossing powders, I have found I love the look of Tarnished Foil even more. I share all those options and many cards in my newest video here. I created the background on this masculine card with gold foil from Tonic Studios, a SU trees embossing folder and greens and browns in the StazOn and embossing powders. The deer die is from Tim Holtz and the frames were created with dies from Lil' Inker Designs.

I embossed both the gold foil and the green cardbase on this card with a Sue Wilson embossing folder and the sentiment die is also from Sue Wilson for Creative Expressions. I streaked the gold foil with orange, green and brown StazOns and the embossing powders were gold and green as well. I added some sticker gems to highlight the embossing. 


It is difficult to photograph the tarnished foil pieces to show the sparkle and beauty of the colors and textures. This card was created with an embossing folder I got once with a stamping magazine and I used blues and black in the StazOn and embossing powders. The frame and sentiment dies are from Karen Burniston and the shells were created with an Impression Obsession die set. 

I am hoping these cards inspire you to watch the video here and try some tarnished foil with the colors and foils you own. Remember if you do not have colored foil paper, you can use heavyweight aluminum foil as I show in this older video here.

Monday, July 15, 2019

Video - Tarnished Foil Technique Updated with New Foils and More Colors


 One of my favorite all time techniques is the Tarnished Foil (or Heat and Dry Foil Embossing) Technique and I decided to revisit it with new foils from Tonic Studios, new embossing folders and powders and more colors of StazOn for my new video here. I had so much fun playing I share 8 new cards in the video. This is the card I make in the video:


It is much prettier and more sparkly IRL as I show in the video. I used Tonic gold foil, a Sizzix embossing folder, and red and blue StazOn. I added Nuvo red, blue and sparkly gold embossing powders and red glitter stars cut with a Crealies die set. On the inside of the card I added a couple more Crealies stars and Celebrate from Tonic Studios:


I love how this card turned out with a swinging half door created with gold foil, a 3D wood grain embossing folder and the Tarnished Foil Technique. The large fern die is from Penny Black and continues on the inside of the card. The thank you circle was created with an Impression Obsession die. 

I hope you will watch the video here and be inspired to try some tarnished foil pieces yourself!