Wednesday, March 30, 2022

Even More Monochromatic Cards From My Newest Video


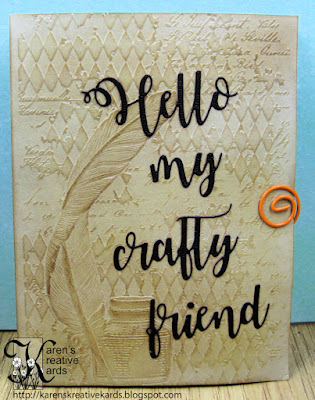
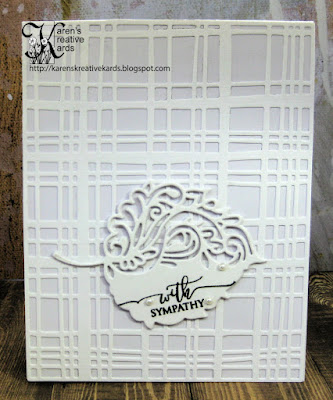
White on white cards may seem boring but they don't have to be when extra texture is added with a background die and the focal point is raised up to stand out against the monochrome background as I show on this card from my newest video. I had so much fun creating tone on tone cards for the new video, I have shared many 5 minute cards Monday and Tuesday on my blog as well. The background die on this card and many from the video is the new Tim Holtz Sizzix Simple Plaid Background die. I cut several of the leaves using a die from Gina Marie Designs, layered them together for height and stamped a pretty "with sympathy" from Gina K Designs. 


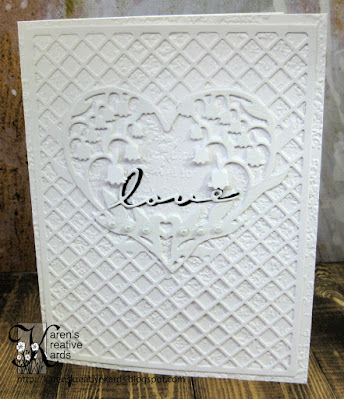
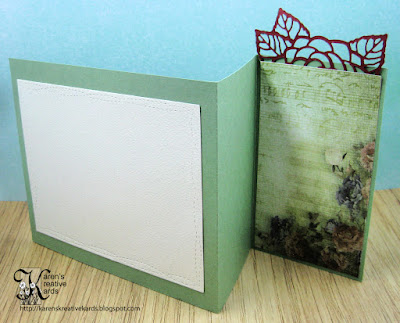
Here is another lovely white on white card featuring a beautiful cover die from Tutti Designs called Lily Heart Panel. The scripty "love" die is from Karen Burniston.
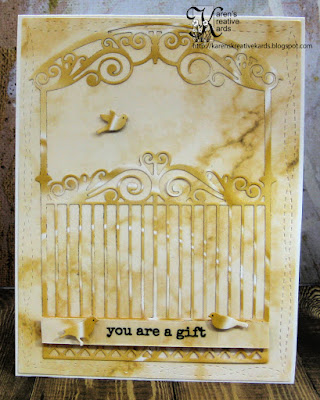

My last 5 minute monochromatic card from the new video features a lovely Arched Garden Gate die from Paper Wishes and more of the marble designer paper from Stampin' up. The clear sentiment sticker is from STAMPlorations. 


Tuesday, March 29, 2022

Monochromatic Masculine Cards For the Celebrating Parents Card Drive at Altenew


Monochromatic cards are perfect for masculine cards as I show in my newest video and I created the cards in this blogpost specifically for guys as part of the Altenew Celebrating Parents Card Drive. Here is a brief explanation of this great cause from their blogpost:

"Mother's Day and Father's Day are approaching, and this can be a difficult time for seniors who are in nursing homes or shelters. We want these important people to feel loved, celebrated and honored, so we have organized the Celebrating Parents Card Drive."

Altenew is collecting these cards until April 20, 2022. I will be sending a bunch of my cards for both men and women to the #AltenewCardDrive including those shown here today. All of these cards feature the new Sizzix Tim Holtz Simple Plaid background die. Here is the card I made in the new video here


I cut the plaid background diecut down for this card and embossed the whole card with a SU 3D embossing folder. The fishing dies are from a set called Gone Fishing from Gina Marie Designs. Here is a look at the inside of this card and another in greys and blacks:


To see how easy this card was to make and many more cards, watch the new video here. And if you have any extra masculine or feminine cards you could share for seniors in nursing homes, please read this blogpost and consider sending them to Altenew to cheer someone with your handmade cards.

Monday, March 28, 2022

5 Minute Tone on Tone Cards


5 minute easy to make cards with monochromatic colors do not have to be monotonous or boring! Choose the right papers and of course dies (if you are die cut crazy like me) and you and your recipient will love the results! 

All the cards in this blogpost and in the first card I made in my new video feature the new Tim Holtz Simple Plaid background die from Sizzix and two sided marble paper from Stampin' up along with favorite dies. I make the blue version in the video in less than 5 minutes and share the purple one as well:


The acetate butterflies are from a set called Jewel Acetate Butterflies from Paper Wishes and the layered hello die is from Gina K Designs.


I think the grey version is my favorite with the marbling really showing in the plaid background! The sentiment die is from Sue Wilson and Creative Expressions and the leafy sprig is from Simon Says Stamp.


Wouldn't a set of these cards make a great gift? And these are just a few of the many tone on tone or monochromatic cards I share in the new video. Of course I didn't just stop at using these papers or that one die, so you will want to watch the video to see more 5 minute monochromatic cards. 

Thursday, March 24, 2022

Facebook Live Masculine Wiper Card


This is the card I made this morning on my Facebook Live at Karen's Kreative Kards and I just have to say it is so much better IRL especially to see the interactivity of the secret message that pops up when the card is opened. I showed how easy it is to make this masculine wiper card with a kit from Photoplay and gorgeous Foggy Forest papers and dies from Paper Wishes. Here is a close up of the card with the surprise message up and another view:


You could win this card if you watch the Facebook Live on replay and leave a comment and if you live in the USA. Good luck!

Wednesday, March 23, 2022

Easy To Make Wiper Card (from a card kit) With Altenew Flowers


In Thursday's Facebook Live I am going to show how to make an easy wiper card using another card kit this time from Photoplay. I have tried to make wiper cards before but always struggled. The kits give you the exact pieces cut and scored to make the most complicated interactive cards super easy. Here is this card with the "wiper" up:


Of course it is much more effective to see the motion as the card is opened, so be sure to watch the Facebook Live here on my Facebook Page at 11:00 a.m. CDT tomorrow or on replay and you could win the card I make (with gorgeous Foggy Forest papers from Paper Wishes!) 

I made this gorgeous floral wiper card with a 3D embossing folder and layered flower die from Altenew. The sentiment that pops up when the card is opened was cut with a die from Sue Wilson and Creative Expressions. 

Tuesday, March 22, 2022

Two More Easy Inexpensive Fancy Fun Fold Cards


Hello my crafty friend! This card has a pretty front with embossing and a favorite sentiment die from Kat Scrappiness. But of course when the card is opened, the real fun happens: 


A paper kit at Paper Wishes called Book Pop-out that costs only $5.00 does all the cutting and scoring to make this impressive pop out fun fold on this card. I decorated all the pop out pieces with vintage Transfer Me transfers. This and the next card were shared in my newest video here.


Here is another fun fold card from the video with a pretty Sizzix butterfly and Happy Birthday sentiment cut with a die from Karen Burniston. But of course the real magic happens when the card is opened: 


This card kit is called Tunnel Card and all the cutting and scoring is done to make this fun inside piece for this slimline card. I chose to have some butterflies dangle in the opening and decorate with 49 & Market Vintage Artistry rub-ons. 

I had great fun playing with the blank fancy fold card kits at Paper Wishes and encourage you to take a look because there are many more there I think would be fun to design with.

In my Facebook Live this week on Thursday I am going to share another pre-made fun fold card kit to make an easy wiper card and use more of the gorgeous Foggy Forest paper I showed yesterday so be sure to check that out!

I am entering the first card in the Favorite Things challenge at Simon Says Stamp because fun folds are my favorite thing to do:)

Monday, March 21, 2022

Fun Fold Cards So Easy and Inexpensive With Kits From Paper Wishes


Do you love to make fancy pop up interactive fun fold cards but struggle with either the cost of a fancy die set or the intricate instructions to do it without the die? I certainly do! I found an inexpensive way to make fancy fun fold cards at the Paper Wishes website here. They sell many kits of cards with the hard work of cutting and scoring perfectly already done for us, and I feature several of the kit in my new video here


My favorite of the fun fold kits is the Peek-A-Boo or Shutter kits. We get all the pieces perfectly cut and scored so all I needed to do was decorate the card. Here is how the inside looks when the shutter is opened: 


I have struggled to make shutter cards before but this one was so easy as I show in the new video here. All the gorgeous scenery paper you see is part of a 6 x 6 paper pack from Paper Wishes called Foggy Forest. I used a favorite stencil from A Colorful Life Designs called Cloud Edger to add clouds in grey and tones of green on the areas not covered with the Foggy Forest paper. The sentiment is a Dazzles sticker from Paper Wishes. 


Here is another shutter card I made easily with the Peek-A-Boo card kit. The beautiful scenery designer paper on this card is from Stampin' Up as is the sentiment stamps and the sailboat punch. Here is a look at this card when the shutters are opened:


The white spaces on this card were decorated with 49 and Market Vintage Artistry Rub-ons from the Beached collection. 

In the new video I also show cards made with two more fancy fun fold kits from Paper Wishes and how easy these cards are to make. 

I am entering the first card in the Favorite Things challenge at Simon Says Stamp because fun folds are my favorite thing to do:)

Friday, March 18, 2022

Facebook Live Bridge Card with Tonic Header Dies and Paper Wishes Romantic Florals Paper


I love how this bridge card turned out and you can still watch me make it and maybe win it by watching the Live video from yesterday (3/17/22) here on my Karen's Kreative Kards Facebook page, and leaving a comment before 3/23/22. Here is another view of the bridge card I made:


Isn't that paper gorgeous? It is from a 6 x 6 pack called Romantic Florals by Hot Off The Press at Paper Wishes. The beautiful "congratulations" sentiment die and the rose header dies are from Tonic Studios. I cut two of the roses and couldn't decide where to put the second one, but I decided to put it on top of the first fold in the bridge card. That may have been a mistake because then the card I made did not fit into a 5 x 7 envelope or a 6x6 square envelope which were the largest I own. But I solved the problem by making my own envelope in my WeRMemory Keepers Envelope Board. I am going to make a video soon using the Envelope Board again, but I can share that if you take a 12 x 12 piece of lighter weight patterned paper and use the score line of 4 7/8" on all sides, it makes an envelope just big enough to mail this card perfectly (6 1/2" x 6 1/4".) Whew! 


Here are the view of the card from the back (where I did add another piece of the lovely patterned paper over the bottom of the back of the rose header die as I said in the Live) and also the template picture I promised to post. As you can see you can choose to put the bridge on the top or bottom and also make the bridge piece a little taller or shorter than the 1 1/2" on the template. 

I hope you like the card I created in this week's Live on Facebook and will watch it on replay and leave a comment for a chance to win it (USA mailing addresses only please.) I also shared some new and exciting cardmaking products I will be playing with soon. 

I am entering this card in the Favorite Things challenge at Simon Says Stamp because fun folds are my favorite thing to do:)

Tuesday, March 15, 2022

More Tonic Studios Header Dies and Dress My Craft Transfer Cards


In my newest video I share many fun fold cards featuring Dress My Craft transfer images and Tonic Studios header dies. I learned how to make this triple easel card from this tutorial, and it is a perfect fun fold to highlight both of these awesome products! The header dies stand up off the top of the easels and the floral transfers become part of the cardstock with just a little water and pressure. Here is a look at this card from a different angle:


Bridge cards are another fun fold that is easy to make without any fancy die sets and highlight the Tonic Studios header and sentiment die as well as the gorgeous transferred images. Here is another view of this card:


In my Facebook Live this Thursday on my Karen's Kreative Kards Facebook page, I am going to show how to make another type of bridge card with more of the header dies in unique ways and you could win the card I make just by watching and commenting either live or on replay before next week's Live. 

Monday, March 14, 2022

Headliner Cards With Just Water, Transfers and Tonic Studios Header Dies


Have you tried Transfer Me transfers from Dress My Craft? I recently discovered them and in my newest video I am showcasing them with some gorgeous Tonic Studios header dies to create a bunch of fun fold cards! 


I make a version of this z-fold card in the new video using beautiful Transfer Me transfer flowers that become part of the cardstock with just a little water and pressure. The sentiment and floral header dies are from Tonic Studios and are part of a bundle I purchased with three sets of header dies, two packages of cardstock, some pop dots and Crystal Drops. (The bundle is a bargain, but you can buy the die sets separately if you prefer.) The z-fold and layers were cut easily with a die set from Divinity Designs. Here is another look at the card from the inside:


Of course fun fold cards can be made with and without die sets to cut the pieces and I show both kinds in the new video. The fun flaps card was cut with a die set from Karen Burniston called Flap and Frames. I covered two of the flaps with a large butterfly transfer and added more transferred butterflies throughout out the card. The Tonic Studios rose header pieces hold the top and bottom flaps in place until the card is opened:


The frame die cuts were cut with dies from the same Karen Burniston set and the beautiful sentiment die is from the Tonic Studios header die set. To see more fun fold cards featuring the Transfer Me transfers from Dress My Craft and Tonic Studios header dies, watch the new video here.