Thursday, January 31, 2019

Happy Birthday Cards with Spellbinders Grand Dome Die Set

I had so much fun making cards with some new 3D Shadow Box die sets for my newest video that I didn't want to stop.  One of the dies sets I feature in the video is the Grand Dome 3D die set from Spellbinders. Spellbinders also sells additional die sets that fit in the Grand Dome 3D cards and I am using the Layered Happy Birthday set on today's cards. Here is a view of this colorful birthday card from the side:


These Spellbinders die sets can also make lovely flat cards like the one I did here:

I created the dome shaped card base using the Spellbinders main die and just trimmed off the side hinge pieces. The front is a decorative piece cut with that same die set out of Tonic Studios Imperial Blue mirror card over some pretty patterned paper with some pearls to accent it. The center is cut out with a circle die to show the decorative Happy Birthday die cut with more pearls and mirror card. 

I hope my card samples and new video convince you to give one or both of these die sets a try and you have fun making 3D Shadow Box Cards.

I am entering the first card in the Anything Goes challenge at Simon Says Stamp Wednesday.

Tuesday, January 29, 2019

More Sizzix and Spellbinders 3D Shadow Box Cards


I love 3D stand up cards and in my newest video, I show how to make shadow box cards with new dies from Sizzix and Spellbinders. I made this 3D water scene with the Spellbinders Grand Dome 3D card die set. Can you see the totally realistic water in the background of this card? I stamped that with a new Multi-Step stamp set from Kitchen Sink Stamps called Ocean Waters. The sentiment dies and some of the ocean critters were cut with dies from Karen Burniston. Here are some more views of this card from the side, folded down to mail and from the back: 


Creating these 3D shadow box cards is easy as I show in my newest video here. Here is another I made for the video:


I made this white on white winter birthday card using the many scenery dies included in the Sizzix Holiday Shadow Box #2 die set by Katelyn Lizardi. I also used a stitched snowflake backgound die from Kat Scrappiness and sentiment dies from Karen Burniston. Here is a view from the side showing the three snowbanks and various trees and buildings included in the Sizzix die set (34 dies!) 


Thanks for visiting my blog today and for watching, subscribing and sharing my videos on YouTube. Thanks, too, for helping me #share the joy of creativity!

Monday, January 28, 2019

Video - Sizzix and Spellbinder 3D Shadow Box Cards


I love to make cards that stand up when the recipient pulls them out of the envelope and in my newest video I show how easy it is to make shadow box cards with new dies from Spellbinders and Sizzix. 


 I share many cards in the video and this winter scene is one I made from start to finish. The card was made with a new Sizzix die called Holiday Shadow Box #2. This die set has 34 dies including the shadow box dies as well as many scenery dies for winter and Christmas scenes, although with different colors the scene could be for other times of the year too. 


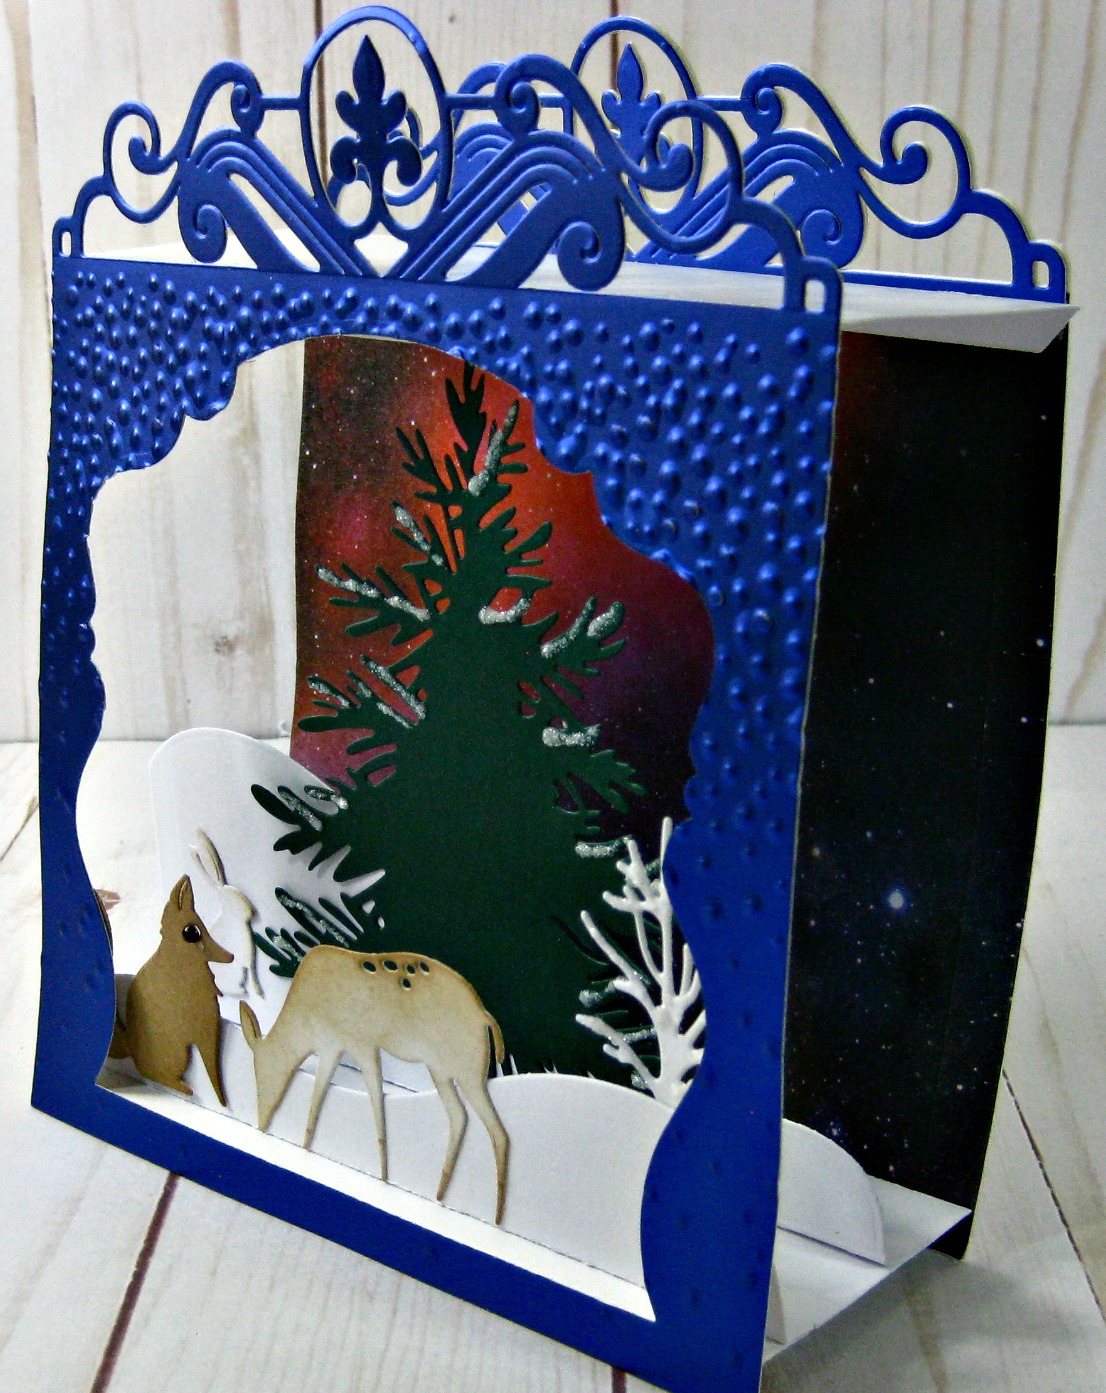
As you can see from this picture, the shadowbox card stands up and I have created a scene with snowbanks, animals and trees from the Sizzix die set. I used Tonic Studios mirror card embossed with snow on the decorative front and Altenew Watercolor Nebula wide washi tape on the back for a pretty night sky. 


This beautiful dimensional wedding card is the second card I make in my newest video and it was made with Spellbinders Grand Dome 3D Card die set. The pictures show the card standing up and laying down. It folds flat to mail. I used Tonic Studios mirror card as well as some of their specialty papers to make this card. Two of the layers are made out of vellum and the forever and lace heart dies are from Stamplorations and Elizabeth Crafts. Here is a look at the side so you can see the many layers in this shadow box card: 


(I made a small mistake in the making of this card with the Grand Dome die set in the video. The side flaps should have been facing IN when I slid the center pieces in their slots. Then the front and back would have fit on better than shown in the video. It was easily fixed. I did the original card correctly and didn't want anyone to be confused if they try to make a card with the Spellbinders Grand Dome 3D die set.)

Both of these cards were easy and fun to make as I show in the video and I hope you click on the link and check them out. I will share more cards with both sets of shadow box dies here on my blog this week, so be sure to stop back. 

Wednesday, January 23, 2019

Pocket Letter for My Grandson and One You Could Win Too!


I had never heard of a pocket letter before I joined in a collaboration video hop and made a pocket insert for the Valentine's Day Pocket Letter you could win full of crafty goodies and mini works of art! That video and all the details on how you could win can be found here. 

Pocket letters are made with 9 pocket trading card binder pages and in each pocket little presents and opportunities for creativity are placed. I made this one for my 3 year old grandson using the fun Super Friends stamp set from Motion Crafts and sparkly foil and foil-mates from Gina K and Therm O Web. I also used alphabet and word dies from Karen Burniston and Honey Bee Stamps.

Some of the stamps in this and all stamp sets from Motion Crafts by Uchi's Designs are animated stamps. That motion is impossible to show with still pictures so I made a little video to show you that:


Isn't that fun? I know Evan is going to love it! Here is a picture of the goodies I put in each pocket for him:


A three year old boy will love these, but you would love the goodies in this collaborative crafty pocket letter you could win:


Behind each mini work of art are some crafty goodies! Watch my video here for the secret code word to use in the comment and then watch and comment on the other videos for more chances.

I am entering my pocket letter for my grandson in the "Have a Heart" challenge at Simon Says Stamp Wednesday.

Tuesday, January 22, 2019

Valentine's Day Collaboration Pocket Letter You Could Win!


 How would you like to win a pocket letter full of crafty goodies and nine mini pieces of art? I am participating today in a video hop with some super talented crafty YouTubers and one lucky commenter along the way is going to win this Valentine's Day Pocket Letter! Here is a link to my video where I show how to use Nuvo Expanding Mousse to make this textured love ATC: 


Nuvo Expanding Mousse is a new product from Tonic Studios that is applied like their other mousse through a stencil or directly to cardstock or other surface, but when Expanding Mousse is dried with a heat gun, it bubbles and expands with wonderful texture. I made this card with the same products used on the ATC for the Pocket Letter you could win:

I created this card the same way I did the pocket letter insert as shown in this video. Here is a close up picture showing the great texture of this unique product:


In the description box of my video, there is a complete list of all the talented YouTubers participating in this video hop and all the products I used to make these projects. It won't take too long to hop and leave a comment for a chance to win. You must listen to each video to find their secret code word to use in your comment to qualify. You have until January 29th to hop and comment for your chance to win. 

Monday, January 21, 2019

Special Card for a Non-Video Monday


Every Monday that is not a major holiday I share a new video on my YouTube channel, but this week I am posting a new video on Tuesday instead as part of a fantastic Valentine's Day collaboration you are not going to want to miss! But while you waiting, I am sharing my favorite new card made with some awesome NBUS products. Don't those ice skates look so very real? They were stamped with Kitchen Sink Stamps Multi-step Figure Skates in shades of grey and black ink. I am a huge fan of Kitchen Sink Stamps because I am not any good at coloring and with their layered stamps and a series of inks, I can stamp shaded beauties like these skates. 

I am also a huge fan of Tonic Studios mirror card and the subtly textured background on this card was made with Silky Sky mirror card and an embossing folder from Stampin' Up. I die cut the frame (also out of Tonic mirror card) with a new die from Memory Box called Woodland Heart Frame and die cut the stitched circle with a Gina Marie Designs die.  Here is a look at the inside of the card:


The circle frame is from that same die set from Memory Box, the background is more mirror card embossed with a snowflake embossing folder and the perfect sentiment is from the Kitchen Sink Stamp Multi-step Figure Skates stamp set.

I am entering this card in the challenge at Scrapy Land (I used a Memory Box die.)

Be sure to stop back tomorrow to see a pocket letter full of crafty goodies you would win! And Happy Martin Luther King Day! 

Thursday, January 17, 2019

Club Sketch School Color Graduation Card


I belong to a club that meets once a month where we share cardmaking ideas and each month we have a sketch challenge. I looked at this month's sketch with the four boxes on the bottom and using numbers for a graduation card popped into my head. I inlaid the numbers 2019 into the purple rectangles using number dies from Karen Burniston. "Class of" is a die from Impression Obsession on a stitched rectangle from Gina Marie Designs. "Congrats" was cut with a die from Tonic Studios and partially sponged with purple ink. Here is a look at the inside of the card:

The grads celebrating were cut with a die from Taylored Expressions. Purple and white are the school colors of the school from which my niece is graduating this year, so this will be perfect for her or a friend of hers.

Tuesday, January 15, 2019

Patchworkzz Circle Love Cards with Crealies Dies


I combined two products I love to make this circular love card from my newest video: dies from Crealies and Clear Views transparencies, and I am thrilled with how the card turned out. As I explained last week in my video here, Clear Views transparencies are beautiful pictures on transparencies that can be used to create gorgeous cards. They are now available to be purchased at a local stamp shop. You can see the choices here on their website and then call Let's Create at 715-424-1343 to order them. I used transparencies called Puppy Love and Love Actually to make this card. 

The die from Crealies I used to make these cards is called Patchworkzz Circle and is one of several Patchworkzz die sets you can find here. They cut shapes into stitched puzzle pieces that are so fun to create with! Here is a picture of the inside of this love card and another Valentine I made:


The inside of the first card was made with another sweet "puppy love" transparency picture and a Tonic Studios die. The second card shows all the pieces of the Patchworkzz circle die so you can see you can put two layers of the circle puzzle on a card if you wish. I die cut the inside circle message out of the same designer paper I used on the front. 

To see more cards made with the creative dies available at Crealies, click this link and watch my newest video. I appreciate every minute you watch a video of mine, your likes and shares, and your visits to my blog here!

Monday, January 14, 2019

Video - Valentines and Love Cards with Crealies Creative Dies


I recently discovered a new website full of unique dies and as most of you know, I am a die cut addict. Since I am not looking for a cure anytime soon, I have ordered twice from Crealies which is located in The Netherlands. The dies are very reasonably priced as is shipping costs and both times I received my order in just over a week. In the my newest video here, I share some love and valentine cards I made with Crealies creative dies. This is the card I show how to make in the video. 


I love "cards in a box" and have made this size from scratch before, so it can be done. The dies I have seen previously on the market were for much smaller cards and I was able to resist those. But look at the scalloped and rounded edges on this "card in a box" die from Crealies! This die set makes this card so easy and I am so glad I purchased it! In the video, I changed the card I made up to be a wedding card since I only need one "love you" card for Valentine's Day (just one husband here:) Here are some more views:


I used Tonic Studios Opera Red and Silver mirror card for all the diecuts on this card in a box. The "love you" and the "Mr. & Mrs." on the wedding card I make in the video are from Honey Bee Stamps. The striped heart on the right flap and the heart sprinkle trail on the left flap are from Simon Says Stamp. The floral lace heart on the back flap is by Elizabeth Crafts Moda Scrap. The inside pop up pieces are a dancing couple from Die-Versions and "forever" from Stamplorations. 

To see how easy it is to make this "card in a box" and how it folds flat to mail, as well as several other love cards I made with Crealies dies, click this link to watch my newest YouTube video here. Thanks for visiting my blog, and watching and sharing my videos. You are greatly appreciated!

Thursday, January 10, 2019

Circle Framing of Winter Clear Views Transparencies


Today I am sharing two more cards from my newest video featuring Clear Views transparencies, embossing folders and dies from my favorite companies. I created circular framing on both of today's cards and backed the transparency picture with specialty papers that enhance their beauty. 

The card above features Memory Box's Circle Trees die cut out with a stitched circle die from Gina Marie Designs. I layered the transparency over richio paper and attached over a snowflake embossed (Darice) cardbase. "Thinking of you" was cut out of Tonic Studios mirror card with a die from Papertrey Ink.

I have been designing with Clear View transparencies for years and now there is a place you can buy them too! If you like the transparencies I show and would like to purchase some, simply visit this page on the Let's Create website, chose the ones you like and call them at 715-424-1343 to place your order. The cost of each sheet of 8 transparency pictures is $4.50 and $5.50 with adhesive backing which makes them so much easier to attach. 


The snowy scene in this winter card just sparkles from the glitter cardstock background cut out with the stitched circle die from Gina Marie Designs. The layered shaped frame was cut with the Issa Snowflake Layered Die set from Birch Press Designs out of two shades of Tonic mirror card and one white layer. "Warm Winter Wishes" is a new favorite die from Stamplorations.

I am really happy with how all these winter cards with Clear View transparencies turned out and hope you will watch the video and give them a try!

Tuesday, January 8, 2019

Winter Birthday and Hello Cards with Clear Views Transparencies


Today I am sharing a couple more cards I made with Clear View transparencies, embossing folders and dies from favorite companies. In my newest video here, you can see how easy it is to make gorgeous cards with these transparency pictures. I made the card above with a new Patchworkzz die from Crealies, embossed Tonic Studios mirror card and a "hello" die from Karen Burniston. The round shape of the card was cut with the Crealies die out of glittery cardstock and IRL the glitter shines through the Clear Views transparency with lovely sparkle.

I have been designing with Clear View transparencies for years and now there is a place you can buy them too! If you like the transparencies I show and would like to purchase some, simply visit this page on the Let's Create website, chose the ones you like and call them at 715-424-1343 to place your order. The cost of each sheet of 8 transparency pictures is $4.50 and $5.50 with adhesive backing which makes them so much easier to attach. 

Here is the inside of the hello card with a beautiful Thinking of You die from Quietfire Designs and a winter birthday card I designed for a special December birthday:


I placed a glitter cardstock behind this lovely Clear Views picture and it just sparkles IRL! I embossed Tonic Studios Purple Mist Mirror Card with a Happy Birthday script embossing folder and layered all on an A2 white card base. 

To see more cards with transparencies and how easy it is to use them for lovely cards, come watch the video here.