Showing posts with label Technique Junkies. Show all posts

Tuesday, August 20, 2024

Have a Flamazing First Day of School!


My grandson who lives in Illinois starts school next Monday and I wanted a fun card for his first day of school. I had some Flamingo stamps and dies from Riley and Co. and a new perfect sentiment stamp from Technique Junkies so I combined them on this fun Triple Floating Diamond Card I learned how to make from Lisa's Stamp Studio. Here is another view of the card:


The two flamingos are mounted with Action Wobbles so they jiggle and wiggle. Here is a look at the back of the fun fold card where we signed it and enclosed a back to school treat:


Monday, September 18, 2023

Thanks To Gina K A New Technique To Try


I love to find new techniques to try, then have a play and come up with my twist on the technique. Recently I watched a video where Gina K of Gina K Designs shared the idea of stamping twice on white cardstock with black ink, then cutting one out with a cover die, raising it and gluing back on for a unique look. I pulled out every stamp set and die that I thought could work, and in my newest video I share what did and did not work. 


I thought I would try different colors than the black and white Gina K showed, and here is one of my favorites of the cards I made. I stamped "Baseball in Motion" from Technique Junkies twice on kraft cardstock using my MISTI so they were in exactly the same spot, then cut one of them out with the largest plaid die from a set by Tim Holtz and Sizzix. This die set was new to me, but is apparently out of stock at Sizzix.  I did find it here. I love how this card turned out, and wondered- do we need to stamp on each layer for this technique to work? 


No! All I did on this one was to start with two identical forest scene designer papers and cut one out with the Sizzix die and one without. I also cut out two more of the Sizzix plaid die out of thicker black cardstock and glued the three together before gluing onto the back piece. Then I glued onto a black cardbae and added a couple die cut birds. This card was so easy to make and would be perfect for sympathy, thinking of you, birthday or any reason to send a card. 

In the new video here, I show these and other cards where I learned what did and didn't work, and I made this card step by step: 


I knew I wanted to use the same Sizzix plaid die as it worked the best of the ones I tried. I had this new stamp from TEXTures by Lou Collins that I found at Paper Wishes, but it was quite a bit larger than the die. I show how I stamped twice on the same designer paper cut to 4 1/2 x 6, die cut one and glued on to two die cut out of black. I attached back onto the larger uncut piece so the flowers flow from the background on the diecut piece, and love how this one turned out!

I thank Gina K for her video and this fun technique and hope between the two of us, you have been inspired to give some of the ideas a try!

Wednesday, April 27, 2022

RubberStampMadness Summer Issue Salad Spinner Article


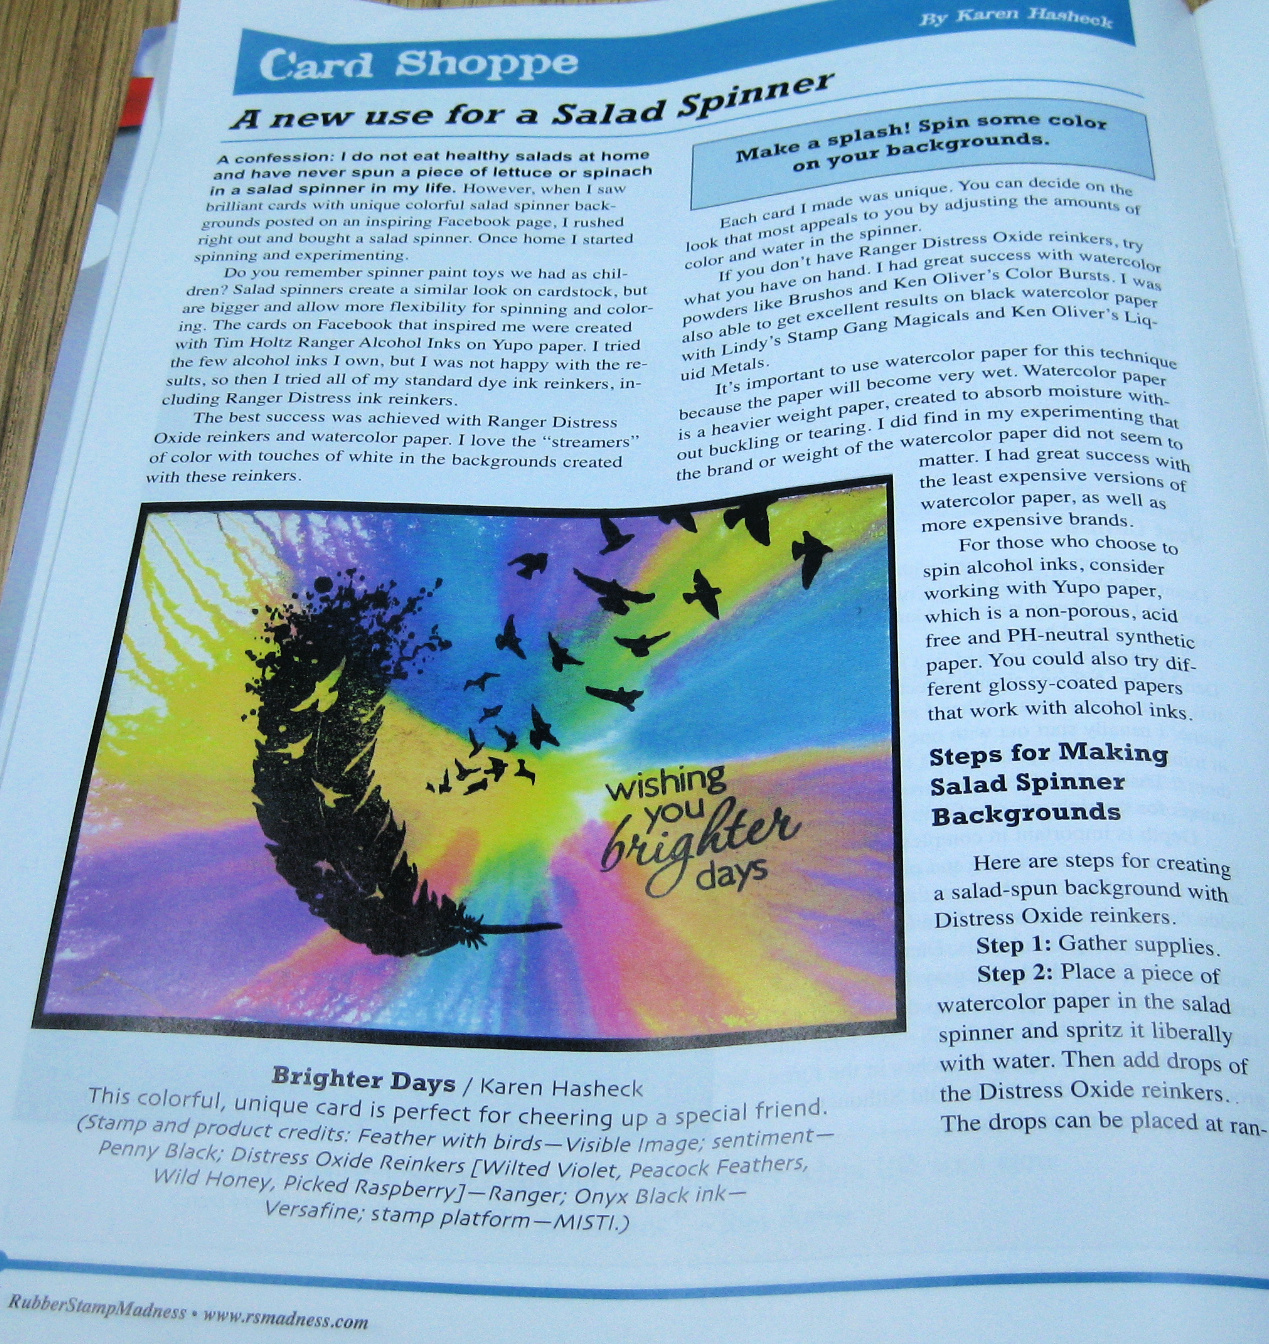
I have some fun news to share - I have an article I wrote and designed the cards for in the newest issue of RubberStampMadness! You can find the issue at their website or at local stamp shops and book stores. I wrote about how to use a salad spinner to create colorful unique backgrounds for stamped cards and here is the first card I shared:


The feather and birds stamp is from Visible Image, the sentiment stamp is from Penny Black and I used Wilted Violet, Peacock Feathers, Wild Honey and Picked Raspberry Ranger Distress Oxide reinkers in the salad spinner. Here is another card I created for the article:


This card features the Baseball In Motion stamp from Technique Junkies and a sentiment die from Karen Burniston. 


I am currently playing with the floating strips technique for an upcoming video, and I tried it with a piece of salad spinner watercolor paper returned from RubberStampMadness with my card samples. The "hi" die is from Spellbinders and I used a pinpoint burst plate from Memory Box on the background of the card. 

I have written many articles in the past for Scrap and Stamp Arts (in addition to doing the card samples), but this is the first time I wrote the copy for an article in RSM so that was fun! I hope you will help print magazines stay in business by buying and reading them.


Tuesday, August 3, 2021

More Distress Oxide Reinker Salad Spun Beauty


My favorite color combo of Distress Oxide reinkers that I spun in my salad spinner for this background is Wild Honey, Picked Raspberry and Peacock Feathers. I chose those colors for both this card and the next one from my newest video here. The stamps on the card above are from a set at Stamplorations from Dee's Artsy Impressions called "Beautiful You." The card below features water droplet stamps from Designs by Ryn and an "awesome" die from Tonic Studios.


This is another stamped card I made with a salad spun background for the new video. I chose Tumbled Glass, Scattered Straw and Orange Marmalade Distress Oxide reinkers, a sentiment die from Karen Burniston and a cool Baseball in Motion stamp from Technique Junkies. 

To see many more cards and how easy it is to create these awesome backgrounds, be sure to watch the new video here. I hope my cards inspire you to give this technique and the products shared a try!

I am entering the first card in the Anything Goes challenge at Simon Says Stamp Wednesday.

Monday, June 21, 2021

Video - Cardmaking with a Salad Spinner and Watercolor Powders


I am spinning with delight after discovering a new way to make fun colorful backgrounds on my cards! I have never spun lettuce or spinach in a salad spinner, but now own two salad spinners dedicated to only crafty spinning as I share in my newest video here.


This is one of the many cards I share in the video and I show exactly how easy and fun it is to spin the colors onto the background of this card. I started with a smaller salad spinner but explain why I highly recommend a larger one like the one from Farberware I show in the video. I was inspired to try this technique by Karen Dunbrook but on her spun cards she used alcohol inks. I did not have much success with my limited supply of alcohol inks, but pulled out my Brusho Water Colors and made the three cards I am showing in this blog post. However, be sure to watch the video and check back here because I have many more cards to share with you using other watercolor powders and various products. The card above features the super cute Whittle Fish Trio and Whittle Sealife Sentiment Stamps from Poppystamps as well as the shaped stitched die from Whimsy Stamps. I show in the video how I spritzed watercolor paper with water, sprinkled on three colors of blue Brushos, sprayed again with Technique Junkies Shimmering Bliss Dolphin Cove spray and then spun the salad shaker for the magical results. I also sprayed this and many of my cards with Glitter Dust from Therm O Web for extra sparkle. 

Here is another of my favorite cards created with Brusho Crystal Colors watercolor powders and water in my salad spinner. It is so pretty and I simply added some birds cut with an Impression Obsession die set and a favorite sentiment die from Sue Wilson. The stitched squares are dies from Crealies.


Here is another card I share in the new video created with Brushos and the salad spinner. I framed the background with a beautiful die from Hero Arts, added a couple of punched butterflies and another lovely sentiment from Sue Wilson. 

I had so much fun creating cards in my salad spinner for this video! I have many more cards to share with you here and in the video, so be sure to stop back and watch here.

I am entering the first card in the Animal Antics challenge at Simon Says Stamp Wednesday.

Saturday, June 5, 2021

Cards For Teens and Tweens Challenge At Send A Smile 4 Kids


It’s the first Saturday of a new month and time for another fun challenge at Send a Smile 4 Kids! Again this year, all challenges at SAS4Kids are Anything Goes 4 Kids! We will also have an alternative theme that you can choose to follow, but are not required to. The theme for this challenge is: Cards for Teens and Tweens.

I made my card with a new stamp from Technique Junkies called Baseball in Motion on some cool paper from Paper Roses. I die cut YOU out of the stamped pattern with alphabet dies from Dies…To Die For and raised them before putting back in their respective holes. “Celebrating” is a stamp from Repeat Impressions.


Be sure to check out the rest of the cards from TEAM SAS here and we would love it if you entered our challenge.


I am entering this card in the Masculine challenge at Simon Says Stamp Wednesday.


Tuesday, April 27, 2021

More Split Stencil Cards With New Stencils from A Colorful Life Designs


I love how easy it is to create gorgeous cards with the new Split Image Stencils from A Colorful Life Designs and I made seven different cards easily for my newest video here. The stencil I used on this card and the next is called Split Swirls. I simply brushed on aqua blue ink through the stencil onto a lightly colored piece of designer paper, then stamped a sentiment and added a punched embossed butterfly. 

**EDITED TO ADD: The owner of A Colorful Life Designs liked my cards and video so much she offered me a discount code to share with my viewers! Click on the link in the paragragh above, pick out the split stencils you want (and look around- so many neat stencils!) and then use my discount code KarenSplit to get 10% off! The code is case sensitive and expires 5/9/21 so be sure to go shopping soon!**


I added my favorite Rainglow foil from Brutus Monroe and Therm O Web through the Split Swirls stencil after applying Deco Foil Transfer Gel Duo and letting it dry. I also used a favorite technique (the eclipse technique) and favorite dies from Dies...To Die For to make this card. The stitched frame die is from Cutplorations.


This and the next card both feature the new Split Bubbly Flourish stencil. I simply brushed on pink, yellow and purple distress ink, stamped a sentiment from Stampendous and added a couple gems from Gina Marie Designs. 


I sprayed a couple colors of Shimmer Bliss color spray from Technique Junkies through the Split Bubbly Flourish stencil on this card, then also sprayed with Therm O Web's Glitter Dust. The glitter dust is very hard to clean off of stencils so if you want clean stencils, you won't want to do that. It didn't ruin the stencil and I like the added sparkle (which is hard to see in the photo.) The layered hello is a die from Tonic Studios and I layered it on vellum, and then added more of my favorite gems from Gina Marie Designs. 

See what I mean about how easy it is to make awesome cards with these new split image stencils? I show all these cards and more in the new video here. 

Monday, April 26, 2021

Video - Cardmaking With Split Image Stencils From A Colorful Life Designs


I had so much fun designing cards with the new Split Image stencils from A Colorful Life Designs for my newest video, I didn't stop until I had made 7 different cards with different stenciling techniques. My favorite of the new split stencils is the rose and here is a CAS but lovely card to show you why: 


I show in the new video how easy it is to make this card with the gorgeous Split Rose stencil and a brand new sympathy stamp set from Technique Junkies. Here is another CAS card with this awesome Split Rose stencil:

All I did to make this card was apply Red Velvet Glitz Glitter Gel from Gina K Designs and Therm O Web through the rose stencil and when it was dry, I added a sentiment die from Cutplorations and a few gems from Gina Marie Designs. 

**EDITED TO ADD: The owner of A Colorful Life Designs liked my cards and video so much she offered me a discount code to share with my viewers! Click on the link in the first paragragh above, pick out the split stencils you want (and look around- so many neat stencils!) and then use my discount code KarenSplit to get 10% off! The code is case sensitive and expires 5/9/21 so be sure to go shopping soon!**


I also show in the new video how to make this love slimline card with Brutus Monroe Sunrise Foil and Deco Foil Transfer Gel Duo through the Split Rose stencil twice. The 'love" die is from Poppystamps, the Torn Heart is from Dies...To Die For and the stitched slimline die is from Pinkfresh Studios. Here is a look at the inside of this card:


I share the foil technique in the video of how to not waste any of the gorgeous foil after the first pass through a laminator or MINC by running it through again with a piece of Deco Foil Toner Sheet and that is how this rose image was created. 

To see all the Split Image stencil cards and how I made these, watch the new video here. 

Wednesday, April 21, 2021

RubberStampMadness Summer 2021 Article Cards


I am honored to share that 4 of my cards are featured in a three page article in the newest issue of RubberStampMadness! Most of the cards feature stamping with stencils and this is one of the cards. I applied yellow and orange ink through a Mini Galaxy stencil from The Crafter's Workshop and then over stamped the gorgeous "Part of the Dance" stamp from Technique Junkies in black ink. As I so often do I completed the card with some of my favorite gems from Gina Marie Designs. 


I love how this card turned out with the combination of a stamped text background created with the Romantic Script Background stamp from My Favorite Things and the layered floral Sweet Spring stencil from Altenew! I added a sentiment strip stamp from Taylored Expressions and more gems from Gina Marie Designs.


I told the author of the article about my cards that this card was inspired by a card I saw on Pinterest years ago, but do not have a link to credit the original cardmaker. The beautiful bride stamp set which includes the sentiment stamp is called Haute Wedding Dress from The Ton and the stencil is from Carabelle Studio. After I did the stamping and stenciling, I created a reverse stencil and added Irisdescent Glitz Glitter Gel from Gina K Designs and Therm O Web. 


One of my cards chosen for the article included no stamping or stencils but is a favorite of mine featuring gorgeous dies from Sue Wilson and Creative Expressions in a slimline format. And of course because I almost always do, I added some gorgeous gems from Gina Marie Designs.

I want to thank RubberStampMadness for again featuring my cards and Christina Hecht for her amazing writing of the article after interviewing me.

Wednesday, April 29, 2020

Three More Cards with Nuvo Shimmer Powders From My Newest Video


 Humor helps in these trying times and the sentiment on this card from Your Next Stamp seems very appropriate. I tried Atlantis Burst, Solar Flare and Blue Blitz Shimmer Powders on a piece of suede paper and then cut it into strips for the top of this card for my newest video. I also played with the emboss resist technique for the next two cards:


I started by stamping a Hero Arts dandelion background stamp with Versamark Ink and embossing it with white embossing powder. That then resisted the Nuvo Shimmer Powder and this lovely background was the result. I added a punched butterfly and an amazing sentiment from Sue Wilson.


I created this mixed media card for my grandson with an emboss resist background with Technique Junkie's barb wire stamp and then added some gold Nuvo Crackle Mousse through a Wendy Vecchi stencil. When that was dry and cracked, I die cut Nate's name using ABC dies from Kat Scrappiness for the Eclipse look. 

Wednesday, April 15, 2020

Sending You a Big Hug Spring Card Camp Card Day 3

I jumped on the chance to participate in a new card class from Online Card Classes hosted by Jennifer McGuire and friends called Spring Card Camp. Every day we get a new lesson to watch and learn from with card samples, and Day Three's idea was perfect for me! I love to paper piece and fussy cut and we were taught how to "color with paper" using a background stamp with an abstract pattern. I looked at my background stamps and decided Technique Junkie's Zen Waves would be perfect for this idea. I stamped on 3 shades of blue cardstock as well as a yellow and green and created this card. Then I simply added a perfect sentiment strip from Taylored Expressions to complete the card. I am so missing real hugs from my dear friends and grandkids, but until we can have the real thing, I will keep sending cards like this one. 

Thursday, August 24, 2017

Hello Gorgeous Flamingo Card with NBUS

I finally got a chance to play with some of my NBUS (never before used schtuff) that was piled on my bed and I made a couple cards I will be sharing this week on my blog. I featured the Card Layering Die sets from Jaded Blossom, Distress Oxide Inks and the Zen Waves background stamp from Technique Junkies in my 1st Enabler Alert video on YouTube and here is the first card I made with them. I stamped the Zen Waves stamp with two colors of blue distress oxide inks (Salty Ocean and Broken China) in my Tim Holtz Stamp Platform (in case I didn't get a perfect impression the first time- and I didn't, so this tool is a must especially for large background stamps.) I die cut the perfect stitched triangles with the Card Layers Die One from Jaded Blossom and sponged some blue distress ink around the edges. I also used my Tonic Studios Tim Holtz Stamp Platform to stamp the flamingo from Hero Arts in three shades of pink inks and then cut it out with the matching Hero Arts Flamingo Frame Cut die. I attached him with mounting tape to raise. The "hello gorgeous" stamp is from the same Hero Arts Color Layering Flamingo stamp set. I added some sticker gems to the front. Here is another look and a peak at the inside of the card:


I die cut a stitched tag with the Card Layer Dies One from Jaded Blossom out of the Technique Junkies Zen Waves background and stamped another fabulous sentiment from the Hero Arts flamingo set.