Showing posts with label Memory Box. Show all posts

Tuesday, August 19, 2025

Christmas Cards with New Products for my Stash

Recently I have purchased new embossing folders, dies and stencils for Christmas cards, and I had a play with them before putting them away. Today I am sharing 3 cards I made for my Christmas card stash. My favorite new paper is from CutCardStock and it is Stardream Metallic Cardstock. My first two cards were made with the Antique Gold Color. 


I combined the Molded Frame Embossing Folder from Spellbinders and the Radiant Snowglobe die from Memory Box. This Antique Gold cardstock embosses beautifully as you  can see on the next card which features a new 3D embossing folder from Lisa Horton called Candles and a pretty Clear Views Transparency. 


I love making cards with Waffle Flower's Postage Collage dies and stencils. The card below was created with their Postage Collage Christmas Stencils, and the North Pole and Dear Santa stamp sets.


Cardmaking Joy & Hugs, Karen 

Wednesday, June 19, 2024

More Inky Embossed Beauties from my Newest Video


I love this card I shared in my newest video here featuring the black out technique and a 3D embossing folder and die set from Memory Box called Anemone Bunches. If you haven't tried the black out technique yet, it is all over internet land and is easy to do. Simply add bright inks to the images on the  DEBOSSED side, then swipe with black ink to fill the flat areas and add a bit of highlighting to the images. I finished this card by spattering on white paint. I also created the following card with that technique and embossed white and colored lilacs made with a Simon Says Stamp embossing folder.


Here are a couple more cards I share in the new video where I simply added ink directly to the embossed backgrounds:


The card on the left features an Eyelet embossing folder from Stampin up and a fun sentiment die from Picket Fence Studios. On the card on the right, I swiped gold ink on a background created with a new Penny Black script embossing folder called Noted, and then added a stamped and die cut flower from 49 and Market and Sizzix.

Tuesday, April 30, 2024

Guy's Cards with Hero Arts and Other Products


I participated in the Hero Arts Spring Stamp-along recently and here are a couple cards I made with supplies and inspiration after the weekend. One thing I really like about Hero Arts Stamp-alongs are you can choose to buy the class supplies or not. The cost of the classes are very reasonable either way and usually I wait until after the classes to see which of the supplies I really need. 

Ralph Tyndall designed a stamp and die set that looks just like old fashioned composition notebooks and the classes showed several ways to use it creatively. I made a card with the large background stamp and with 3 mini notebooks. Then I made a more colorful notebook card here:


I never have enough guys cards so I also used a new die and embossing folder set from Open Studio/Memory Box to make the background on this card and then added some beer die cuts for an easy quick card perfect for Father's Day. 

Wednesday, February 22, 2023

More Fun Easy to Make Postcards from My Newest Video


Here is another postcard made with the new A2 Postcard die from Kat Scrappiness that I share in my newest video here. I am die cut crazy and wanted to use some new dies I have recently purchased on some of the postcards. I was careful to glue them down completely, but if when I mail I am concerned that the diecuts might get ripped going through the machines at the post office, I can always just throw them in an A2 envelope to mail. The pretty Gilia Flower Frame die is from Memory Box, and the sentiment die is from Sue Wilson and Creative Expressions. Here is a look at the other side of this postcard with the same cloud cardstock and some rub on butterflies from 49 & Market:


This picture shows very well the stitching that the A2 Postcard Die from Kat Scrappiness does creating a place to write a message and address the postcard. Here is another postcard I made with a new die from Poppystamps and a Sizzix sentiment:


I recently purchased some Balloon Occasions dies from Sizzix with fun balloons and "strings" that are also scripty sentiments. I used them on this postcard making sure to glue them down very thoroughly:


The colorful sentiments and other decorative elements are Dazzles stickers from Paper Wishes. I had great fun making these postcards in just minutes and hope they inspired you to watch the new video and give some of the ideas and products featured a try!

I am entering the last postcard in the Anything Goes challenge at Simon Says Stamp Wednesday.

Wednesday, September 7, 2022

More Two Sided Sequin Sparklers From My Newest Video


One of my favorite colors of two sided sequin material I found here on Amazon is this pretty red that turns to gold when I brush my finger up on it:


Isn't that fun? The ornament is a Spellbinders die, the background snowflake pinpoint die is from Memory Box and "believe" is from Tonic Studios. I thought this color combo was perfect for Christmas and so I made this card too:


Here is another magical card I made and shared in the new video:


So pretty even if the sequins are not brushed for that second color! All you need is an open die and the 2 sided sequin fabric to create these fun interactive cards! Here is a bonus card (not in the video) that I made for my grandson's birthday:


He loved his interactive birthday cake which I made with two rectangle shaped dies. The cheerful Happy Birthday die is a favorite from Karen Burniston. 

I love how all these 2 sided sequin cards turned out and hope you will watch the video and get inspired to try some of the ideas and products featured. Have a creative joyful week!

Wednesday, May 25, 2022

More Floating Strips and Elements With Dies From My Newest Video


When I decided to play with the Floating Strips or Floating Elements technique for my newest video here, I had several pieces of lovely paper from Paper Wishes with Made To Surprise border dies cut, folded and tucked that I demoed in last week's video sitting here too pretty to waste. I didn't want to cover the center or the pretty flowers so I added some butterflies both die cut and punched made with the technique. 


My next two cards both feature heart dies (torn edge and slimline) from Dies...to Die For and background pinpoint burst plates from Memory Box. The gorgeous love die is from Quietfire Designs and the "Mr. & Mrs." dies are from Honey Bee Stamps. 


Another reason I like trying different ideas like this Floating Strips technique is because it adds so much interest to an otherwise boring card. I simply cut a Penny Black Masterpieces Made Simple image into the strips on acetate and raised it over a wavy wonky rectangle cut out with a Kat Scrappiness die. The sentiment is a new one from Sue Wilson and Creative Expressions. 

I had so much fun playing with this technique and making the cards I share in the new video here. I hope you will watch it and then have a play yourself!

Wednesday, April 27, 2022

RubberStampMadness Summer Issue Salad Spinner Article


I have some fun news to share - I have an article I wrote and designed the cards for in the newest issue of RubberStampMadness! You can find the issue at their website or at local stamp shops and book stores. I wrote about how to use a salad spinner to create colorful unique backgrounds for stamped cards and here is the first card I shared:


The feather and birds stamp is from Visible Image, the sentiment stamp is from Penny Black and I used Wilted Violet, Peacock Feathers, Wild Honey and Picked Raspberry Ranger Distress Oxide reinkers in the salad spinner. Here is another card I created for the article:


This card features the Baseball In Motion stamp from Technique Junkies and a sentiment die from Karen Burniston. 


I am currently playing with the floating strips technique for an upcoming video, and I tried it with a piece of salad spinner watercolor paper returned from RubberStampMadness with my card samples. The "hi" die is from Spellbinders and I used a pinpoint burst plate from Memory Box on the background of the card. 

I have written many articles in the past for Scrap and Stamp Arts (in addition to doing the card samples), but this is the first time I wrote the copy for an article in RSM so that was fun! I hope you will help print magazines stay in business by buying and reading them.


Saturday, March 5, 2022

Cards 4 Boys at Send A Smile 4 Kids Challenge


It’s the first Saturday of a new month and time for another fun challenge at Send a Smile 4 Kids! The theme for this challenge is Cards 4 Boys, but you can choose to participate in our challenge with any card appropriate for a child.

My card is a fold back pop up fun fold card featuring Poppystamps Whittle Taco, Nacho and Avocado dies and the adorable "Life is Sweet" stamp set. The patterned paper is from Memory Box. Here is a look when this fun fold card is opened: 

Be sure to check out the rest of the cards from TEAM SAS here and we would love it if you entered our challenge.

I am entering this card in the Use A Die Cut at Simon Says Stamp Wednesday. 


Tuesday, March 1, 2022

More Easy To Make Floral Pinpoint or Debossed Cards


Most of the cards I share in my newest video featured stencils, but I do show a couple cards with the pinpoint or debossed backgrounds and simple floral dies such as this easy to make birthday card. I simply debossed the iridescent mirror card from Tonic Studios with the Memory Box Pinpoint Daisy background die and attached the Stamplistic Floral Flourish diecut on top. STAMPlorations clear sticker sentiments are so easy to attach to cards like this and I added Therm O Web's Easy Cut Adhesive sheets before cutting the black mirror card floral flourish. I made this and the next card in less than 5 minutes, but love how they turned out!

The leafy pinpoint background on this card is also from Memory Box on black Tonic Studios mirror card; the floral dies are from Gina Marie Designs and the sentiment strip is from Simon Says Stamp. 


Here is another favorite of the cards I share in the new video. I started with a Basketweave Slimline Die from Honey Bee Stamps that just adds that subtle texture and then brushed various colors of ink through ARTplorations Just Roses slimline stencil. The sentiment sticker is also from STAMPlorations. 


This is the full size slimline card I made a mini-slimline version of in the new video. I show how to apply Cosmic Shimmer Lustre Polish through a ARTploration slimline stencil (Peaking Mandala) over a pinpoint background die from Memory Box. I love how the inside pops with a W fun fold and am going to show how to make a similar card and the template for this card on my Facebook Live this Thursday, so be sure to join me there!


The W fold features ink stenciling over a pinpoint Stitched Heart Background Die from Kat Scrappiness. The alphabet dies are also from Kat Scrappiness as is the Wonky Wavy square die for the signature piece. 

I am entering the first card in the Anything Goes challenge at Simon Says Stamp Wednesday.

Monday, February 28, 2022

Easy Stencil Cards With Pinpoint Texture


What favorite cardmaking supplies do you reach for over and over when making cards? My current favorites are stencils and pinpoint or debossing dies, and in my most recent video I am featuring them on all the cards I share and make in the video. 


Isn't the combination of the stenciled ARTplorations Bold Rose over the Memory Box Pinpoint Daisy background die just gorgeous on this card? The stencil is one of many slimline stencils I feature in the video, but as you can see the card does not have to be a slimline one to use this or any stencil from ARTplorations (a division of STAMPlorations.) I have a subscription where I receive 3 brand new slimline stencils quarterly for only $18! You can choose to get yours monthly, bi-monthly or quarterly for that bargain of a price and can choose the ones you want or get brand new ones not even on the website yet! The sentiment is a clear sticker from STAMPlorations.


This is the card I make in the new video. It is a mini-slimline with a fun pop up surprise on the inside. I started with the same pinpoint background die from Memory Box and added Cosmic Shimmer Tantalizing Teal Lustre Polish through ARTplorations Mandala Accent #1 stencil. When it was dry, I layered on a piece of teal cardstock on a peach mini-slimline cardbase and added a Simon Says Stamp sentiment strip. I also created a mini-slimline envelope using a die from Kat Scrappiness. But the real fun happens when the card is opened:


I show how to stencil ink over the Kat Scrappiness pinpoint Stitched Hearts Background die before diecutting out the word LOVE and putting them back in for the eclipse look. The letter dies are Hannah's Alphabet from Dies...To Die For. Here is another view of the inside showing the signature piece on the right side:


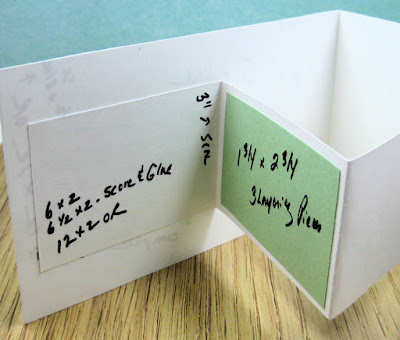
As promised in the new video, I am posting pictures of the template I shared here on my blog. However to see how to use this template and how to put the card together, I suggest you watch the new video here. On my template I show two different sizes of the card itself and the W Fold Piece if you have 12 x12 cardstock or if you don't. 


I hope you will watch the video and give some of these ideas and products a try!

I am entering the first card in the Anything Goes challenge at Simon Says Stamp Wednesday.