I belong to a stamp club and once a month we are given a sketch and/or challenge to use for a card to share the next month. This was the sketch we were given last month, and I cut the pieces from a poured paint background on yupo paper I made with some friends recently. After we poured several colors of paint on the yupo paper, we dragged the paint to create the look you see.
The couple was cut with a new die from Taylored Expressions called Love Story, and I also used a stitched tag die from My Creative Time and "always" from Tonic Studios.
For the inside of the card I cut "love" from Impression Obsession from another part of the yupo poured paint piece. I will use this card for my upcoming anniversary as we "grow old together" always in love.
I am entering this card in the Anything Goes challenge at Simon Says Stamp Wednesday.
I love the animation of the stamps from Motion Crafts and show how easy it is to make an animated camera card in my newest video here which is part of the huge Save the Crafty YouTuber Video Hop going on now until June 5th. I had so much fun making these animated camera cards, I made three and share all of them in the video. (The teen version will be blogged on Saturday, June 1st for the new Teens challenge at Send a Smile 4 Kids.)
See how the flash inside the circles changes as the top piece is pulled? It is much easier to see that in the video here, and if you leave a comment there with my secret word and live in the USA, you could win your very own Motion Crafts Camera Animation Clear Stamp Set and Die Cut Combo valued at $30!!
I made this camera card for my grandson Evan and used alphabet dies from Tonic Studios and Jade Blossom to personalize it. Here is a peak at the back of the card:
You have until June 5th to watch and comment on my video as well as the many others in this video hop for a chance at over 45 prizes! In your comments, please state if you are an international guest or from the United States- many of the prizes are for either, but some can only be mailed to a USA mailing address.
Please consider subscribing to new crafty YouTubers you find, leave positive comments, share and give thumbs up- we are all dependent on you for our channels to grow. Thank You!
I am so excited to be again participating in the Save the Crafty YouTuber Video Hop today with many crafty friends and Motion Crafts! You can start the video hop at my video here and then hop for tons of inspiration and chances to win! Just look at all the sponsors of our hop with over 45 prizes to be won:
In my video, I am sharing how easy it is to make this animated camera card using stamps and dies from Motion Crafts. When the top flash piece is pulled up, the star changes colors and its shape, something that can only be shown in a video, so be sure to watch here.
If you watch the video and leave a comment with my secret word and live in the USA, you could win your own Motion Crafts A2 Camera Stamp and Die Cut Combo valued at $30!! And I will send you the card pictured above that I make in the video!
If you are busy today with holiday fun, don't worry- you have until June 5, 2019 to leave a comment on my video and the others in the video hop. You do not have to comment on all the videos to win, but if you do, you will earn more chances at winning a prize. More details and the next link in the hop are in my description box here.
Please consider subscribing to the new YouTubers you find on this hop as we all are trying to grow our YouTube channels and each minute watched, comment, thumbs up and new subscriber will help us reach our goals! Thank You!
Today's card combines the layered sentiment dies and the Brutus Monroe foil and Designer Toner Sheets that I featured in my last two videos on YouTube in one card. I started with a Paint Brushed Designer Toner Sheet and foiled the brushed lines with Brutus Monroe Silver Stretch Deco Foil. Then I applied peach ink with a soft makeup brush through a Tonic Studios stencil on the white parts. I die cut the back part of the Tonic Studios Celebrate Sentiment Strip out of the piece, raised it on fun foam and attached it back on with the black "celebrate" message. I also die cut Reverse Confetti's candles out of the card front, backed them with teal and yellow cardstock and then attached the finished card front to a peach A2 card base.
I finished the card with a few candle stickers from Trivini Crafts.
As I have shared all week here on my blog, I had so much fun designing with layered stencils and sentiment dies for my newest video, I didn't want to stop. This is my last card with the gorgeous Layered Dahlia Stencils from Altenew and I chose shades of pink and green for my colors. The layered Happy Birthday dies are from Tonic Studios and the Will's Hand Birthday was popped up on pop dots to hold the top easel of this stand up card.
I chose to layer two different stencils for this wedding card. The hearts background was created with a stencil from Gina Marie Designs and the bride is a stencil by Gabrielle Pollaco for TCW called "She Said Yes." The layered sentiment dies are from Honey Bee Stamps and I cut the back layer right out of the stenciled background and then inlaid the words.
The strip of hearts on the side shows you do not have to own layered stencils to get the look. I sponged on a light pink through the hearts, then moved over a little and sponged on a darker pink. Always is again a Tonic layered sentiment die, but I chose not to layer it this time. These dies are so versatile!
I am entering the first card in the Anything Goes challenge at Scrapy Land (Tonic Studios dies.)
Thanks for visiting my blog and for watching, subscribing and sharing my videos. And thanks, too, for helping me #share the joy of creativity!
Layered sentiment dies can be used in many different ways as is shown by the first two cards I am sharing today from my newest video. I started both of these cards with Altenew's Layered Dahlia Stencils and shades of peach ink and cardstock. The layered Celebrate die is one of many Layered Sentiment Strip Dies from Tonic Studios and I cut the peach letters out of the stenciled card front and layered on a black background. I also cut out "BIG" with dies from Kat Scrappiness, attached to black foam and put back for the "eclipse" look. Here are two more ways the Tonic Sentiment Strip dies can be used:
The "celebrate" die was cut out of stenciled background leaving the negative inlaid word and the "you" was simply die cut out of black and glued to the background.
I made this layered Hugs card again with the Altenew Layered Dahlia stencils in shades of orange and green, then cut apart and layered on brown squares of cardstock. "Sending Hugs" is a layered sentiment die from Sue Wilson and Creative Expressions and is layered on vellum. I added a few punched butterflies and some gems from Gina Marie Designs.
I had so much fun making these easy but beautiful cards with layered sentiment dies and stencils for my newest video and will be back tomorrow with a couple more to share with you.
I am entering the second card in the Anything Goes challenge at Scrapy Land (Tonic Studios dies.)

I am loving the look and versatility of layered sentiment dies and in my newest video here, I show how easy it is to combine them with layered stencils for easy beautiful cards.
I made a bunch of cards with layered stencils and sentiment dies and shared how I made these two cards in the video here. I made many of the cards with the gorgeous Layered Dahlia Stencil set from Altenew. I would never have thought of using shades of grey to make these layered flowers, but saw a card with those colors on Pinterest and loved the look. The layered sympathy sentiment die is from Gina Marie Designs and I cut the first layer out of the stenciled background, added the die cut words and raised on fun foam before putting back in the opening. The clear gems are from Kat Scrappiness.
This is the second card I show how to make in the video and once again I used the Layered Dahlia Stencil this time with shades of blue and green on Tonic Studios embossed cardstock. The "love you" is a layered sentiment die from Honey Bee Stamps which has three layers. I cut the second layer from the stenciled background and the other two out of navy cardstock.
On the inside of this card I used another layered sentiment die (from Tonic Studios) and a punched butterfly out of the stenciled background.
I had so much fun designing with layered stencils and sentiment dies and hope you take a few minutes to watch the video and try them yourself.
In a post earlier this week, I shared a gate fold card with the Sizzix Floral Edges and today I am showing a different way to use this type of die. I diecut the curved floral edges out of silver textured cardstock (from Tonic Studios) and attached them to a navy blue card back. The center piece pulls out like this:
The top of this top folding navy blue card is another floral edge which is part of the same set. The ribbon is new from Gina K. Designs and Therm O Web. This piece opens with a wonderful wish:
The sentiment die is from Die'Sire and I used a Gina Marie Designs wonky rectangle for the signature piece.
**Don't forget- You have until May 21, 2019 to enter to win one of two great prizes in The Hedgehog Hollow Video Hop! Check it out here.**
I love the cheerful look of yellow daffodils in the spring and think this "thinking of you" card I made with some new dies would cheer anyone up. The green hello part is a belly band holding the Floral Edges (from Sizzix) in place. The daffodil was created with layering dies from Altenew and "hello" is from Tonic Studios.
When the floral edges are opened, the recipient sees a softly brushed floral stencil image (using a stencil from Gina K Designs) and "Thinking of You" (die from Sue Wilson of Creative Expressions.
**Don't forget- You have until May 21, 2019 to enter to win one of two great prizes in The Hedgehog Hollow Video Hop! Check it out here.**
I am thrilled to be part of a video hop today sponsored by The Hedgehog Hollow with two fantastic prizes donated by The Hedgehog Hollow and Tonic Studios! You will want to watch my video here and then enter the giveaway at the Rafflecopter link shown there. You have one week from today (May 21, 2019) to enter for a chance to win.
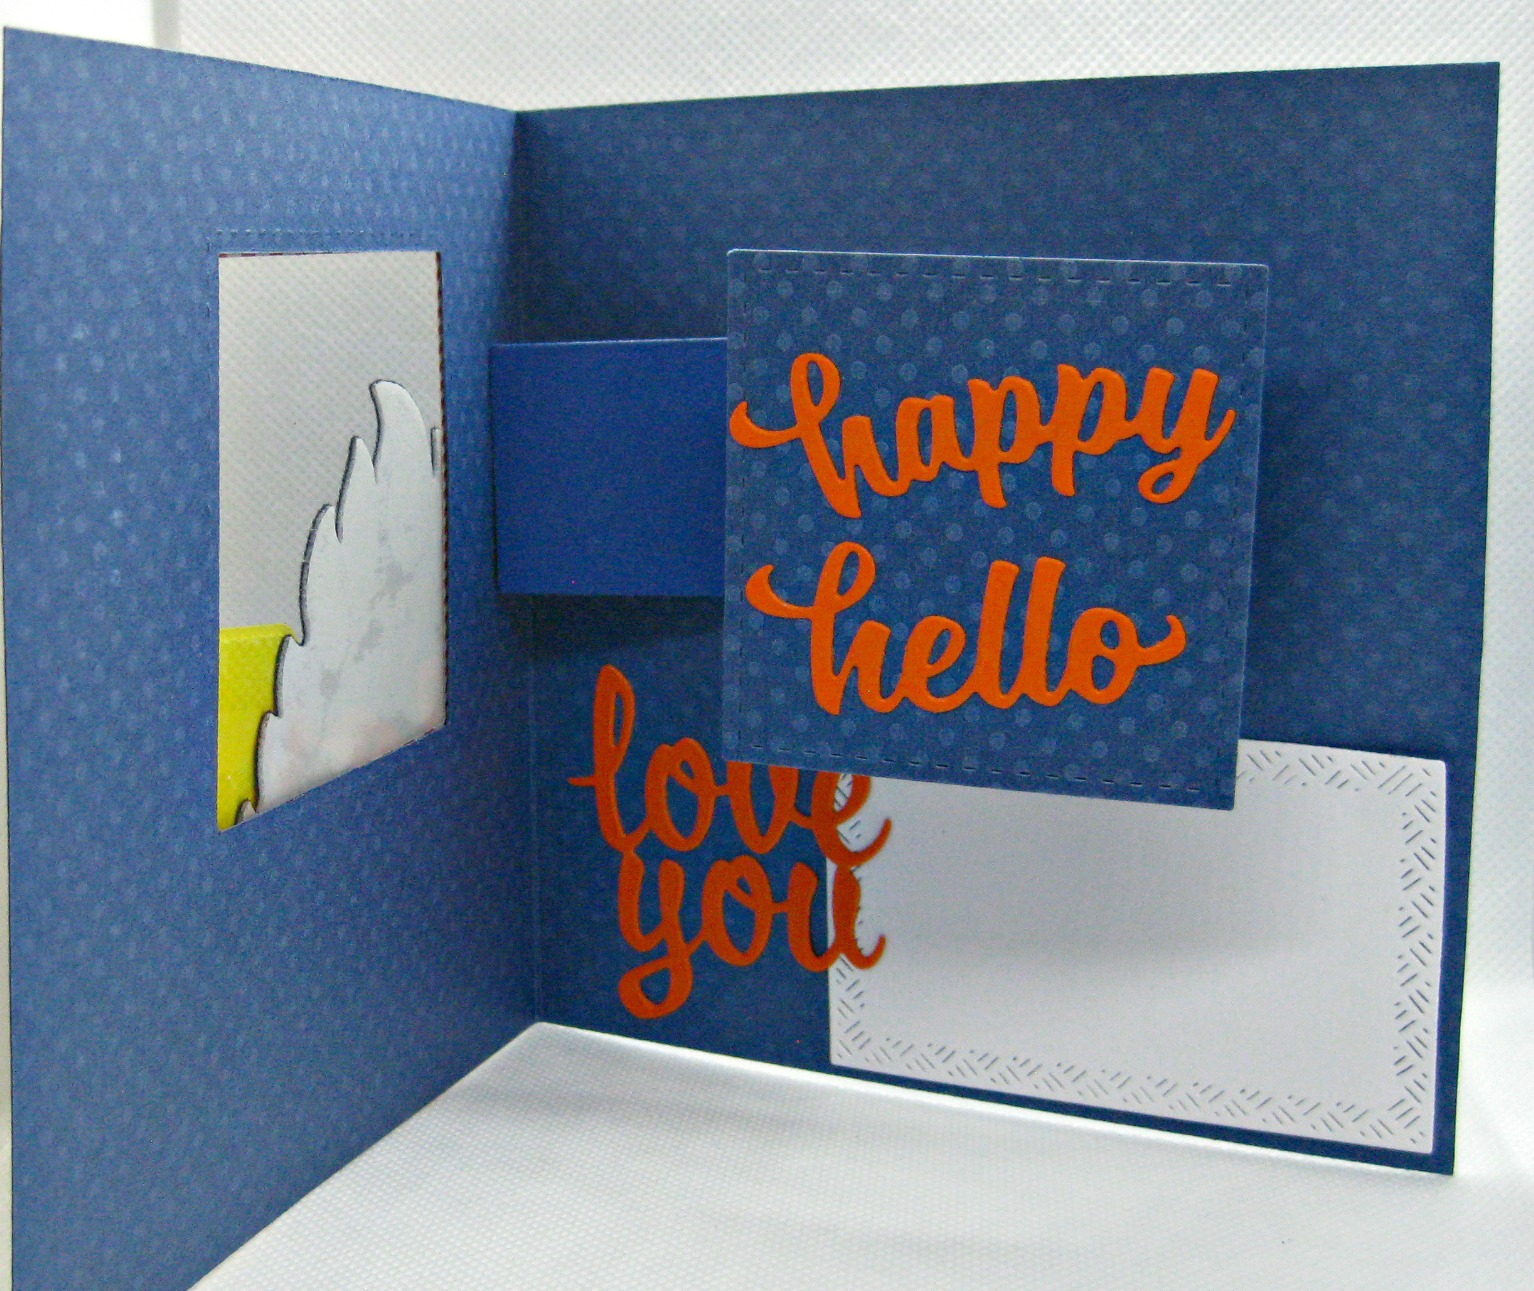
Every card on the video hop will feature an adorable hedgehog as that is our theme, and I show how I made Harry the Hedgehog with Tonic Studio dies and Deco Foil Flock Transfer Sheets in my video here. The Therm O Web Flock Transfer Sheets are soft and fuzzy and make any animal diecut come to life. See that "happy" peaking out in the window? Watch what happens when the card is opened:
I used the new Karen Burniston Rockin' Rectangle Die to make that "happy hello" pop up and out when the card is opened. To really see how cool that movement is and how easy this interactive card is to make, watch here. The word and Crosshatch Rectangle dies are also from Karen Burniston.
Would you like to win either a coupon code from The Hedgehog Hollow or a goodie bag from Tonic Studios? Of course you would! Watch, enter and then hop for more chances here. You get bonus chances by commenting on each channel in the video hop anytime before May 21st, 2019.
Check the description box too for a chance to win this card I made in the video! Requirements for this BONUS GIVEAWAY are listed in the description box of my video, so be sure to check that out!
Therm O Web and Deco Foil have recently released Metallix Gels in several different colors and I have created some classy easy cards with this fun new product. I love the look of the Aged Copper Metallix Gel through my favorite new stencil from Gina K Designs on black cardstock! I layered that piece on a Golden Satin cardstock from Tonic Studios. Here is a look at the inside of this card (layered die from Gina Marie Designs) and another card I made with that same stencil:
It is so easy to create gorgeous cards with this new Deco Foil Metallix Gels! I used the black gel on this card on a patterned cardstock from Park Lane at Joann's and added some pretty layered flowers from Crealies.
It is Monday and usually I have a new video posting every Monday with sample cards here on my blog. This week I am participating in a special video hop featuring an adorable animal and great prizes you could win on Tuesday the 14th, so be sure to stop back for that!
I love experimenting with embossing powder for unique backgrounds and it occurred to me that if I sprinkled embossing powders on cardstock and ran it through my Minc Machine with foil, the embossing powder would melt and hold the colors of the foil for a spotted grungy look. I started this card by stamping the Woodware Craft Collection Magnifying Glass Stamp with red ink and die cutting the center of the magnifying glass out. Then I sprinkled on Nuvo Embossing Powder and ran the piece through my hot Heidi Swapp Minc Machine with Raindow Deco Foil. I repeated that same process with Gina K Designs/Therm O Web Gold Sequins Foil. I stamped the "You did it, yea!" stamp from a Ranger Dina Wakley stamp set on a white piece and created a shaker with various beads and star sequins inside the stamped magnifying glass.
I am entering this card in the May Take It Make It Challenge at Craft Stamper Magazine.
I was having so much fun with the new Brutus Monroe Sketch Deco Foils and some new stencils for my latest video here, I made almost a dozen cards in just a couple days! The three I am featuring today were all made with Deco Foil's Transfer Gel and several new stencils. The wedding card above was made with Silver Sketch Deco Foil, a Tonic Studios stencil and "always" sentiment die as well as a double layer of Seth Apter's Ring String die.
On this sympathy card, I sponged green ink through a new stencil from Gina K Designs and Therm O Web, then moved the stencil over and applied Deco Foil Transfer Gel. When it was dry, I placed a piece of Brutus Monroe Green Sketch Deco Foil on top and ran it through my Minc machine. The sentiment die is from Tonic Studios.
I used strips of Brutus Monroe Green and Purple Sketch Deco Foils to color this pretty new stencil from Taylored Expressions and added a "thank you" sentiment die from Karen Burniston for my last card featured in my newest video here. Thanks for your visit here and for watching, subscribing and commenting on my YouTube videos too!