Monday, November 30, 2020

Bitty Ball Pop Up Piggy Happy New Year Card


Last week I shared several new Bitty Ball pop up animals using new dies from Karen Burniston in a video here and found a super cute pig bitty ball pop up I hadn't made into a card. My grandkids love interactive cards so I am sending this one to one grandson and the New Years card from the video to the other grandson. 


I will  be honest and say one issue I have with the double ball animals is how to get them to stay relatively flat in a card to mail. I like to use magnets (as I did in the video) but they can get pricey and several are needed to keep the animal in. I have tried using a very strong tape and sliding it in a card like this one, but I watched my grandson open his like that, and the card had come completely undone in the mail. So I had an idea- on this card, I stapled the top and bottom shut with 4 or so staples on the top and bottom of a square folded thick cardstock base. Then I covered the staples with this fireworks cardstock from Divinity Designs and added the Happy New Year die cut from Impression Obsession. I also covered the staples on the back of the card which is where I will write a message and sign the card. No way is this card coming undone in the mail!


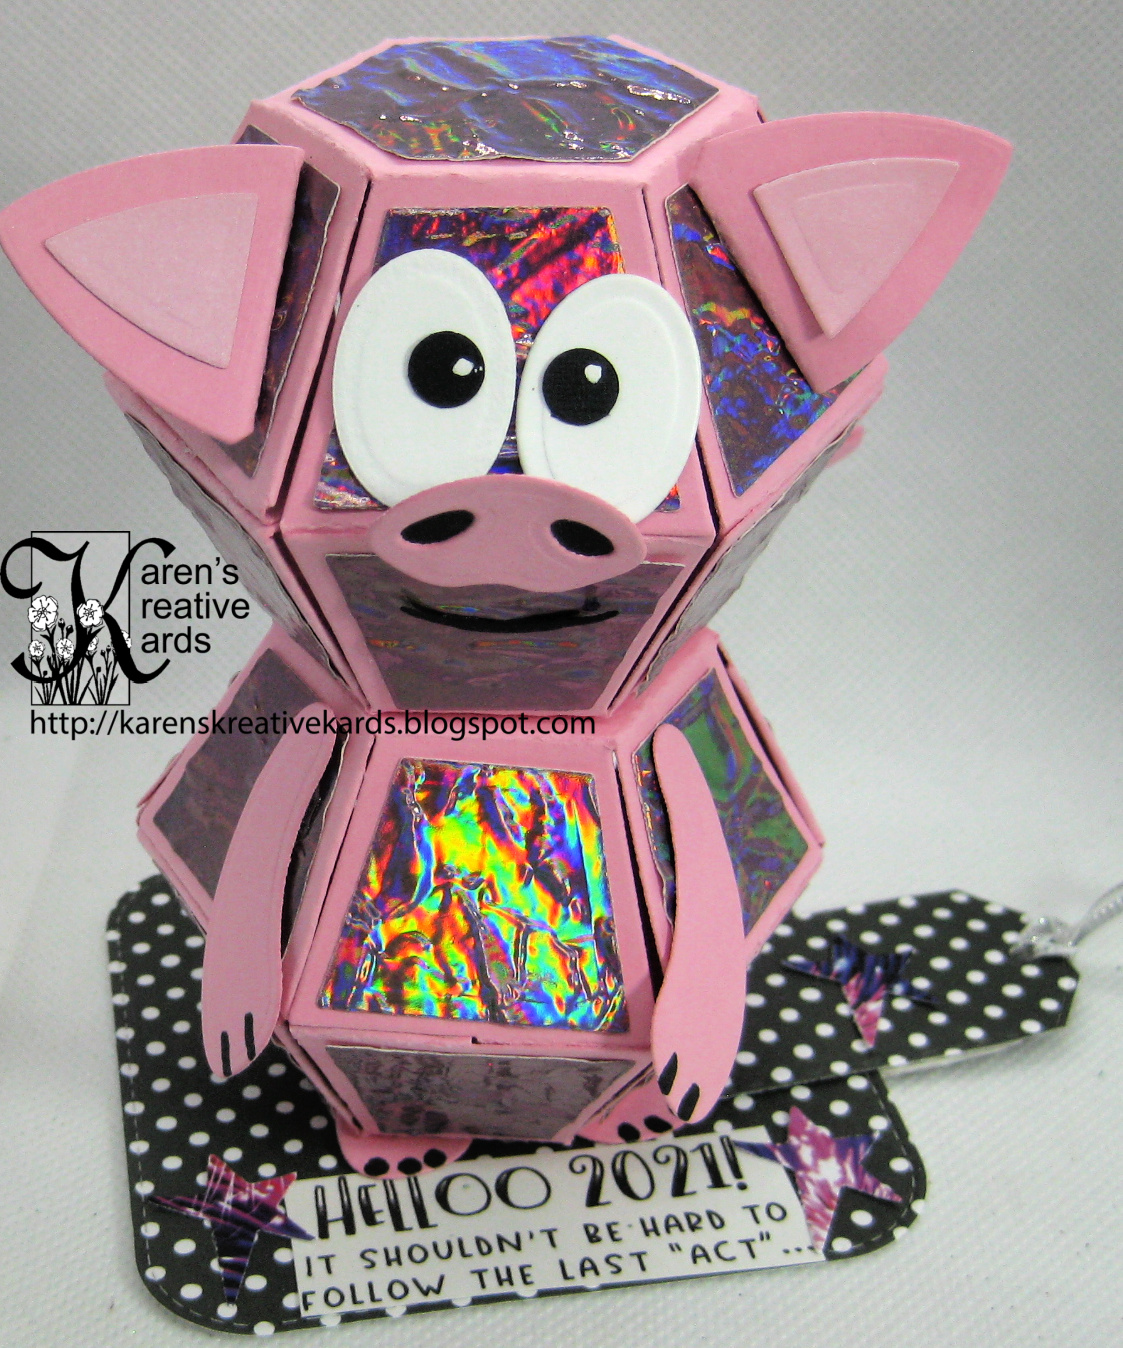
Isn't this pig adorable? I created her with Karen Burniston's Bitty Ball and Animal Add-ons 1 die sets. I added a funny snarky Hello 2021 sentiment from a free digital stamp set by Taylored Expressions. The iridescent pink mirror card from Tonic Studios was embossed with a SU embossing folder for texture on her skin.

FYI- I am participating in a video hop tomorrow featuring slimline dies from Whimsy Stamps, so my usual Monday YouTube video will be on Tuesday instead. Be sure to check back tomorrow and then hop and comment for chances to win awesome prizes from Whimsy Stamps!

I am entering this card in the Anything Goes challenge at Simon Says Stamp Wednesday.


Friday, November 27, 2020

Stamplorations Giving Thanks Blog Hop and Giveaway

It is a little harder to find things to be grateful for this year and this Thanksgiving, but I can still list quite a few blessings. Zoom is a blessing even though of course I would rather be with my family and friends, but when we cannot, we can at least see each other's faces and visit together. We have our health and pray for all those facing health issues this holiday season. And I am blessed to have been chosen as a guest designer at Stamplorations and for all the awesome dies and other products I have received for those guest designer spots. I decided to participate in the Stamplorations Giving Thanks promotion with this card:


I just received some new rainbow foil from Brutus Monroe and Therm O Web that sparkles with stars and decided that would be perfect behind a gorgeous Dragonfly Cover die from Cutplorations (a division of Stamplorations.) I added some punched dragonflies out of the Rainglow foil and sentiments from the Everyday Sentiments Die Set to the front and on the inside of the card.


I am also grateful for all those who follow me on this blog, on Instagram and subscribe and watch my YouTube videos. Remember you can hop in the Giving Thanks Blog Hop for chances to win and participate in many other ways too for chances at great prizes!

I am also entering this card in the Anything Goes challenge at Simon Says Stamp Wednesday.

Tuesday, November 24, 2020

More Interactive Pop-up Holiday Cards with Karen Burniston Dies From My Newest Video


I admit I totally CASED (Copy and Selectively Edited) this four way pop up card from Karen Burniston in her Mini Pop Ups Die Set Assembly Video on her website here. This new die set has 4 small versatile pop up dies and I used at least one in all the cards I am sharing today from my newest video. I made this card for my youngest grandson and personalized it with KB Alphabet Letters and some cute penguin paper. 


The top panel opens up to reveal Santa and his sleigh saying "HoHoHo". Santa was cut with a die from Impression Obsession and HoHoHo is a die from Taylored Expressions. The next panel opens to the left and reveals a pop up Big Hugs (from Cutplorations) and a wiggly snowman using dies from Karen Burniston. The next panel opens to the right and a picture of Grandma and Grandpa pops with with a message of love on both sides. The bottom panel opens to the left with a very true "Missing You" message (from Cutplorations) and an oval to sign the card. 


I also have a teenage grandson who loves Minecraft so I made him this special Christmas slimline card and look at what happens when the "push here" button is pushed:


It is easier to see in the video here, but the image lights up using Pear Blossom Press EZ Lights. I added several more pop up MineCraft images in the inside of his card as well as some heartfelt messages from Grandma and Grandpa:


I shared the front of this last pop up card in my video last week featuring layered camouflage stencils in many different ways. On the inside of that card is a pop up Holiday House created with another new die from this Karen Burniston release and popped with one of the dies in the Mini Pops Pop Up die set. Anything can be popped up with these dies! The sentiment die is by Tonic Studios.

I had so much fun creating easy pop up winter holiday cards especially the Bitty Ball animals that I share in my newest video here. I am quite sure the recipients will love them as we look forward to the holidays next year when we can get real hugs and visits!


Monday, November 23, 2020

Video - BItty Ball Animals and Winter Holiday Pop-Up Cards with Karen Burniston Dies


 I love to make pop up interactive cards and especially bitty ball animals with dies from Karen Burniston. In her newest release there is another Animal Add-ons die set (#3) that makes reindeer and penguins! I had so much fun playing with the new dies in this release as I show in my newest video here. 


In the video I show how to make this adorable penguin Happy New Year card step by step. Here are some more pictures showing the front and inside at different angles: 


The front is made with all Karen Burniston dies including the new Pattern Plate - Snowflakes. On the inside, the fireworks paper is from Divinity Designs, the Happy New Year die from Kat Scrappiness and the perfect snarky new year's message is a free digital stamp from Taylored Expressions. I like making pop up animals with Karen Burniston's Bitty Ball die set because they fit better into a card and delight the recipient when the card is opened!


This is the Christmas version of my bitty ball animal pop up card that I also share in the video. The front is a trifold held closed with magnets and I created the pretty snowflake background with the new Snowflakes Pattern Plate and Tonic iridescent blue mirror card. The sweet little reindeer is from Karen's Christmas Animals die set and the popping up sentiment is also from KB. It gives a hint as to what happens when the card is opened:


Isn't my Rudolph reindeer adorable? He pops up because there are rubber bands in both of the bitty balls and is decorated with die pieces from the new Animal Add-ons 3. 

I have three more winter holiday cards to share with you in the new video using dies from the newest release from Karen Burniston so I hope you will hop over to my YouTube channel and watch, comment, share and subscribe. 

Sunday, November 22, 2020

Twofer of Stars With New Slimline Stars Background Die


I just got a new stars slimline stars background die from Tutti Designs and wanted to play with it so when I saw the Stars challenge at the Twofer Card Challenge, I got these cards made today. The black and gold version is a slimline card with a peace sentiment from Tonic Studios. Here is another view:


For my second card I layered yellow on black and black on yellow, cut them in half and then down to an A2 size card. The birthday sentiment is from Simon Says Stamp and I sponged on yellow ink so it matched the color scheme. 


Video - Stamplorations Stencils for Holiday and Non-Holiday Cards as the Stencil Sunday Guest DT


I was so honored and thrilled to be asked by Stamplorations to be a guest dt member for Stencil Sunday for November, December and January! I had so much fun designing with their awesome stencils, dies and stamps that I made eight different cards and a video for my November Stencil Sunday! In my video I share all the cards and how to stretch your crafty dollars by making non-holiday cards with Christmas stencils and Christmas cards with stencils not designed for the holiday season. 

Most of the cards I made are shown on the Stencil Sunday blogpost at Stamplorations blog here. IF YOU COMMENT ON THAT BLOGPOST, YOU COULD WIN A $15 GIFT CODE, so please click, read and comment.


This card is definitely not a Christmas card but was made with stencils called Christmas Trees and double stenciled with a slimline Kitty stencil. I also feature a perfect die cut sentiment die called Big Hugs from Cutplorations (a division of Stamplorations) that I liked so much, I bought it twice! Lucky for one commenter on my video that I did because I am giving it away to a commenter who lives in the USA and leaves a comment before December 1st following the instructions in the video.


In the video I show all 8 cards and how to change this floating easel Christmas card into a masculine birthday card, so be sure to watch the video and comment for a chance to win. 

If you are reading this on Sunday November 22nd and you like all the stencils, dies and stamps from Stamplorations you see in the video and on their blogpost, rush right over to their website for THE GIVING THANKS FLASH SALE FOR 50% OFF ALL ORDERS WITH THE CODE GIVING THANKS!! But if you reading after Sunday, you can still save 20% any day by using my code: STAMPGIRLKARENH! 

I had so much fun designing with Stamplorations great stencils and other products for Stencil Sunday and hope my cards and the video inspire you to give some of them a try!

Tuesday, November 17, 2020

A Colorful Life Designs Camouflage Stencil Cards Four More Ways


As I shared yesterday and in my new video here, the new Camouflage Layering Stencils from A Colorful Life Designs can be used in traditional camo colors but also for unique easy backgrounds in different colors. I used three different blue distress inks on a blue marble cardstock to create this background, then cut three stitched layers with Gina Marie Designs rectangle dies. I layered on navy blue cardstock and raised each layer before adding a "thank you" from Karen Burniston.


This card also features Gina Marie Designs and Karen Burniston dies with a purple camo background. How about we step it up even more and add foil to the last layer: 


I created this gatefold card with Fired Brick and Black Soot Distress inks through the first two layers of the Camouflage Stencil Set. Then I added Deco Foil Transfer Gel Duo through the last layered stencil and after it dried tacky, attached Brutus Monroe Sunrise Deco Foil. I cut out the pieces for the sides and front of the gatefold card and attached a "thinking of you" from Karen Burniston. 


With a little imagination and the right colors and glitz, camouflage can even be used for a Christmas card! I started with a green lightly patterned cardstock and applied red and green inks through the first and second camouflage stencils. For the third layer, I started with a very bright green ink and then added Iridescent Glitz Glitter Gel from Gina K Designs and Therm O Web and let that dry. I layered the square background on red mirror card and added a Christmas greeting with a die from Karen Burniston.

I sure had fun stretching my imagination and supplies to create seven very different camo cards for every season and reason for my newest video here. I hope my cards and ideas encourage you to give these new stencils a try!

Monday, November 16, 2020

Video - Stretch Your Supplies Series - 7 Layered Camo Stencil Cards


It's November in Wisconsin and I know many people who just can't wait to go deer hunting. I just bought a new set of camouflage stencils from A Colorful Life Designs that is perfect for all the hunters and outdoorsmen and women in our lives. But I love to stretch my supplies so I also stepped up the camo with different colors and mediums and created 7 different cards for my newest video here.

Deer hunting camo in Wisconsin is orange so the background on this card for a hunter was created with two colors of orange distress ink and Black Soot on a piece of orange cardstock. As I show in the video, the three layers of stencils are so easy to line up and create the awesome camouflage look! I also used another new stencil from A Colorful Life Designs called Sighted to add the bullseye on the deer (die from Tim Holtz and Sizzix) and add the sentiment. 


Of course traditional camo colors are greens and browns and blacks, so I made this card for a hunter with a sense of humor. I hope it doesn't offend anyone, but I thought he would like this play on words. I used Mowed Lawn, Pine Needles and Black Soot Distress Inks on a kraft piece of cardstock with the three layers of the Camouflage Stencil Set, then cut out the letters (Karen Burniston dies), raised them on black foam and attached back in for the eclipse technique look. Happy Birthday is a Penny Black die and the deer is from Sizzix. 

But these brilliantly designed stencils do not have to be used for traditional camo colors. In the video, I show how to step it up by choosing different colors and even adding a layer of Glitz Glitter Gel like I did here:


I make this card in the video and started with a piece of pink cardstock on which I stenciled two colors of pink ink and Black Soot again. I added Iridescent Glitz Glitter Gel from Gina K Designs and Therm O Web to the last layer. After it dried, I die cut out the stitched frame from Kat Scrappiness and popped it up on Motion Crafts Double Sided Skinny Foam Tape Strips, then attached to a black A2 cardbase. I trimmed a little from the inside triangles before attaching them inside the frame. "Celebrate" is a scripty word die from Tonic Studios. 

Be sure to watch the video to see how easy it is to make unique backgrounds with the Camouflage Stencil Set from A Colorful Life Designs and 4 more cards with different colors and mediums.

Wednesday, November 11, 2020

Honoring Veteran's Day With Patriotic Cards From My Newest Video


Happy Veteran's Day! I made these cards and my Pinterest inspired video with Clear Views Transparencies much earlier this year when I thought my twin brother was going to be going on an Honor Flight to Washington DC with several hundred other veterans. That of course has not happened yet, but I thought this week would be a good time to post these cards. The card above features a flag frame created with a Tim Holtz Sizzix die and several star dies.

In the new video, I show how easy it is to take Clear Views transparencies and some great sketches to make a batch of cards (or just one.) The link will take you to a page on the Let's Create website in Wisconsin Rapids, WI. You can pick the Clear Views transparencies you like and then call 715-424-1343 to order.


In the new video, I show how to make this unique version of an easel card with a Memory Box starry night die and a sentiment from Taylored Expressions. 


Here is CAS another card I made after finding a sketch on Pinterest. I knew I wanted to use the Clear Views transparencies and patriotic paper but went to my Sketches Board on Pinterest to find a sketch that makes a fun CAS card. Here is my last card which features a Paper Cut pre-cut card base and layer and a star flourish die from Tonic Studios:


So remember when you are stuck for a card design, check out Pinterest and my video here.