Showing posts with label Stamplistic. Show all posts

Monday, July 18, 2022

27 3D Embossed Cards Made in 5 Minutes or Less!


Do you like to make gorgeous cards in less than 5 minutes you  can send out with pride to loved ones and friends? Who wouldn't? In my newest video I share many many cards I made with 3D embossing folders PLUS...Plus stencils, mirri card, sentiment dies and a new product for me called Gilders Paste Wax. I created 27 cards plus a few in the new video and so these blog posts are going to be photo heavy. To see how easy it is to create these cards and see a demo on the Gilders Paste Wax, be sure to watch the video here. 

I have four new 3D embossing folders that I use on all the cards I share. Under the picture of each card I will share a little info on what I used on the card.

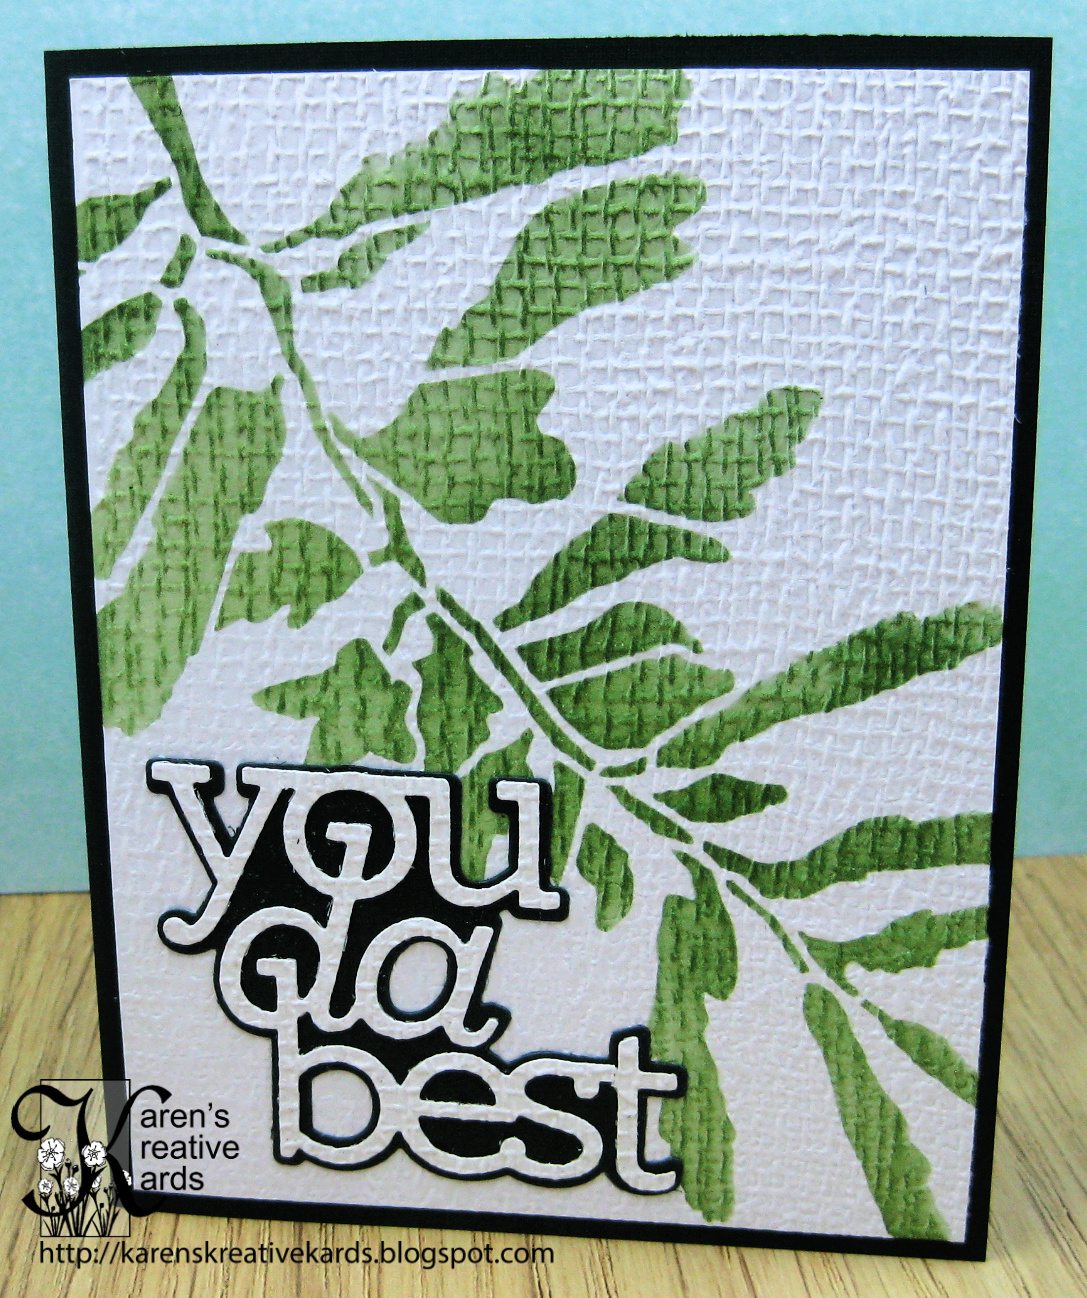
I made a version of this card in the video showing how to add several colors of ink through a stencil onto the textured background created with the Woven 3D embossing folder from Tim Holtz and Sizzix. The stencil is a brass one from Sweet Poppy called Absolute Abstract and the sentiment is a die from Simon Says Stamp.


These three cards all feature stencils and brushed ink color onto a background created with the Sizzix Woven 3D embossing folder. 


I also demo in the new video a new product I just discovered called Gilders Paste Wax. Every month on the 2nd Saturday there is a full day of free classes on the Crafters Classroom Facebook Page.  You can watch for free but you can also choose to purchase kits so that you can make the cards with the instructor and I decided to buy the waxes and other supplies for the "Wax on Paper Intro Class" taught by Bill the Gilder. I have tried other paste waxes before but was disappointed in the limited colors and how I ruined my stencils with them. There are 28 colors of Gilders Paste Wax including 16 Metallics available at Stamplistic here and I am ordering more after playing with the ones I got in the class kit. I show in the new video how I made the card above in just a few minutes with the Patina Gilders Paste Wax and a lovely sentiment die from Sue Wilson and Creative Expressions. 


I also demoed this quick card to show how the Patina on navy blue cardstock can be buffed to a brilliant shine especially on a less detailed embossing folder like this one from Stampin' up called Cascading Ruffles. I added a 3D champagne Easy Topper from Hearty Crafts and a Celebrate die cut from Karen Burniston. Here are some more cards I made with 3D embossing folders and the Gilders Paste Wax:


In the video I also show many cards made with the lovely Botanical Ferns 3D embossing folder from Lisa Horton and this one features the Antique Gold Gilders Wax on brown and on green with the pattern continuing from the back to the front.


I was so happy to find out the Gilders Paste Waxes can be washed off stencils (and my hands) with Fast Orange Hand Soap and will be playing with it and my stencils more for another video after I get the new colors I ordered. I added Patina over the Sizzix Woven 3D embossed background and then added Antique Gold through an Artplorations stencil. The sentiment die on this card and most of the cards I share in the new video is from Sue Wilson and Creative Expressions as I just love her use of different fonts in her dies.

I hope you will watch the new video to see my demos of this great new product and all the rest of my 5 minute cards made with 3D embossing folders. Remember to take some time to play this week and then send some of your handmade joy out into the world!

Tuesday, March 1, 2022

More Easy To Make Floral Pinpoint or Debossed Cards


Most of the cards I share in my newest video featured stencils, but I do show a couple cards with the pinpoint or debossed backgrounds and simple floral dies such as this easy to make birthday card. I simply debossed the iridescent mirror card from Tonic Studios with the Memory Box Pinpoint Daisy background die and attached the Stamplistic Floral Flourish diecut on top. STAMPlorations clear sticker sentiments are so easy to attach to cards like this and I added Therm O Web's Easy Cut Adhesive sheets before cutting the black mirror card floral flourish. I made this and the next card in less than 5 minutes, but love how they turned out!

The leafy pinpoint background on this card is also from Memory Box on black Tonic Studios mirror card; the floral dies are from Gina Marie Designs and the sentiment strip is from Simon Says Stamp. 


Here is another favorite of the cards I share in the new video. I started with a Basketweave Slimline Die from Honey Bee Stamps that just adds that subtle texture and then brushed various colors of ink through ARTplorations Just Roses slimline stencil. The sentiment sticker is also from STAMPlorations. 


This is the full size slimline card I made a mini-slimline version of in the new video. I show how to apply Cosmic Shimmer Lustre Polish through a ARTploration slimline stencil (Peaking Mandala) over a pinpoint background die from Memory Box. I love how the inside pops with a W fun fold and am going to show how to make a similar card and the template for this card on my Facebook Live this Thursday, so be sure to join me there!


The W fold features ink stenciling over a pinpoint Stitched Heart Background Die from Kat Scrappiness. The alphabet dies are also from Kat Scrappiness as is the Wonky Wavy square die for the signature piece. 

I am entering the first card in the Anything Goes challenge at Simon Says Stamp Wednesday.

Sunday, December 25, 2016

Merry Christmas Wishes for All!


I finally gave this card to my bff yesterday and so I can share it here on Christmas Day. I used real Swarovski crystals and a layered stamp from Stamplistic to created the poinsettia which can be used as an ornament. Here is a close up look at the sparkle of the crystals and Nuvo glitter on the green leaves. I am entering this card in the Make it Sparkle challenge at Simon Says Stamp Wednesday Challenge.
Santa has come to our house and all the stockings and presents are ready for my kids and grandsons when they come tomorrow! Grandma can't wait! 

Wishing you all a blessed holiday season! I will be back after our Christmas visit with more cards and ideas to share.

Tuesday, November 22, 2016

Snowman Sparkle from My Favorite Booths at Madison Stamp Show


I had so much fun this weekend at the One of a Kind stamp show in Madison and this card was made with make and takes and ideas from my favorite two booths at the show. The snowy background which sparkles with stars and shimmer when it is moved IRL was made with a Gina K product called Foil-Mates and a laminator. I saw a video by Gina K last summer here and immediately bought everything I needed to make the background. But I didn't find the time until I was inspired by her demos in the Craft Fancy booth. So of course I bought some more of her Foil-Mates sheets and Deco Foil and pulled out the laminator and gave it a try. It is impossible to capture the movement and sparkle on this card, but here is another view: 
I added some small gem stickers by Stampendous to the snowflakes and around the snowman  for even more sparkle. The snowman was a make and take in another favorite booth - Stamplistic. The scarf and buttons are sparkling with real Swarovoski crystals and the snowman is layered for great dimension. Here is a look at the inside where I foiled the sentiment with another Gina K Foil-Mates and rainbow foil.

I will be sharing many other cards with Gina K Foil-Mates and Stamplistic stamps and sparkle in the near future.