Showing posts with label Viva 3D Paint. Show all posts

Friday, February 5, 2016

Mixed Media Design and Happy Dance!


It's Crackerbox Palace Friday and today I am sharing a Mixed Media style card I made with Crackerbox Palace stamps. I don’t often design cards in this style, but I was inspired by the new Just Mixed Media! Issue of Just Cards I received this week. The magazine is packed full of beautifully photographed mixed media wall art, tags, atcs, journals and cards. I have a four cards in the issue including a Happy card on the cover (a first for me.)

I started the card above by heat embossing with white embossing powder a few fun stamped images from Crackerbox Palace. Then I sprinkled on orange, green and purple Color Burst powders and spritzed with silver iridescent Glimmer Mist. I added some black Viva Modelling Paste through a TCW stencil. When that was dry, I sponged on some black distress ink through another TCW stencil and around all the edges. I also did some doodling in the petals of the center flower with a thin black marker. I attached the completed card front to a black A2 card base. 

I am entering this card in the anything goes challenges at Jo’s Scrap Shack and Crafting from the Heart, and the "text" challenge at Craft Stamper Magazine.

Tuesday, October 27, 2015

Mixed Media Joy Card


I was playing recently with mixed media backgrounds for my cards and came up with this Christmas card for my stash. I started with a piece of watercolor paper, sprinkled on green and yellow Brushos and spritzed with water. I stamped some holiday text and created circles with several sizes of caps and found items with red 3D Stamp Paint from Viva. I also spattered red dots with a paint brush and diluted distress ink. I die cut an ornament (Memory Box) out of the piece and popped the ornament back in the negative space. I also die cut the ornament and the "joy" (Tim Holtz for Sizzix) out of shiny red paper and attached. The completed card front was attached to a red card base.

I am entering this card in the Mixed Media challenges at That Craft Place and Love to Create.

Sunday, July 26, 2015

Believe Mixed Media Christmas Card


This mixed media card is one of three cards I am teaching in August to my students in my home class. I started with two pieces of watercolor paper, sprinkled on Ostwalt Blue and Purple Brushos and Violet Color Burst and spritzed with Dazzling Diamonds Glimmer Spray. IRL the background is very sparkly. On the smaller piece (after it dried) I applied Gold Metallic Creative Media from Imagine Crafts through a poinsettia brass stencil from Dreamweaver and let it dry. On the larger piece, I stamped a Hero Arts Merry Music background stamp randomly. Then I put some Rose 3D stamp paint from Viva on my craft mat and created circles with that and various sizes of bottle caps and covers. I mixed black distress ink from Ranger with Heidi Swapp gold spray on my kraft mat, picked it up and spattered it on the background with an old small paint brush. I attached the smaller panel to the larger one, and added a "believe" die cut from Tim Holtz for Sizzix and some pearls.

I am entering this card in the Sparkle and Shine challenge at Simon Says Stamp and the Anything Goes challenges at Brown Sugar and Crafting with Friends.

Sunday, July 5, 2015

Dotted Timeless Mixed Media Card


I am having more fun with new stencils and the mixed media look on my cards. The theme this week at Simon Says Stamp Wednesday Challenge is Going Dotty and this card certainly qualifies. I started with a piece of watercolor paper that I sprinkled on grey and orange Brusho Coloured Crystals and spritzed with a gold spray from Heidi Swapp. After it was dry, I applied blue 3D Stamp-Paint from Viva through a new stencil from Stencil Girl. Then I sponged black distress ink through a couple of other dotted stencils from The Crafter's Workshop. I die cut a scribble circle (from Papertrey) out of two sided tape from Sookang and removed the top cover and applied Cosmic Shimmer gilding flakes. I layered the scribble circle onto a black circle to complete my dotty card.

I am also entering this card in the Anything Goes challenge at Simply Papercraft.

Saturday, June 13, 2015

A Mixed Media Newbie Masculine Card


I am very new to Mixed Media type cards, but am having fun experimenting. I saw in a video someone put gesso on a brightly colored dp to tone it down, then added paint. I don't own any paint but I use my B/B/CB (Brushos, Bisters and Color Burst) powders for color instead of paint, so I tried that after the gesso dried on this piece of polka dotted dp. Not much happened, because the gesso prevented the colored liquid from soaking in and it mostly sat on top. However, I used a silver iridescent glimmer mist and blue Brushos and the card front is sparkly and has a tint of blue. I stamped some words from a background stamp by DRS Designs in several places. I used a gold texture paste through a stencil for some great texture and dimension. I created a black spray with black soot distress ink and water and sprinkled it on with a small paint brush. And I added some more color and texture with bottle and container caps dipped in blue Stamp Paint from Viva. I stamped the sentiment from My Favorite Things on a matching scrap, layered on black and attached. The headphone die is also from My Favorite Things. I layered the completed card front onto a square black card base.


I have these cool new dies from Tim Holtz for Sizzix that I had not used yet, so continued the Mixed Media theme inside the card by simply die cutting the side of the white piece.

I am entering this card in the Texture Take It Make It challenge at Craft Stamper Magazine and the Masculine challenge at Anything But Cute, which is a new Mixed Media challenge I was turned onto by one of my readers. I am a newbie but am having so much fun you will see more of this side of my cardmaking in the future for sure.

Thursday, August 7, 2014

Cover of the August Issue of Die Cut Crazy!

I have had hundreds of cards published and many full length articles too, but I never made the cover until this  newest issue of Die Cut Crazy, so I am very excited! I am doing a monthly column called Never Too Early to Make our Christmas Cards and this is the card I shared along with a review of the Spellbinders Tool in One. Have you tried that yet? I love the Zig Zag die from Memory Box, but I used to have to poke out all the holes by hand in the paper and clean the ones out of the die too. With the Spellbinders Tool in One, you can simply roll the bristles over the paper or the die on a mat and they fall right out! I die cut kraft paper twice with the Zig Zag die and stamped the sentiment from Paper Trey Ink in the center. The poinsettia was cut with a Marianne Creatables die and colored with 3D Stamp Paint from Viva to make it sparkly. I added some greens punched with a Martha Stewart punch.

Check out the new issue of Die Cut Crazy if you have an iPhone or iPad. We are having a birthday blog hop next Friday (the 15th) and I am told the PDF version should be ready by then for those of us without an iPad or iPhone. And there will be prizes and lots of great birthday card inspiration!

I am entering this card in the Anything Goes challenges at Through the Craft Room Door and Paper Take Weekly.

Wednesday, July 30, 2014

My Designer's Choice Challenge - Sparkle, Glitter and/or Bling!


It’s another Designer’s Choice Challenge at The House that Stamps Built, Repeat Impression’s blog. It’s my turn this time and I am challenging my team and you to make a card with Sparkle, Glitter and/or Bling.  After you make your sparkly card, you can enter it for a chance to win some awesome Repeat Impressions rubber! Please visit the blog for all the details and to see the other Rock Star's cards for this DCC challenge. I have seen them and you do not want to miss them!

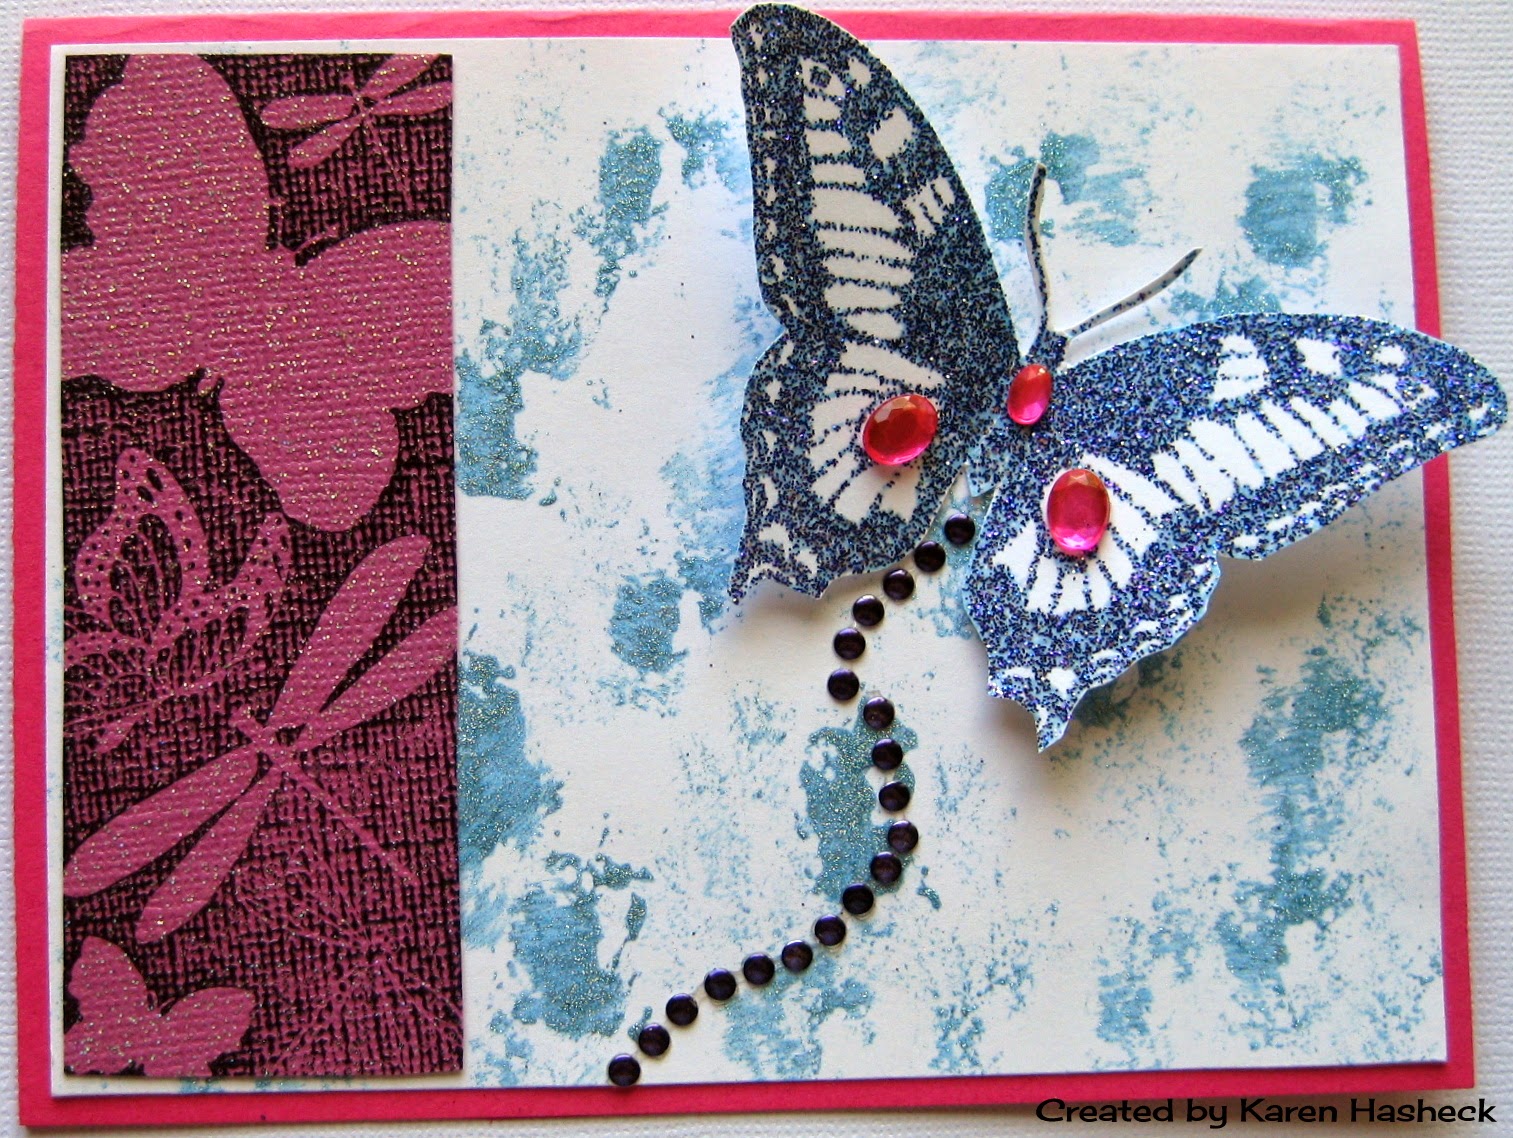
My card is full of sparkle, glitter and bling, and IRL it really shines. I started with a background of sparkly Viva 3D blue paint sponged on with a sea sponge. I stamped Wings Negative on a sparkly pink paper, cut out and applied to the side of the card. I embossed the large butterfly with a blue glitter embossing powder and cut out. Then I added some pink bling to the butterfly and a blue path of some more bling.  

I am entering this card in the Anything Goes challenges at Crafting from the Heart and Through the Craft Room Door.

And don’t forget: For a 10% discount on any size order at Repeat Impressions, just make a note of my discount code (rr10kh), click on the blog badge on the side of my blog and go to the website here to shop and save!

Sunday, June 1, 2014

Viva! 3D Stamp-paint Feather Card for Classes

Sometimes a card comes together very easily and other times I struggle with the design for days. I started this idea weeks ago and was not happy with the card. After setting it aside for a while, I tried again and this time I am thrilled with how it turned out. I was designing it for a class in my home on using Viva 3D Stamp Paint and the class is now up on my Flickr board here along with several other new classes.

I started by sponging a feather stencil with light blue distress ink, then sponged the rest of  the background with a swirls and dots stencil by ColorBox. The feather stencil (sorry do not know who made that one) has two open feather shapes and two detailed feather outlines that match. I taped the detailed outline stencil down and applied blue Viva 3D Stamp-paint though the stencil outline. In real life, this paint is sparkly and adds wonderful texture to the card. I cut some small feather dies (IO) from vellum, colored the back side with a blue Copic and attached with some blue thread. I added some sequins, a "hello" from Paper Smooches, and rounded one corner of the layers and the card base.

I am entering this card in the Anything Goes challenge at Simon Says Stamp and Sister Act.

Sunday, May 18, 2014

3D Stamp-Paint and Stencils

I managed to find time this week to play with my 3D Stamp-Paint from Viva, stencils and dies I have been neglecting and came up with this card. I started with a yellow piece, a stencil from Memory Box and my gold 3D Stamp-Paint. I attached the stencil to the paper with temporary tape and dabbed on the gold 3D paint with a spouncer. I cut out the green tree frame with a Spellbinders die and stamped the sentiment from Simon Says Stamp on vellum. The 3D paint does not take long at all to dry which is nice for those of us impatient stampers. I attached the vellum behind the tree and frame side and raised the green frame with pop dots and attached to the card. I added a flower and gem to complete the card. The 3D paint has wonderful sparkle and texture which is hard to show you in a photograph.

I am entering this card in the Anything Goes challenges at Sister Act, , Craftitude (AG and/or Use a Die) and Simon Says Stamp (Die Crazy.)

Friday, May 9, 2014

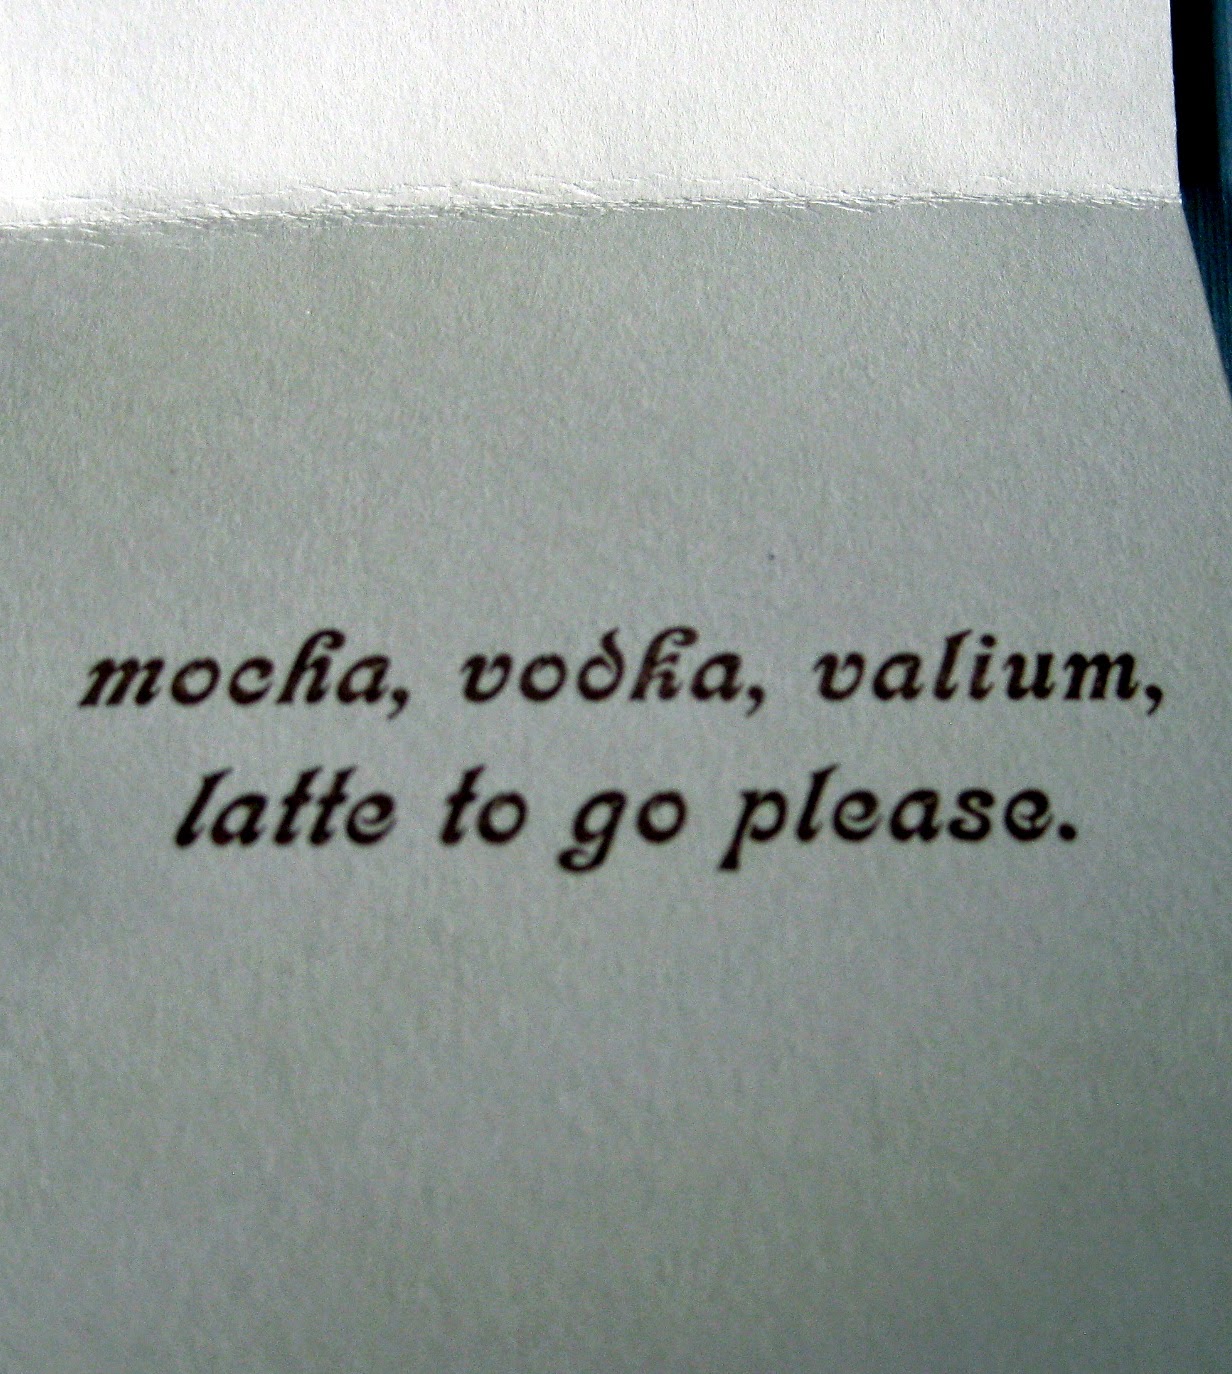
I'll have a cafe', mocha, vodka, valium, latte to go please...


Then please pick me up off the ground… It's Crackerbox Friday and I am sharing a new card I made with a bunch of fun stamps from Crackerbox Palace. I love making people laugh with my cards and CBP has so many funny lol stamps. I just used part of the sentiment on the front in the center of a cream top opening card. I stamped the coffee cup and floral element in Versamark on kraft paper and attached the top half with mounting tape to raise. I embossed the bottom half with a Tim Holtz wood embossing folder and sponged on brown Viva 3D Stamp Paint. I also raised that piece with mounting tape. I stamped CBP’s coffee pot on patterned paper, cut it out and attached. Check out the rest of the sentiment on the inside- could you imagine how you’d feel after that combo?


 Thanks for stopping by my blog. The stamps I have used today and many other awesome stamps are available on our new website here. 

I am entering this card in the Anything Goes challenges at Paper Take Weekly and Scrapper’s Delights.

Tuesday, May 6, 2014

Playing with Stencils and 3D Stamp Paint


I have been playing with stencils and Viva 3D Stamp Paint. It has great texture and sparkle in real life- not so much in a picture. I have a butterfly stencil from Heidi Swapp and I applied sparkly blue 3D stamp paint through the butterfly holes in the stencil. I added some punched and die cut butterflies, a die cut sentiment and some sequins to complete the card.

I am entering this card in the S challenge at Quirky Crafts (stencils, Stamp Paint and sparkle) and the Anything Goes challenge at Ditzie Digi.

Saturday, May 3, 2014

Happy Father's Day (From the Kids) Challenge at SAS4Kids

It’s Saturday and time for another fun challenge at Send a Smile 4 Kids! This time our challenge is Happy Father’s Day (From the Kids)! Create and link any card that a child could give to his Dad or Grandpa and you could win one of our great prizes. Once again we are starting early so there is enough time should you choose to send in your Father’s Day cards for one of our kids in a children’s hospital on Father’s Day to give to his Dad or Grandpa. The gift of giving is one of the best things we can give to our kids! All the details on how to donate can be found on the blog here.

We have three very generous sponsors for this challenge: Kitchen Sink Stamps is giving their winner a $25 gift certificate! Stitchy Bear Outlet is giving their randomly picked winner 3 images (a $10 value)!  And Fred She Said’s winner gets a $10 gift certificate! TEAM S.A.S will also be choosing their favorite cards for our top three and the winners will receive a blog badge and an opportunity to be a guest design team member on a future challenge.


My first card above is made with a set of stamps from Kitchen Sink Stamps called Classic Old Truck. It is perfect for Father's Day or any other occasion for a man. I love Kitchen Sink Stamps because they make me feel like a real artist with all the beautiful shading made easy with their series of stamps for each image. The truck is created with several shades of red ink, along with grey and black ink in stamping layers. The sentiment is from the same set. The silvery black background is made with an embossing folder from Cuttlebug and sponged on 3D Stamp Paint from Viva.

My second card features BB Kakes Balloon Boy from Stitchy Bear's Digi Outlet. Isn't he sweet? I stamped him on a white square and a light blue square, cut out the squares and put him back together as shown. I layered on navy blue and then a patterned cardstock card and added a fun sentiment.

My last card showcases a cute little girl called "Emma in her Cool Cap" from Fred She Said. I created a heart easel card with several Spellbinders heart dies and embossed the pink top heart with an embossing folder from Darice.  Sweet Emma who loves her Dad was printed and simply cut out. The Happy Father's Day sentiment is popped up with pop dots so it holds the easel card open as shown in the second picture.

I am entering these cards in the Anything Goes challenge at Simon Says Stamp  and the Holiday challenge at Addicted to Stamps and More. 

Tuesday, April 29, 2014

Floral Tile Card

I have been playing with my new 3D Stamp-Paint from Viva and am loving this product! There are many ways to use it and this time I embossed a piece of black cardstock with a Stampin' Up embossing folder and then applied silver 3D Stamp Paint all over the piece before cutting it into 1 1/4 inch squares. Those squares were attached to a white card with space in between them to look like tiles. Then I die-cut and attached greens from Cherry Lynn, flowers from Elizabeth Flowers and hello from Paper Smooches.I added some clear gems to complete the card.

I am entering this card in the Anything Goes challenges at That Craft Place and 613 Avenue Create.

Thursday, April 10, 2014

Happy Birthday to my Best Friend

It is my BFF's birthday on Saturday but I am not able to blog that day and I gave her her card yesterday, so I am sharing it with everyone today here on my blog today. I masked the front square piece with a beautiful dragonfly stencil from The Crafter's Workshop and then painted on Rose Metallic 3D Stamp Paint from Viva. This was my first card using this new product, but I will be playing with it more as soon as I have the time. I love the sparkly dimension it gives to a card. The perfect sentiment for my best bud is from Simon Says Stamp. There was more fun when she opened the card:

I continued the dragonfly theme with dragonflies and swirls I cut out with my Silhouette that pop up when she opened the card. I also added some pearls that I recently pulled off my 24 year old wedding bouquet before I finally tossed it. The dragonfly flourishes are attached with strips of acetate to a scored center in the square card. I attached one more dragonfly flourish to the bottom and added another perfect sentiment for my friend.

I am entering this card in the Anything Goes challenges at Through the Craft Room Door and Fan-Tastic Tuesday.