I love my Clarity Stencil brushes and was on the look out for videos and ideas on how to use them in unique ways when I came across this blog post with 4 video tutorials. I fell in love with her card like this and had to even order the same wedding dress set from The Ton that she used. I did change up the color and stencil and used a Tim Holtz die for the sentiment, but the card itself was CASED and I thank Justine for her inspiration. It is a very simple idea- simply use the Clarity Stencil brush to lightly brush color through a stencil and then stamp the beautiful bride. I added the floral bodice and a few floral sequins.
I am entering this card in the Stamp It challenge at Simon Says Stamp Wednesday challenge and the Anything Goes challenge at Craft Stamper Magazine.
It’s Crackerbox Palace Friday and I am sharing a pretty Hello
card I made with some Crackerbox Palace stamps and Clarity Stencil Brushes. I love
the soft look achieved when using the Clarity Stencil brushes with any inks. I
started with an A2 top folding white card. I used a Clarity Stencil brush to
brush on Faded Jeans Distress Ink along the bottom of a piece of white
cardstock. Then I brushed on orange and yellow dye inks and finished with a
little Tumbled Glass Distress Ink along the top. I stamped Crackerbox Palace’s
pine tree and brush stamps, cut the piece into three pieces and attached to the
white card base. I added a CBP stamped “hello” to complete the card.
I have been playing with my new Nuvo Glimmer Pastes for an article I am writing and wondered what would happen if I used two stencils together with the glittery paste? I created a stencil out of acetate with Tonic Studio's Moonglade Wish Semi-Die and then put my Memory Box Diamond stencil under it over a white cardstock piece. I spread the Blue Topaz Glimmer Paste evenly with a plastic craft knife and let it dry, then cut it out with the outside die from the same set. I love how it turned out! These beautiful Glimmer Pastes in 12 gorgeous colors will be available for purchase in the USA after September 15th. Here's a close up of the double stencil glimmer:
I used my Clarity Stencil Brush to apply white pigment ink on the navy card base through a stars stencil by Memory Box and added the perfect sentiment from Tonic's die set of the same name to complete the card.
I am entering this card in the NBUS challenge at Darnell's blog here. The Memory Box stencils and the Blue Topaz Glimmer Paste were NBUS.
It’s Crackerbox Palace Friday and I am sharing a birthday card I made with some Crackerbox Palace stamps and Clarity Stencil Brushes. I am loving the subtle
soft look that is so easy to achieve with the Clarity brushes and ink. I inked
orange ink through a fern stencil onto the orange card base for a tone on tone
look. Then I stamped and paper pieced the sleeping kitty and stamped the
perfect sentiment from Crackerbox Palace. This is going to be my husband’s
birthday card from me and our kitty Lucky.
He always says he wants to be reincarnated as a cat in a loving home
like ours. What a life- eat, sleep, play, repeat.
I am entering this card in the birthday challenge at Live Love Cards.

I decided to make a wedding card for two men and cut the "s" off Tonic Studios Mr. and Mrs. heart die. One of the reasons I love Tonic Studios dies so much is that they are so very versatile. With this die, you can chose to cut the heart alone, or the Mr. and Mrs. without the heart edge (as I did here), or you can cut them together as on the heart on the right. I tried a technique I learned about in a class on line to make a tarnished silver look with embossing powders. I did not achieve the look like the instructor did, but I still like the result. I applied Versamark ink all over the heart that I die cut out of chipboard. I applied Nuvo silver embossing powder and heat set it. Then I added some thick clear embossing powder (from Ranger) and some black Nuvo embossing powder in spots (after applying another layer of Versamark in random areas) and melted the black and thick embossing powder to achieve the look you see. I also tried the embossing technique on the Mr. and Mrs. heart but on that one I did not use any black. I created a square top folding white cardstock card base and used a straight edge mask, my Clarity stencil brush and Weathered Wood Distress Ink to achieve the soft grey lined background. I die cut and attached Tonic's Congrats from the Miniature Moments sentiments line to complete the card.
I am entering this in the Anything Goes challenge at Scrapy Land.
The challenge this week at my favorite challenge blog is "Things with Wings". I recently made this CAS butterfly card playing with several new toys and decided to post it for that challenge (at Simon Says Stamp Wednesday Challenge.) I started with a new words background stencil from TCW and applied Fossilized Amber distress ink softly through the stencil with my new Clarity Stencil Brushes. I die the new and beautiful Bellini Butterfly from Poppy Stamps out of dp and attached with some new gems I found at Let's Create in Wisconsin Rapids.
It’s Crackerbox Palace Friday and I am sharing a sympathy card I made with some Crackerbox Palace stamps and Clarity Stencil Brushes. I am loving the subtle
soft look that is so easy to achieve with the Clarity brushes and ink. I heat
embossed Crackerbox Palace’s beautiful rose bouquet with white embossing powder
in the center of my card front. I applied a strip of temporary tape on all four
sides for a mask and then used a Clarity Stencil Brush to bring in soft color
in the rectangle opening around the roses. After I removed the temporary tape
strips, I applied just a little pink around the edges of the card front to
soften those as well. I stamped CBP’s “With Sympathy” to complete the front of
the card. I also stamped one of my favorite Crackerbox Palace sentiments on the
inside of the card:

The Clarity Stencil Brushes are available at Crackerbox Palace on line, but the website is in transition right now. You can find out more about them by calling the store at 608-755-4638 or emailing them at crackerbox@crackerboxstamps.com.
I am entering this card in the embossing challenge at Scrapy Land and the Anything Goes challenge at Craft Stamper Magazine.
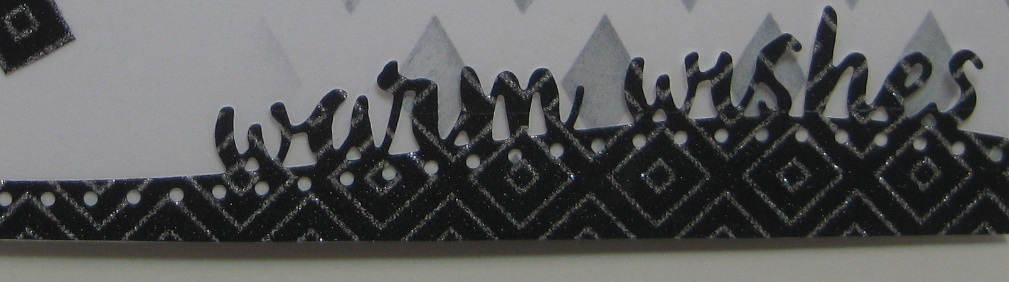
I love it when I come across a new idea using supplies I already have. I have lots of "glitter tape" but rarely use it. I saw a card where someone had die cut a die out of several lines of glitter tape placed on cardstock. I found a fun black and silver patterned glitter tape (Recollections brand from Michaels) in my stash and die cut a new "warm wishes" border die from Memory Box for the bottom edge of this card. Here is another look at the glitter tape die cut border:
Then I looked at the glitter tape again with fresh eyes and cut a corner piece and some squares which I also used on this card. I brushed some Weathered Wood Distress Ink through a Stampers Anonymous stencil with my Clarity Stencil brush fading it out towards the end. I like how this experimental card turned out.
Happy Monday everyone! It's my turn to post a
card on Die-Version's blog and mine,
and I am sharing this sympathy card featuring Die-Version’s beautiful Iron Cross die found here on the Die-Version’s website. I die cut the Iron Cross out of a thick white cardstock which also embossed the diamond shape of the die. I applied Fossilized Amber Distress Ink to the cross lightly with my Clarity Stencil Brush and placed it back in the die cut cross negative space in the card front. I also used the same ink and Clarity Stencil Brush to add some soft color to the diagonal corners of the card front. I die cut and attached Die-Version’s “With Sympathy” from their “With Deepest Sympathy” Wordlets Die. I like how the words are separate so I can choose which words to use or not use.
**Remember you can get a 15% discount on any
of Die-Version’s great dies by simply using my discount code karen15 when
you check out at the Die-Versions website.**