Wednesday, May 31, 2017

Uchi's Design Hugs & Happy Thoughts Animated Card


I recently received the DC 103 Animation Envelope Die Set from Uchi's Design and I created this card for a dear friend with it as soon as I had time to play. I watched the video on the website (link above) and learned how to use the die, stamps and grid from Uchi's Design to create this animated card. Here are a couple more pictures showing the tab being pulled:


I used the bird and sun stamps from the Growing Garden stamp set by Uchi's Design, a sentiment stamp from Altenew and a "Pull Here" stamp from Lawn Fawn. I added a couple punched polka dotted birds to complete the hugs card. Still photos do not show the wonderful animation of these cards very well, so I am sharing a video so you can see the magic:


**Edited to add: To see the animated motion of the bird and sun in this card as well as the butterflies and ballerina above, check out my Cardmaking Techniques and Tips Session 102 - Uchi's Designs Animated Stamps and Dies in Three Different Ways video on my YouTube channel here:  https://www.youtube.com/watch?v=wpRxxjX_M4M&feature=youtu.be. You could even win the cards shown if you subscribe and comment before early October 2017!


Thanks for helping me #spread the joy of creativity!

Tuesday, May 30, 2017

Happy For You Bride's Card with Nuvo and Tonic Studios


A friend recently announced she was getting married and so I made her this card to say how happy I was for her. I stamped Tonic Studio's Belle Boutique Sweet Sashay Stamp with Versamark ink and heat embossed it with Nuvo's black embossing powder. I colored her hair and skin with Nuvo Soft Rose and Rustic Oak Aqua Flow Markers and a Nuvo Aqua Flow water brush. I created a stencil with Tonic Studio's Floral Blooms Patterned Panels Die and used a craft knife to add some Powder Blue Embellishment Mousse through the stencil. I stamped "Happy For You" by Flourishes with black ink, added a few dots with Nuvo's Signature Calligraphy Pen and layered the finished card front onto a black card base. 


Thanks for helping me #spread the joy of creativity!

Monday, May 29, 2017

Congrats 2017 Graduate Card

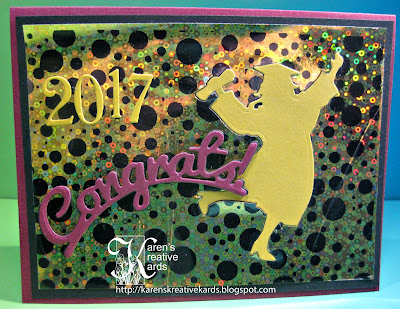
My great niece (yes I am that old! My nephew's daughter is graduating from high school!) graduated this weekend and this is the card I made for her. The colors are gold and maroon as those are her school colors- at least they were many, many year ago when I graduated from the same high school:) I started with the negative of a piece of Gina K's Foil-Mates foiled with her gold sequins. I layered it on black and then onto a maroon cardbase. I die cut a celebrating female grad out of gold and out of the foil sheet and inlaid her back in the shape's hole. I die cut and attached "congrats" and the year 2017 (dies from Tonic Studios.) 

I just can't waste any of the gorgeous golden sparkly foil, so I put it inside the card where I wrote my message of graduation best wishes. 


Thanks for helping me #spread the joy of creativity!

Friday, May 26, 2017

Karen Burniston New Pop up Dies Series - Day One


I was so excited recently to find out that my favorite pop up interactive die designer has started a new company and released a bunch of new designs. I visited Karen Burniston's new website here and placed a large order immediately. I just received my new dies yesterday and had to play right away. If you received this card, you would no doubt think the front was pretty. The grass and hills and clouds (from 1006 Nature Edges) and sentiment dies (1002 Word Set 1-Greetings) are all by Karen B. and are perfect for scenery and saying hello. I added a couple flowers to my card front die cut with a Wild Flowers 2 set by Tim Holtz for Sizzix. 

But when you open the card, the magic happens:


Right?? One of Karen Burniston's new dies is 1010-Flower Pot Pop-Up and it creates a pop up flower pot sure to put a huge smile on the recipient's face! I watched the video here and also printed the PDF with super helpful instructions (both available for every die on the website!) I made mine a little differently from the video in that I cut the pop up mechanism into the card base and added a piece in the front and the back to cover up that hole. I die cut and attached many of Karen's flowers and leaves from the same die set. Then I added some more Tim Holtz flowers, a few punched flowers and some punched butterflies. I attached some Stampendous gem stickers to the flowers and butterflies and die cut another sentiment from the Karen Burniston "Word Set 1 - Greetings" to let my friend know I am thinking of her.


Here is a look at the flower pot pop up from the top. There is a lattice inside the box that the flowers and greens are attached to. I "flew" my butterflies using strips of acetate and added a couple more punched butterflies to the inside of the card. 


Thanks for helping me #spread the joy of creativity!


Monday, May 22, 2017

A School Color Graduation Card with Distress Oxides


 I needed a couple graduation cards this spring and in both cases, I chose to use the graduate's school colors on the card. I started this card by applying two shades of blue Distress Oxide inks to a thicker piece of cardstock with a Smoothies sponge and then spritzed it with water. I die cut Taylored Expression's celebrating grads die in blue and white and layered them together with a white shadow. I also die cut and attached Tonic Studio's Congratulations. 


On the inside, I created a diploma with the cash gift, tied it with a piece of blue baker's twine and attached it with a temporary glue dot. The inside sentiment is an old one from CTMH. 

I am entering this card in the Anything Goes challenge at Live Love Cards. 

Saturday, May 20, 2017

Bright Colors 4 Kids at Send a Smile 4 Kids!


It’s Saturday and time for another fun challenge at Send a Smile 4 Kids! This time our challenge is: Bright Colors 4 Kids! Create and link any brightly colored card appropriate for a child and you could win one of our great prizes.

We have two very generous sponsors for this challenge: Paper Nest Dolls is giving their winner 3 digis of their choice! And the winner from Tonic Studios will receive 8 bottles of Crystal Drops! TEAM S.A.S will also be choosing their favorite cards for our top three and the winners will receive a blog badge and an opportunity to be a guest design team member on a future challenge.

My card today features a sweet digi from Paper Nest Dolls called Birthday Owen. I paper pieced him in bright colors of patterned paper scraps. I foiled a Gina K Foil-Mates birthday message with rainbow colored Deco Foil for a bright Happy Birthday, and layered them both onto a bright polka-dotted cardstock base.


Thanks for helping me #spread the joy of creativity!

Friday, May 19, 2017

Altenew Layered Floral Dies Series - Day Six


I have been having a great time designing with my Altenew floral layering dies and I showed my in home classes the cards I had made. They asked that I teach three of them in an upcoming class and suggested that I design one for Christmas as we all like to make cards all year round for our Christmas card stash. 

I die cut Layer A out of a dark red and Layer B out of a medium red and glued them together. I then cut out the bottom two flowers and attached them with thin strips of mounting tape on a white A2 card base. I die cut and punched some greens and stuck them behind the Christmas flowers. I die cut and attached Creative Expression's Christmas Blessings, then added some gold Nuvo Crystal Drops to complete the pretty Christmas card.

If you would like to see the other cards in this Altenew Layered Floral Dies series, just click here. 

I am entering this card in the Anything Goes challenge at Live Love Cards. 

Thanks for helping me #spread the joy of creativity!

Thursday, May 18, 2017

More Nuvo Glimmer Paste Sparkle for Online Card Class Homework


I really liked the look achieved when I mixed Nuvo's Moonstone Glimmer Paste with shades of dye inks for a sparkly ombre' background on my cards and today I am sharing one more card with that technique I learned on Day 5 of the Sparkle and Shine Online Card Class I am taking. The live class is done this week, but you can take the class anytime and I highly recommend it. For my first card, I combined three shades of Distress Ink with my Nuvo Moonstone Glimmer Paste and applied them directly on an A2 piece of heavy white cardstock. When it was dry, I decided it looked like water, so I die cut and attached some fish from Penny Black. I wanted to say "keep on swimming" as an encouragement for someone going through a rough time. I had a strip of cardstock that was sponged with blue Distress Oxide inks and spattered with some water, so I pulled out my Sophisticated Script letters from Concord and 9th and started stamping each letter. I love these stamps because I can personalize any card with a calligraphy script- way better than my writing! But I ran out of room, so I had to say swimmin'. Let's pretend that is exactly what I wanted to do:) Here is a close up of the sparkle on this card:


For my last homework card, I spread on Nuvo's Blue Topaz, Tanzanite Lavender and Amethyst Glimmer Paste full strength combining the colors a little as I changed colors on the background piece. I created the heart with another technique I learned. I covered a heart cut with Tonic Studio's Traditional Hearts Layering Die Set with Versamark and Nuvo Ballerina Pink Embossing Powder and melted it with my heat gun. That process is repeated several times to get a thick layer of embossing powder. I found to get enough layers it is best to start with a super thick embossing powder like the Ultra Thick EP from Ranger. Once the embossing powder is thick enough, I swiped on some red, pink and purple dye inks and then melted it again with my heat gun. The inks will move around and run down for a faux marble look. I die cut and attached a favorite sentiment from Tonic Studios. Here is a close up of the heart and sparkly background:


Thanks for helping me #spread the joy of creativity!

Wednesday, May 17, 2017

Glimmer Paste Ideas from Day 5 of Online Card Class

I have learned something everyday of my Sparkle and Shine Online Card Class, but my favorite day was Day 5 where they featured Paste and Mousse. I love Tonic Studio's line of Embellishment Mousse and especially their Glimmer Pastes so it was fun to learn new ideas of ways to use these products. I loved the idea of making my own glitter paper in ombre shades using inks and glimmer paste so much I made four backgrounds and then 4 cards! I will show you two today and two tomorrow to sneak them into the galleries before they close. 


It never occurred to me to mix dye inks with Nuvo's clear Moonstone Glimmer Paste, but that was one brilliant idea shared on Day 5. The instructor suggested creating "wings" of scrap cardstock on each side of the thicker cardstock and taping those down with blue painter's tape. That way you can spread the glimmer paste over the entire card front, and then use the "wings" to move to the card to a drying spot. I adhered the card front piece to the side wings with a temporary glue dot runner. On the craft mat, mix 3 shades of a color family one at a time with the Moonstone glimmer paste, and use a palette knife to apply to the cardstock. I used Altenew's Shades of Purple (and pink) for the background of this card. Here is a close up showing a bit more of the lovely sparkle:


IRL it is super sparkly, but more subtle than the colored Glimmer Pastes applied without mixing it with inks (come back tomorrow for a card I used with three shades of Glimmer Paste without the dye ink.) I die cut a beautiful Kindness saying from Hero Arts and added a couple punched butterflies out of some Brutus Monroe paper. 

I made another ombre glittery background mixing three shades of Altenew's Green Fields and Nuvo's Moonstone Glimmer Paste. I had been wanting to try Jennifer McGuire's idea of using tulle to make a shaker card, so I combined that idea with the ombre handmade glitter paper for this card. I die cut an opening in the green glitter piece and in the front of a top folding green A2 card with a scalloped circle die from Tonic Studios. I applied the tulle to each following Jennifer's instructions (linked above.) I dumped some floral and other pastel sequins and attached the pieces together. Here is another look with the sequins spread out:


I stamped the roses from Tonic Studio's new Bunched Bouquet Traditional Spray Stamp Set Two and the leaf from the Stamp Set One of the same name using several shades of Altenew inks. I die cut "sweet" from Tonic's Awesome, Sweet and Cool set and attached with my favorite Nuvo Deluxe Adhesive. Then I finished the card by punching a butterfly out of the center scalloped circle piece and attached with a pink gem. I used a strong glue dot in the center of the butterfly and some small strips of mounting tape on the wings so they will stay up even when mailed.

I am entering the second card in the Bit of Sparkle challenge at Simon Says Stamp Wednesday Challenge. I am also entering this card in the Anything Goes challenge at Live Love Cards. 

Thanks for helping me #spread the joy of creativity!
Tuesday, May 16, 2017

Nuvo Gilding Flakes Homework for Sparkle and Shine Online Class

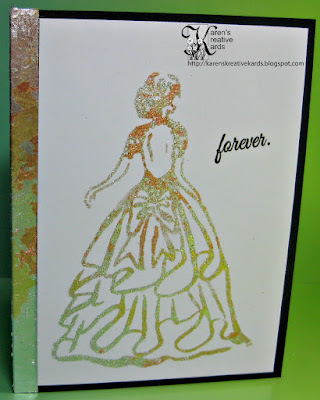
I made another card with the mix of Nuvo gold, silver and copper gilding flakes and the Day 4 lesson at Online Card Classes on how to use gilding flakes with stamped images. I learned how to stamp the image (in this case the gorgeous Belle Boutique Sweet Sashay stamp from Tonic Studios) with Versamark and then apply a sticky powder to that image. I chose Stamp N Bond from Stampendous. I was taught in the class to let the heat gun get good and hot and then melt the powder quickly moving as soon as it melts to another spot. After it cooled just a bit, I rubbed on the lovely mix of gold, silver and copper Nuvo Gilding Flakes and my bride sparkles beautifully. I also adhered a strip of two sided tape down the side of my black card base and burnished in the same pretty mix of gilding flakes. I stamped "forever" from Tonic's Best Friends Forever stamp set to complete the front of my wedding card. Here is a close up look at the gilding flakes and the inside of the card:


Thanks for helping me #spread the joy of creativity!

Monday, May 15, 2017

Gilding Flakes Card with Nuvo for Online Card Class Homework


Day 4 of the Sparkle and Shine class I am taking at Online Card Classes once again featured our awesome Nuvo products and so I had to pull out mine and play with some of the ideas they taught. I was fascinated with the idea of putting Versamark on the back of a stencil and then laying that on a sticky sheet of two sided tape paper. Jennifer McGuire then applied one color of our gilding flakes to the open areas in the stencil. Then she removed the stencil and filled the other areas with a different color of gilding flakes. She also mixed the three colors of Nuvo gilding flakes together and applied them on a different project. I tried the stencil idea on one piece of two sided sticky paper from Sookang and the mixed flakes on another. Both were beautiful, but I could not see the stencil pattern very well, so I cut some stripes and die cuts out of the pieces for this sparkly Celebrate card. The Champagne Flutes and Celebrate were cut with Tonic Studio dies. I attached them with Nuvo fine tip Deluxe Adhesive to a black card base and added some gold bubbles using Nuvo gold Crystal Drops. Here is a close up showing the gold, silver and copper shades of sparkle on this card as well as a peak at the inside where I attached a couple more strips: 


As is often the case, the card is much prettier IRL because it is so hard to capture the sparkle in photographs.


Thanks for helping me #spread the joy of creativity!

Saturday, May 13, 2017

Sweet Spotted CAS Card for Grandson and More Fun News


Day three at the Sparkle and Shine Online Card Class was all about liquid drops and products. As a member of the USA Tonic Studios blog team, I was so happy to again see our awesome Nuvo products recommended by the instructors! I love Nuvo Crystal Drops and use them all the time, but never tried a three layer eyeball and that was one of the tips I learned today. I tried it on the Adorable Elephant die cut (from Tonic Studios) and it is a sweet touch. I also colored his spots and dots with several colors of Nuvo Glitter Markers. I die cut the dotted "hi" with a die from Paper Smooches and filled in the dots with a lime green Nuvo Crystal Drops and dotted the i with a black Crystal Drop. I die cut the letters "evan" with Tonic's Attraction Lower Case Simple dies and colored the letters with red and yellow Crystal Drops. Here is a peak at the adorable grandson who will love this card: 


I am entering this card in the Going Dotty challenge at Simon Says Stamp Wednesday Challenge.

MORE FUN NEWS: I have had another card and tutorial published at AllFreePaperCrafts.com. Here is a sneak peak:


Click on this link to find out how to use dish soap and glitter to make an awesome masculine card. As always, comments are welcome. 


Thanks for helping me #spread the joy of creativity!

Friday, May 12, 2017

More Online Card Class Homework - Day Two Foiling


Day two of the Sparkle and Shine class at Online Card Classes was all about foil and one of the instructors was Wisconsin's own Gina K! If you are a regular visitor to my blog, you know I love Gina K Foil-mates and Therm-o-web foils. I turned on my laminator and played with rainbow foil and Gina K's Swirls and Flourishes Foil-Mates. Once you have the gorgeous rainbow colored background, it is so easy to make a lovely card. I colored a piece of Gina K Therm-o-web White/Gold ribbon with a blue dye ink and attached it to the rainbow layer, and added a Happy Birthday die from Tonic Studios.  
The same piece of rainbow foil can be run through the laminator again with a piece of Therm-o-web toner sheet and all the gorgeous rainbow color transfers. Then I ran it through the laminator one more time with a piece of Gina K's Silver Sequins Fancy Foil for sequin shine on the flourishes. Some of the black still shows but it is still very pretty and sparkly. It is so hard to capture that sparkle and rainbow shine in photographs, but it is really pretty IRL. I added another piece of Gina K's ribbon and a white die cut Happy Birthday from Tonic Studios. 

TIP: I learned a lesson I am going to share with you all- I normally use only Therm-o-web Deco Foil, but I found a large roll of rainbow foil at a stamp show for less money so I tried it. The first time I ran it through the laminator, I pulled off the foil and it did not cover the Foil-Mate well at all. The second one I tried, I ran it through the laminator twice and it worked OK. But I was not happy with the double foiling on my second card with the less expensive rainbow foil either. I will stick with Therm-o-web Deco-Foil in all future purchases. 


Thanks for helping me #spread the joy of creativity!

Thursday, May 11, 2017

Best Wishes Butterfly Glitter Card with Tonic Studios and Nuvo


I recently needed a "Best Wishes" card for a special friend and today I am sharing how I made this card. I chose the Fluttered Fence Die and Embossing Set from Tonic Studios, and embossed a 6x6 white cardbase. I attached a piece of thick white cardstock to a sheet of Sookang two side tape and ran the butterfly topper die from the Tonic set through my Tangerine. The two sided tape sheet is cut, but not the bottom heavy cardstock, so I can take off each piece and put the different colors of glitter where I want it. I used Tonic's Tim Holtz craft knife to cut around the butterflies first, removed the top piece of the two sided tape paper of just the butterflies and dumped on Nuvo's Cosmo Berry Sparkle Dust. I burnished it down and then pulled off the leafy border covering. On that part I applied Fresh Kiwi Sparkle Dust and burnished that in. Here is a picture of how it looked at this point: 


Then I removed the rest of the tape sheet cover pieces and applied Nuvo Rose Quartz Sparkle Dust. I also die cut Tonic Studio's Best Wishes and a small butterfly from the Layering Butterfly Set One out of Sookang two sided tape paper and covered them with the gorgeous Nuvo super fine Sparkle Dust as well. It is hard to capture the amazing sparkle in this card, but here is a close up where it might show:


I added a few gems to complete the sparkle and shine best wishes card. 


Thanks for helping me #spread the joy of creativity!