Thursday, July 7, 2016

Holy Crap! It's a Blog Hop!


Please join us at The House That Stamps Built for a blog hop celebrating Repeat Impressions' newest stamp series... Holy Crap! Yup, hehe... it's true... Wendy's designed a humorous collection of stamps around something she's confessed to saying a little too often.

This new stamp series starts with a large "holy crap!" sentiment which can be paired with any of the great variety of smaller words and sentiments to create a wide range of funny cards. A few theme appropriate images are also included. Please visit Repeat Impressions' online store to check out the entire Holy Crap! collection.

Today Repeat Impressions is kicking off a blog hop to showcase some of the new designs and also give you an opportunity to win the stamps!  To participate in the hop all you have to do is visit The House That Stamps Built blog and the blogs of all the Rock Stars listed there (and below.) On each blog you will find a key letter. After you collect all the letters, use the letters to create the proper word and then email it to Wendy at wendy@repeatimpressions.com to be eligible for the blog candy.


**My letter for you is C. **


I was so happy when Wendy asked me to design with this new lol stamp set from Repeat Impressions and then participate in this blog hop! I love using humor in my cards so this set is perfect for me and to put smiles on the recipient’s faces! I made two Z Fold cards to show off the funny stamps. Z Fold cards are easy and fun to make. Simply cut a card base that is 4 ¼” x 11” and a strip (or two like below) 1” x 11”. Score both at 2 ¾” and 5 ½” and then decorate. This card will fold to fit into an A2 envelope. My first Z Fold card above would make a funny congrats card with the “you’re on a roll”, “that’s fantastic”, tp and out house along with the featured “holy crap!” 

My second Z Fold card is for a friend who is my age and has a great sense of humor. I added two strips on this Z Fold card with “29…again?!”, “it’s your birthday”, “time to celebrate” and the outhouse again. I added some black gems and of course featured the lol “holy crap!” again. Here are a couple more pictures of this funny birthday card:


 You must complete the hop and email Wendy the correct word no later than 5pm eastern time on Monday, July 11th. The blog candy for this hop… an unmounted sheet of the new "Holy Crap!" stamps! Wendy will announce the winner on Tuesday, July 12th on Repeat Impressions' Facebook page so please be sure to "Like" and follow them there if you don't already.

NEXT STOP on the blog hop is my friend Kathy's blog here.

Here is the complete list of those participating in this fun blog hop. Hint- Follow the list and collect the letters in order from the top!

Wendy at The House That Stamps Built  http://www.thehousethatstampsbuilt.com

Wednesday, July 6, 2016

Love is Love is Love is Love


I have seen many requests lately for cards for same sex weddings and decided to try a couple myself. The Mr. and Mrs. die from Die-Versions is perfect because the words are separate so can be used for any type of couple. I created the female version above with a gorgeous cut and emboss folder called "Dress" by X-Cut. I applied some soft lilac color under the openings with my new Clarity Stencil Brushes. I re-attached the small butterflies that came out of the die with pearls on the card front and in the oval center with the white "Mrs. & Mrs." 


My masculine wedding card was created with another cut and emboss folder from X-Cut called Champagne. I cut and embossed it out of silver mirror card and attached it to a black A2 card base. I simply added silver die cut "Mr. & Mr." to complete the card front. Here is a peak at the inside of the card: 

I stamped a beautiful sentiment from Verses Rubberstamps and punched a star trio (older punch from Tonic Studios.) 

I am entering this card in the Anything Goes challenge at Scrapy Land

Tuesday, July 5, 2016

Tonic Studios Kensington Die Picnic Basket Gift Bag


I saw a tutorial on how to make this fun basket using the Tonic Studios Kensington Handbag Die on Crafting with Jo's blog here and knew I wanted to give it a try. I am so happy with how it turned out and will be sharing how I made it with the classes I teach soon. I think I will pack it with some homemade cookies and a gift card for a fun summer gift. I followed the tutorial in cutting out the Kensington Handbag pieces using kraft cardstock. I re-figured the measurements in inches for the top and bottom pieces and the handle just in case you do not have a cutter or scorer with centimeters on it. You are welcome:)

The top (which is usually the bottom or larger part of the purse die) is 5 inches by 2 3/4" and the bottom is 4 5/8" x 2 3/8". Both are scored at the 3/8 inch line on all sides. Cut a small triangle out of each intersection and fold on all scored lines. The handle is 7" by 3/4". The top embossed piece is 4" x 1 3/4". I used a basket weave embossing folder from We R Memory Keepers and sponged all the pieces with Vintage Photo Distress Ink before putting the picnic basket together. I die cut yellow and orange flowers using the trio of flowers from the Daisy Burst Double Detail Die Set and then filled their centers with Dandelion Yellow and Pumpkin Nuvo Crystal Drops. I decorated the other side of my gift basket with a die cut Tonic fairy called Fae Ella as shown here: 


I am entering this card in the Outdoor Fun challenge at Dies R Us.

Monday, July 4, 2016

Tonic Studios Sew Pretty Butterflies Fun Fold


It's my turn to post a project on Blog Tonic USA and here, and I am sharing a fun fold card featuring the butterfly choices from some gorgeous new Sew Pretty dies, and a stencil and some dies from the Double Details range. I love all the dies in the new Sew Pretty sets, but am especially drawn to the lovely butterflies with their unique pinholes and the embossing details. I die cut the Elegant Column butterflies and also the Admiral Arches butterfly out of Tonic gold mirror card and layered them on the front strip of navy cardstock. I popped up the Admiral Arch butterfly swirl with mounting tape.


I applied blue dye ink with a stencil brush through the Floral Faerie Double Detail Stencil and attached to the navy square card back. I added some gold corner pieces cut out of a die from the Jewelled Crown Double Detail Die Set. Here is another look at the card front from the side.

Tonic Studios and Nuvo Products Used: Butterfly choices from Sew Pretty Elegant Columns and Admiral Arches Die Sets, Corner pieces from Jewelled Crown Double Details Die Set, Floral Faerie Double Detail Stencil, Tonic Gold Mirror Card, Tonic Tangerine Die Machine, Tonic Advantage V Blade Trimmer

I am entering this card in the Anything Goes challenge at Simon Says Stamp Wednesday Challenge and at 613 Avenue Create.

Sunday, July 3, 2016

Playing with New Tonic Products


It's time for "Christmas in July" and I have been having fun designing some Christmas cards using new Tonic Studios and Nuvo products. Did you know Tonic has awesome designer paper packs for only $5.99? I watched them fly off the shelf at Let's Create in Wisconsin Rapids and knew I had to get my hands on them for some Christmas designing fun. About a third of the 54 sheets you get in each Christmas Wishes or Winter Wonderland pack can be used for cards that are not holiday or Christmas. Kraft paper is a favorite of mine,  and I chose this pretty dp from the Christmas Wishes 8x8 Premium Pack as the base for this card. Tonic Studios is also coming out soon with a bunch of delicious colors of embossing powder! I love sparkly embossing powder and used the Gold Enchantment on the bow of the present, and the Crimson Gloss on the present itself. I die cut Tonic's Christmas Present Rococo Die out of two sided sticky paper and sprinkled the gold and red embossing powders on the sticky present. I heat set it with my heat gun resulting in the textured look you see. I die cut the Merry Christmas Strip die out of Tonic's red mirror cardstock and attached it at the top of the card. I love using candy dots or gems on my cards and recently watched Jennifer McGuire make them out of Tonic's Nuvo Crystal Drops and Glitter Drops. After they dry, you can put them anywhere on your card front and attach them with a little glue. Here is a picture of the different sizes and colors of candy gems I made:

After about an hour of drying, the dots were dry to the touch, but still runny in the inside. I would allow them to dry overnight or for several hours. Save your release paper from sticky sheets or other products to make the Crystal or Glitter drops on. I used Rhubarb Crumble, Woodland Green, Bottle Green, Bright Gold, *Golden Sunset, *Ruby Slippers, *White Blizzard and White Gloss for these candy drops I can add anytime to any project.  The starred colors are Glitter Drops and the rest are Crystal Drops. 

The paper packs also have six sheets of sentiments for your cards. Here is a look at the inside of this card using a sentiment and a strip of the matching designer paper:


I am entering this card in the Anything Goes challenges at Simon Says Stamp Wednesday Challenge and at The House that Stamps Built (Repeat Impressions.)

Saturday, July 2, 2016

CAS 4 Kids at Send a Smile 4 Kids!


It’s Saturday and time for another fun challenge at Send a Smile 4 Kids! This time our challenge is: CAS 4 Kids! Create and link any Clean and Simple card appropriate for a child and you could win one of our great prizes.

We have two very generous sponsors for this challenge: Die-Versions is giving their winner a $15 gift certificate! And the winner from A Day for Daisies gets a $12 gift certificate! TEAM S.A.S will also be choosing their favorite cards for our top three and the winners will receive a blog badge and an opportunity to be a guest design team member on a future challenge.

I created my CAS card for this challenge with a sweet digi called Birthday Mermaid by A Day for Daisies. I simply printed her on a white card front and also on several scraps of designer paper so I could paper piece the balloons and her tail. I added a "celebrate" die cut and layered on a teal card base.

I am entering this card in the Anything Goes challenges at Simon Says Stamp Wednesday Challenge and at Repeat Impressions.

Friday, July 1, 2016

Happy Birthday USA with Die-Versions Dies

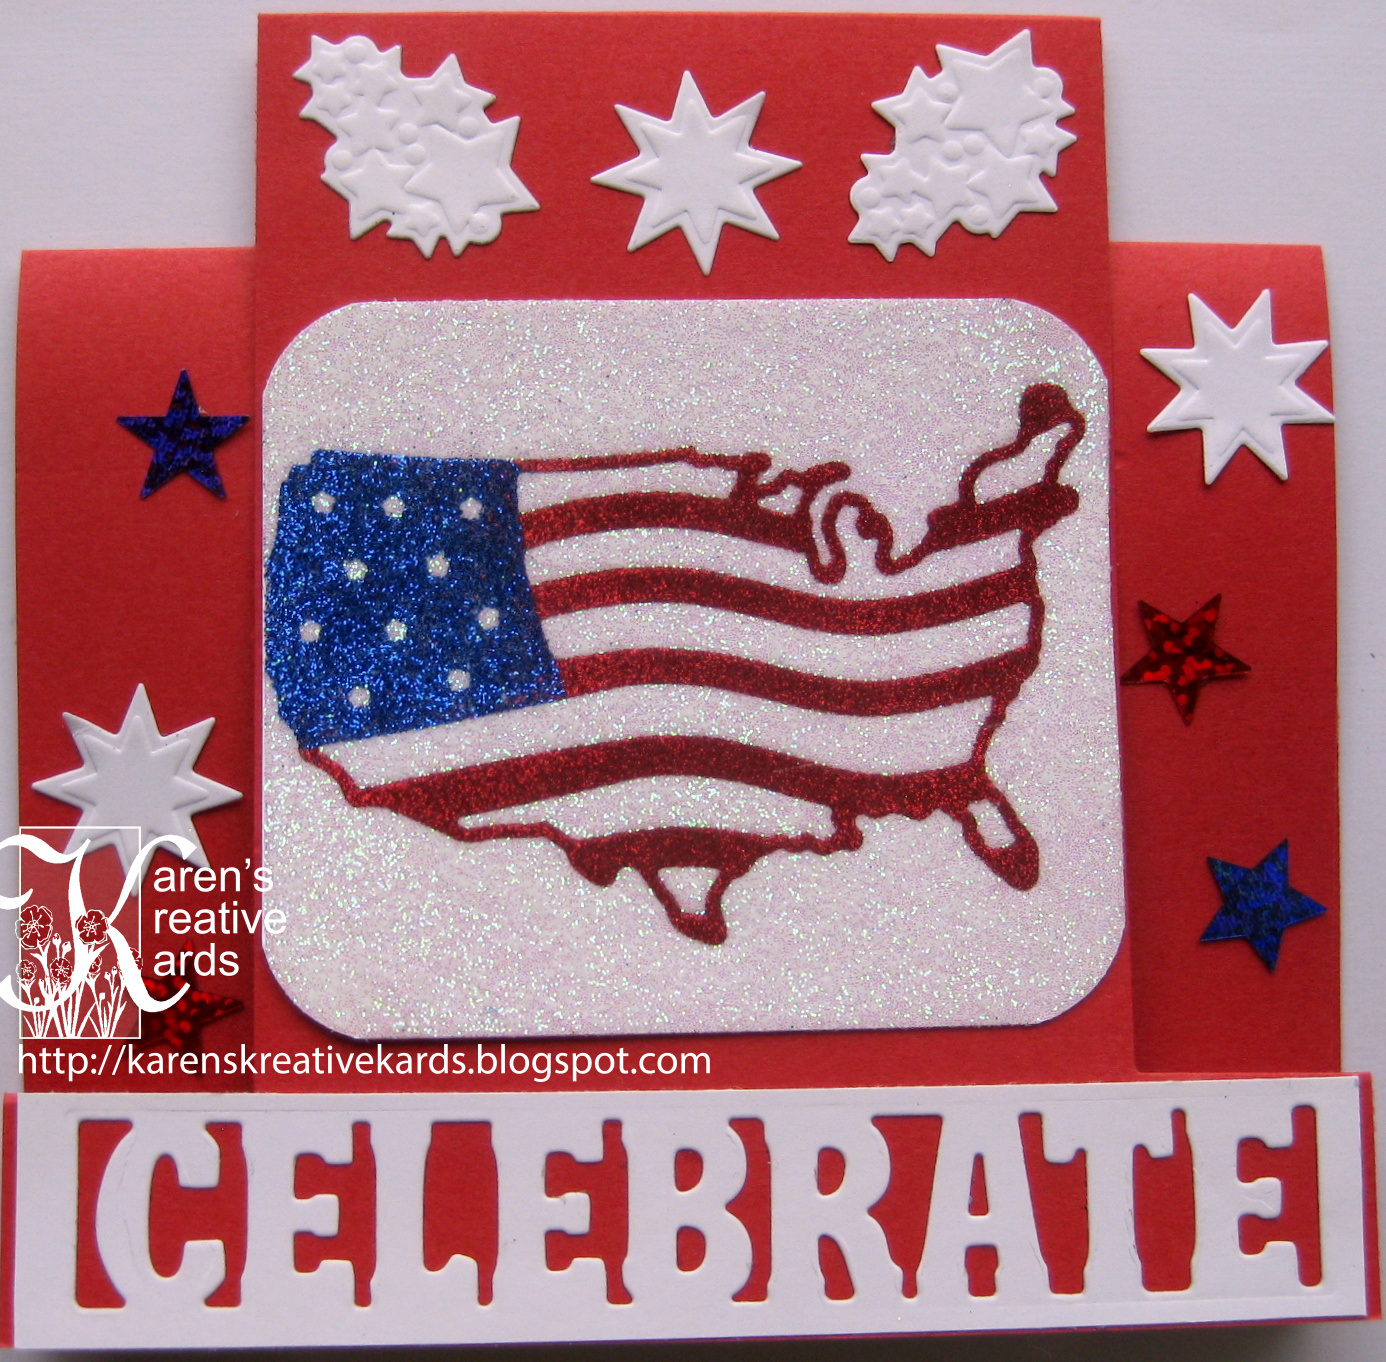
Happy 4th of July weekend everyone! It's my turn to post a card on Die-Version's blog and mine, and I am sharing this  Happy Fourth of July card featuring Die-Version’s Whispers-USA die and the glittery Kiss Cut Technique.  I cut a red center stair step card base and added a “Celebrate” die cut and some die cut and punched stars. The USA flag piece was made using the Kiss Cut Technique that I learned about on this video tutorial. The key is to apply two side tape sheets to thick cardstock and die cut your die with a sandwich that does not cut through all the layers. I used a craft pick to take off the stripes of the flag and dumped red glitter on just that part. I repeated that with the blue in the flag, then removed the rest of the sticky cover and dumped on white glitter, burnishing in each color of glitter.

It is going to be a glorious holiday weekend here in Wisconsin and we are planning on celebrating with some baseball and fireworks and relaxation. I hope you have plans for fun and celebration too.

**Remember you can get a 15% discount on any of Die-Version’s great dies by simply using my discount code karen15 when you check out at the Die-Versions website.**

I am entering this card in the Anything Goes challenges at Simon Says Stamp Wednesday Challenge and at The House that Stamps Built (Repeat Impressions.)