Friday, February 7, 2014

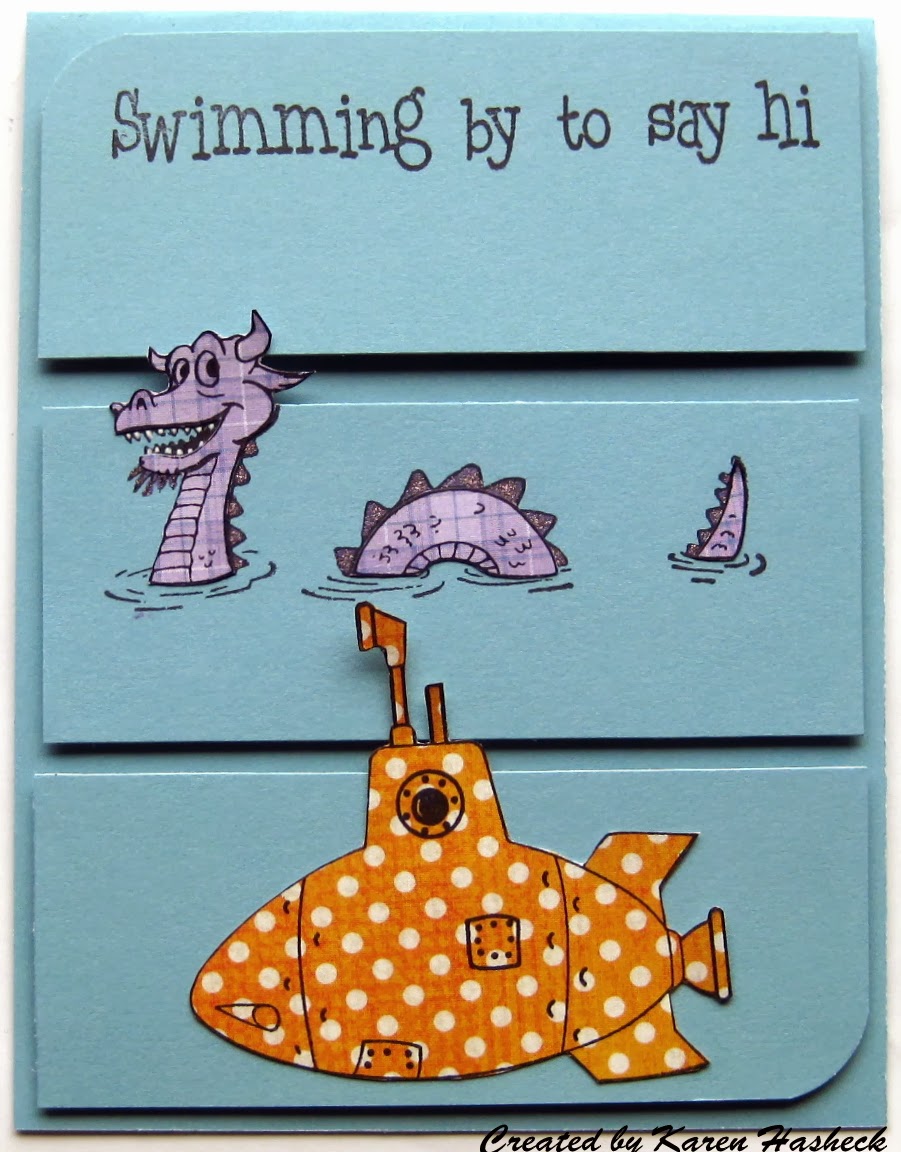
Swimming By to Say Hi!


It's Crackerbox Palace Friday and I am sharing a cute card that would be perfect for a special child in your life. I started with a blue card base and cut three rectangles of the same blue, rounding two of the corners. I paper pieced the submarine and water monster with patterned papers before attaching to the blue pieces. I stamped the perfect sentiment and raised all three pieces with pop dots when attaching to the card base.

Thanks for stopping by my blog. The CBP website is being upgraded currently, but you can always email or call them if you want any of the stamps I share.

I am entering this card in the Anything Goes challenges at Loves Rubberstamps and at Through the Craft Room Door.
Crackerbox Palace smiles, Karen


Thursday, February 6, 2014

A Cold One for an Old One!


I learned a new fold at a recent class at our local Stamp Shoppe and couldn't wait to try it. It is called Reverse Gate Fold and this is the front of the card. I used a new set from Raisin Boat called Birthday Brewing which is perfect for a beer lover's birthday. Here are a couple more pictures that show the fold from the top and the back of the card:


I love to learn new fun folds! For this one, you start with a base card that is 9 1/2" x 4 1/4", and score at 2 3/4" and 3 3/4" from both sides. Valley fold the first score lines from both sides and mountain fold the two inside score lines. I paper pieced the beer stein on the front piece, and stamped the other beer stamps in black ink. I left the back right piece blank for a personal note to the birthday boy.

I am entering this card in the Anything Goes challenges at Loves Rubberstamps and Paper Take Weekly.

Stamping smiles, Karen

Wednesday, February 5, 2014

What If? Wed. Sketch Challenge at Repeat Impressions


Happy Wednesday everyone! It's time for another fun sketch challenge at The House that Stamps Built and we are challenging you to make a card using the sketch below and link it up for a chance at some great Repeat Impressions rubber! For all the details on what you can win and to see the other Rock Stars cards using this sketch, please visit our blog.

I like a CAS sketch and with this card I decided to use a favorite color combo- teal, orange and navy blue and some new RI stamps that make me chuckle. I stamped the “Yikes Cat “ with a brown ink and layered him above the teal panels and OMG! flag. I added couple pearls to complete the CAS card.

Here is the sketch for you to follow when you create a card for our challenge. You do not need to use Repeat Impressions stamps to enter our challenges, but you get an extra chance to win if you do!

I am entering this card in the Anything Goes challenge at My Craft Creations and the Personal Style (CAS) challenge at Digi Darla's.


Stamping smiles, Karen 

Monday, February 3, 2014

Graduation Cards with Twine for Challenges

The challenge this week at Simon Says Stamp is anything Goes with Twine or String and I remembered that I had not blogged these graduation cards I made last spring for some family members and to teach in my classes. I found tutorials on line on how to make the card and the tassels, but I am not sure where they are now. This is what the inside looks like:

It is designed for a money or check holder, and I put a graduation pix and sentiment from Technique Tuesday on the card inside.

I am also entering this card in the Anything Goes challenge at Challenges 4 Everybody.

Stamping smiles, Karen

Pillow Top Background Project of the Week


 I discovered a background technique recently called the Pillow Top Background on one of my searches of bloggerland and am sharing how to make it with you today as my Project of the Week.


The supplies you will need to make this background are a piece of cardstock, a jumbo sponge dauber,  a piece of acetate, a favorite ink and some temporary adhesive. Use the temporary adhesive to attach your cardstock to your work surface (I like to use a craft sheet, but any surface will do.) Place your piece of acetate diagonally from the top left to the bottom right and lightly sponge your ink with the jumbo dauber from corner to corner. You can always add ink if you want some more, but you cannot subtract it, so use a light touch. Move the acetate about a half inch down diagonally and repeat until you get to the corner. How much space between lines and how much ink you use is totally up to you for the look you want. Start at the center and go up to the other corner with the same space between lines.


Turn the acetate diagonally to start in the center from the upper right corner to the bottom left corner and repeat until the cardstock piece is covered with diagonal lines both ways. I like to then lightly sponge all around the edge of the piece with the same ink. I took the piece I sponged with the light green ink and made a fun card with Repeat Impression's Martini Glass and "Olive You." I added a sparkly heart in the olive and to dot the i. 


On my second card, I used the Pillow Top Technique to create the pink lines and cut the piece in a fun angle. I layered it on a bright pink piece cut at the same angle and put it on a white top folding card. I stamped "Little Judy" and her Mom from Repeat Impression's Legacy Series with black ink on a white piece and cut them out. I added the perfect baby sentiment in pink to complete this baby girl card.

I hope these cards inspire you to try the Pillow Top background technique. It has become one of my favorites for a subtle and easy background.

Stamping smiles, Karen 

Sunday, February 2, 2014

Try Something New and Valentines on Silhouette Sunday

The challenge at the Silhouette blog this week is to try something new with our Silhouette cards or projects. I have been wanting to try the color combo of yellow and grey and I think it will become one of my favorites. I also have never done a sympathy card with my Silhouette or their cutting files, and now I have. I had a request for sympathy cards from someone who purchases my cards, so I designed this one as one of the options she could choose from. I cut the rose border twice and embossed the yellow rose with my favorite embossing folder, Swiss Dots from Cuttlebug. I attached the yellow rose just a little offset from the black one. I stamped the sentiment (from Stampin' Up) on velum and cut out with a Spellbinders die. I like the idea of attaching the  velum with tiny glue dots and then covering them up with tiny sequins.


Nothing too new about these Valentines I created for my grandson and my husband. But I do love how easy it is to personalize my cards with my Silhouette and their cutting files. The robot is just too cute for a young boy and my husband loves anything orange with kitties.

I am also entering these cards in the Anything Goes challenge at Crafty Catz.

Stamping and Silhouette smiles, Karen

Saturday, February 1, 2014

For The Boys Challenge at Send a Smile 4 Kids


It’s Saturday and time for another fun challenge at Send a Smile 4 Kids! This time our challenge is For The Boys.  Create and link any card for a boy and you could win one of our great prizes. We created this challenge to draw attention to the need we have at SAS4 Kids for boy’s cards, particularly cards for pre-teen and teenage boys. This is the category of cards we receive the least of, so if you are designing cards to donate to SAS4Kids, please keep our boys in mind.

We have three very generous sponsors for this challenge:  The Paper Shelter is giving their winner a $20 gift certificate! Jellypark is giving their randomly picked winner 4 digis of their choice!  And Sassy Studio’s winner gets 4 images of their choice! TEAM S.A.S will also be choosing their favorite cards for our top three and the winners will receive a blog badge and an opportunity to be a guest design team member on a future challenge.

My first card above features the cute Robot and Sign from Jelly Park. I cut the right side of the front of the card off and layered a grey piece that I embossed and sponged. I printed the robot and his sign on grey patterned paper and cut out. The sentiment is from Technique Tuesday and I added some black brads to the sign.
Oh how this card makes me long for warmer days! Happy Times Beach Boy is a colored digi from The Paper Shelter- isn't he sweet? I printed him and his beach scene, and cut a circular frame with my Spellbinders circle dies.The sentiment on this card is from Paper Smooches.

I am entering these cards in the All New challenge at Southern Girls,(the digis are all new to me) and the Anything Goes challenge at QKR Stampede. 

Stamping smiles 4 our kids, Karen