Friday, February 28, 2014

Vintage Card on Crackerbox Palace Friday


It's Crackerbox Palace Friday and I am sharing vintage looking card I created with some new Crackerbox Palace stamps I recently received. I really like the color combo of kraft and light blue. The light blue layer was sponged with brown ink through a Heidi Swapp plastic stencil, then embossed with a Cuttlebug embossing folder. I cut a kraft rectangle and stamped the beautiful Crackerbox Palace bush in brown twice. I rounded the corners and cut into 4 pieces, sponging all the edges. I attached the pieces to the front of the card and added a “blessed” sentiment with some pearls to complete the card.

Thanks for stopping by my blog. The CBP website is being upgraded currently, but you can always email or call them if you want any of the stamps I share.
 I am entering these cards in the Anything Goes challenges at  Love to Create and Scrapbook Stamp Society.

Wednesday, February 26, 2014

My Turn for Designer's Choice Challenge at Repeat Impressions!


It’s another Designer’s Choice Challenge at The House that Stamps Built, Repeat Impression’s blog. It’s my turn and I have chosen a favorite color combo for the challenge theme: black and white and one more color.  After you make your card with those colors, you can enter it for a chance to win some awesome Repeat Impressions rubber! Please visit the blog for all the details and to see the other Rock Star's cards for this DCC challenge. 

Repeat Impressions has a whole line of stamps called Quartets here on their website. I chose Brewed Quartet because I have so many friends and relatives who love tea and/or coffee. I also chose red as my extra color in addition to black and white.  I stamped the quartet on a white square with black ink and paper pieced the one cup with red cardstock. I layered on a black square and then on a red square card for a CAS and fun card for someone special.

Tuesday, February 25, 2014

CAS Spring Card for Challenges


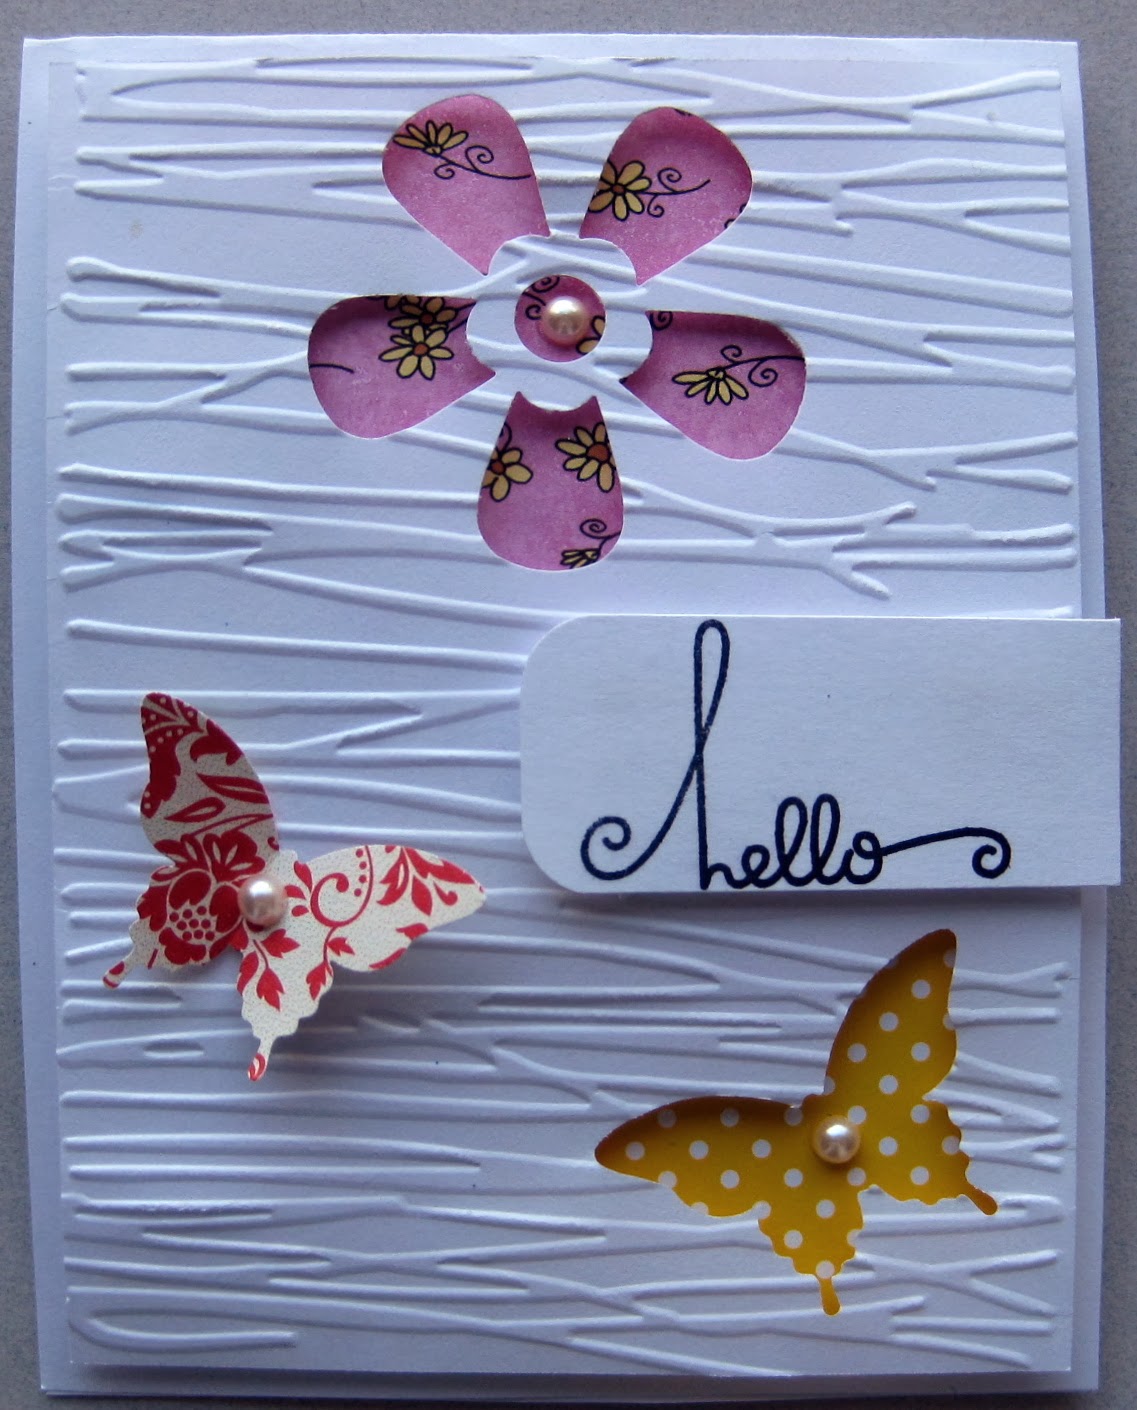
Have you noticed a theme in my cards lately? No snowflakes or snowmen allowed! I am sooo ready for spring and my choice of stamps, dies and punches reflect that! This card is a version of the card my daughter is making for a gathering of stampers in March called Madison Mingle. She wanted to borrow some punches for the idea and I experimented with those I own to help her decide which ones to borrow. I embossed the top white layer with a Cuttlebug embossing folder and then punched the butterfly (Stampin' Up) and the flower (Marvy). Small pieces of brightly colored dp were placed under the embossed layer which was attached with pop dots to raise it. The "hello" is by Paper Smooches and is one of my favorite stamps currently. I added another punched butterfly and a couple pearls to complete the CAS card.

I am entering this card in the Anything Goes challenges at 613 Avenue Create and Amusing Challenges.

Monday, February 24, 2014

Butterflies Flying out of my Card in a Box


I am having fun playing with the Card in a Box concept I have seen all over blogland! This one is a smaller version that would fit into an envelope slightly larger than an A2 envelope. Measurements and directions are available here. I love butterflies and used several of my punches and diecuts to make this birthday card for someone special. The largest top butterfly is a diecut from Memory Box. The midsize butterfly is from Stampin' Up and the smallest from Martha Stewart. I attached the middle butterflies onto strips of acetate so they popped up higher than the others. I used the negative of the SU butterfly over some polka-dotted patterned paper on the side pieces.

Here is another picture that shows the layers of butterflies and the base of the card  which was embossed with an embossing folder by Embossalicious:

My last picture shows the card folded flat to mail and the back where I can write my birthday message.
You will probably see more of these cards on my blog because they are so fun to make! I am entering this card in the Anything Goes challenge at Sister Act and the Punches or Diecuts challenge at The Stamping Boutique. 


Sunday, February 23, 2014

Easter Card in a Box on Silhouette Sunday


Have you seen all the "Cards in a Box" all over Pinterestland lately? I made this one following this tutorial  using several Easter files from Silhouette America. To make the box is not hard to do at all, and with cutting files from Silhouette, this one came together very easily. I cut the eggs, bunnies and Happy Spring with my Silhouette Portrait.


This is what the box card looks like folded flat from the back. I cut another fun bunny face with my Silhouette and layered it on a pink piece that can be used to write a Happy Spring message.

I am entering this card in the Anything Goes challenges at Crafty Girls and Through the Craft Room Door.

Saturday, February 22, 2014

Couture Creations Design Team Application Round 2


I am thrilled to share I have made it through to the second and final round of the Couture Creations Design Team Call! For this round we are to design and blog a new project featuring a Couture Creations embossing folder, our choice of dies and Core'dinations Cardstock if we have it.

I have a whole collection of Core'dinations cardstock since it is my favorite, and have chosen two kinds of Core'dinations Cardstock to create my card with. The card base is made with Core'dinations Vintage Collection, and the heart was cut from Core'dinations Gemstones Cardstock. I experimented with several different shades of blue Core'dinations Cardstock for the heart, and tried sanding them to highlight the embossing. Core'dination's core cardstock is perfect for that technique, but I decided I liked the Gemstone cardstock without the sanding the best for my embossed heart.

I embossed a 5 1/4 inch white cardstock square with Couture Creation's Butterfly Hugs embossing folder. I also embossed the heart (cut out with a Spellbinders Nestabilities die) in the Butterfly Hugs folder, as shown in the picture below:
I attached the heart to the white embossed cardstock with pop dots to raise it, and then attached the completed piece to the front of the card. The real magic of the card happens when you open it. Take a look:


The butterflies pop up and appear to be floating when the card is opened! The technique is called Floating Image and this is how you create this fun effect:

Cut two pieces of matching cardstock 5 1/2" by 6", and score each at 5 1/2" on the 6" side. Apply strong two sided adhesive tape to the two 1/2 inch tabs and line them up together. (I chose to make my card a 5 1/2" square card. If you wanted to create an A2 size card, cut two pieces of cardstock 4 3/4" by 5 1/2" and score at 4 1/4" on the 4 3/4" side. You want an half inch tab in the center of the two pieces.)

Next you will want to decide what you want to pop up when the card is opened. I chose to die cut a polka dotted butterfly with a beautiful large butterfly die from Cherry Lynn Designs, and two smaller butterflies cut out of white cardstock with a die by Memory Box. They are attached to pieces of acetate cut 1/2 inch wide and to the height you want your floating images to be. I chose to place the larger butterfly on a piece 2 1/4 inches high and the two smaller ones on a 3 inch acetate piece. Lay your pop up elements inside the card so they do not extend beyond the sides of the card as shown here:

When you are happy with the placement, remove the outer protective cover of the two sided adhesive on one of the 1/2 inch folds and attach the acetate strips and die cuts pieces. They will pop up and appear to be floating in the air. (As is the designer's prerogative, I changed my mind and placed the two smaller butterflies on one acetate strip in the finished card.) Remove the other adhesive cover and attach the front of the card to the back in the center as shown here:
For the inside of the card, I die cut Memory Box's Grand Happy Birthday on the top of a 5 inch square piece of white cardstock. I also cut out the negative of the Kaleidoscope Butterfly by Memory Box and attached the positive of the same butterfly in the opening.

I think the surprise of the pop up floating butterflies in this card would delight anyone celebrating their birthday. I enjoyed sharing this technique and my card with you, and thank Couture Creations for the opportunity to participate in Round Two of their Design Team Application process.

Friday, February 21, 2014

Roses and Vellum Dimension on Crackerbox Palace Friday


It’s Crackerbox Palace Friday and I am sharing a card that features Crackerbox Palace’s beautiful roses and a technique I call Vellum Dimension. This is one of the cards that will be in an article in Scrap and Stamp Arts in their October issue that I wrote about that technique. Normally I chose animal stamps with stripes or spots, but this card shows the technique can be done with any stamp with smaller areas of white. To achieve the dimension, you stamp on vellum, turn over and “color” in the flowers and leaves with a stylus on a thick pad being careful not to tear the vellum.  This stretches and whitens the velum so it pops out with great dimension. After completing the “coloring”, I attached the vellum piece to a floral frame created with an embossing and cutting folder by Cuttlebug. I added some pearls and rounded the edges to complete the card.

Thanks for stopping by my blog. The CBP website is being upgraded currently, but you can always email or call them if you want any of the stamps I share.

I am entering this card in the Flowers challenge at Inspired by Stamping and the Anything Goes challenge at Creative Moments