Thursday, January 28, 2021

Layered Stencil Fun Fold Cards and Giveaway Reminder


I love this layered love easel card created with a new layered Bokeh Hearts Stencil set from Newton's Nook with the second layer of hearts done with white pigment ink for a true bokeh look. I added another layer on this card with a beautiful A Colorful Life Designs stencil called Heart Hug and Iridescent Glitz Glitter Gel from Gina K Designs and Therm O Web. The "I Love You" is also a stencil from A Colorful Life Designs called Lovely Words. This card and many others with layered stencils and fun folds are featured in my newest video here.


This is the front of my seasons four fold card I learned how to make in this video tutorial. The layered season words shown are dies from Dies...To Die For. Here is why I call this a seasons card:


Can you just see Spring, Summer, Fall and Winter in the layered trees created with a stencil set from The Greetery called Fir and Foliage 1? Just beautiful and easy to create with layered stencils. Thinking of You is a die from Sue Wilson. 

I had so much fun creating fun fold cards with layered stencils and you could win a complete Pinwheel layered stencil set and matching stamp set from The Greetery and me by commenting on my newest video per instructions in the video before February 14, 2021. 

I am entering the first card in the Anything Goes challenge at Simon Says Stamp Wednesday.

Tuesday, January 26, 2021

More Layered Stencil Spring Fun Fold Cards From My Newest Video


I had such great fun creating fun fold cards with layered stencils for my newest video here and this Easter card is a Top Bridge Card with Swinging Elements that I learned how to do here. The jelly bean background was created with the Layered Jelly Bean stencil set from A Colorful Life Designs. The Happy Easter die is from Karen Burniston and the rest of  the awesome Easter dies are from Dies..to Die For at ShopScrapbook101.com. Here are a few more looks at this bridge card with a hanging Easter egg: 


I love the sparkly layered tulips on the front of this fun fold card created with A Colorful Life Designs Layered Tulips stencil set and Deco Foil's Shattered Rainbow Foil (after applying Deco Foil Transfer Gel Duo through the floral layer and letting it dry.) I am also in love with the distressed foil look on the sides of this card made with the same Shattered Rainbow Deco Foil and a new distressed foil technique I just learned on the Therm O Web blog. (I loved the look so much, I just completed another video featuring the technique, so watch for that soon.) Here are a few more views of this tulip and rainbow foiled fun fold card: 


I had so much fun creating fun fold cards with layered stencils and show all the cards in my newest video here. If you watch the video and comment per instructions before February 14, 2021, you could possibly win a whole set of layered Pinwheel stencils and a matching stamp set! So be sure to watch and comment for your chance!


Monday, January 25, 2021

Video - Cardmaking Ideas With Layered Stencils and Fun Folds and Prize Giveaway!


Stencils are great for creating unique backgrounds on our cards and in my newest video, I share many fun fold cards made with layered stencils from favorite companies of mine. 


I learned how to make a Vertical Easel Fun Fold card from this tutorial on Splitcoast Stampers  and this was the first one I made featuring a Layered Leopard stencil from A Colorful Life Designs. The amazing sentiment box die is from Impression Obsession and moves back and forth. Here is a look at the inside of this card where you can see the texture of this stenciled background with colors of brown and black Metallix Gel from Deco Foil. 


I decided to step up this new fun fold and make the front piece that moves back and forth into a shaker and this is the card I show how to make from start to finish in the video. The background on the scored front was created with a Layered Dots stencil set from A Colorful Life Designs, peach ink and Turquoise Sea Glitz Glitter Gel from Gina K Designs and Therm O Web. Because of the dots theme, I chose a Rectangle Dots Layer Die Set from Birch Press Designs for my shaker frame and on the inside of the card too:


The sentiment dies on the front and inside are all from Dies...To Die For at Shop Scrapbook101.com. To see how fun and easy it is to make this card and how the seed beads move in the shaker box, be sure to watch the new video here


I am featuring Pinwheel Party Stencils and the matching die set from The Greetery on this simple Backwards Fold fun fold card. The pinwheels sparkle with a second layer of Glitz Glitter Gel from Gina K Designs and Therm O Web. Here is a look at the fun fold I learned how to make in this blogpost


I created more colorful pinwheels so easily with the brilliant layered Pinwheel Party stencil set from The Greetery on the inside fold of this card, and you could win your very own Pinwheel Party Stencil Set and matching stamp set by commenting on my video here following the instructions in the video. You have until February 14th, 2021 and must have a USA mailing address to qualify to win this prize from The Greetery and me. 

I also share many other cards in the new video with layered stencils and fun folds, so be sure to watch the new video here. 

I am entering the first card in the "Make your own Background" challenge at Simon Says Stamp Wednesday. 

Tuesday, January 19, 2021

More Interactive Cards with New Dies and Stencils From My Newest Video


I love to create cards with stencils and dies and in my newest video here I share many interactive cards I created with new dies and stencils. I recently started a new bi-monthly subscription at Stamplorations where I am going to receive 3 brand new slimline stencils every other month for only $15 (and that includes the shipping!) What a bargain! Here is a link where you can check out this subscription (and if you prefer you can do a monthly version.) I used two of the three new slimline stencils and Distress Oxide Sprays to create the background and color the truck on this masculine birthday card. The truck, presents and torn edge rectangle were all created with dies from Dies...To Die For at Shopscrapbook101.com. Here is a look at the interactive shutter opening on the inside of this card created with a My Favorite Things Shutter Card Components die set:


Another interactive die I could not resist is the Peekaboo Fancy Edge Slimline Die from Rubbernecker. I stenciled the card base and front of the peekaboo die cut with a stencil from A Colorful Life Designs and then added knock knock jokes on top and when the doors are opened:


Isn't that cute? The adorable owls were created with dies from Karen Burniston. I used more Rubbernecker slimline dies on the inside of the card:
I had great fun creating all these interactive cards for my new video with new stencils and dies and hope they have encouraged you to give some of these products a try. 

I am entering the last card in the Layer It Up challenge at Simon Says Stamp Wednesday.

Monday, January 18, 2021

Video : How To make Interactive Cards with Dies and Stencils


I love to create interactive cards and try out new stencils and stencil techniques and in my newest video here, I share a bunch of cards I made with new dies and stencils. 


This is the card I show how to make in my new video. I die cut Trinity Stamp's Slimline Surprise Interactive Die Set pieces and applied Turquoise Sea Glitz Glitter Gel from Therm O Web and Gina K Designs on a piece of acetate through a brand new stencil from Stamplorations called Floral Joy. But just look at what happens when the string is pulled:


Isn't that fun? Two secret messages are revealed. Here is another card I made with the same Slimline Surprise Die set and my favorite slimline stencil from Stamplorations called Kitty


As you can see, the slimline cards lay flat to mail and then the recipient pulls on the string and two secret messages are revealed and the acetate piece stands up. You don't have to use acetate for that piece but I love the look of Glitz Glitter Gel on acetate through a gorgeous slimline stencil. 


Another favorite stenciled card I share in this video was created with Poppy Stamps Adriana Pop Up Easel die set and some gorgeous stenciled roses created with Altenew's Sweet Spring Layered Stencil Set. The picture above shows the card laying flat to mail and the pictures below show it standing for display with the easel die pieces:


I love how all these cards turned out with my new stencils and dies and hope you will watch the video here and try some of the products I share. 

I am entering the last card in the Layer It Up challenge at Simon Says Stamp Wednesday.

Sunday, January 17, 2021

Video: Stencil Sunday At Stamplorations Double Stenciled Tags and Cards


I am once again honored to be the guest designer at Stencil Sunday at Stamplorations and I had so much fun creating cards and tags with two or more of their great stencils, I made 5 different cards, a set of gift tags and a video! To see all the cards and how easy it is to be creative with two or more Artplorations stencils, be sure to watch the new video here. The picture above shows the tag card I make from start to finish in the video and it can be used to give a gift card or cash if you wish.


Here is a pair of masculine cards I made with many stencils from Artplorations which is a division of Stamplorations. And here is a pair of mixed media cards I made and shared in the new video here: 


To see all the cards and get more details on how they were made, you can watch the new video here and/or visit the Stamplorations Stencil Sunday blog post here.

I had great fun these last three months designing with Stamplorations stencils, dies and stamps as a guest designer and thank them for this opportunity! I hope my projects and videos inspire you to give some of these great products a try! And you can save 20% if you click the picture on the side of my blog and use my code STAMPGIRLKARENH! 

Tuesday, January 12, 2021

More Cardmaking Ideas With Nested Layered Dies From Dies...To Die For


This masculine Valentine's Day card from my newest video here is made with the Explosion Background and You're The Bomb die sets in the new January release at Dies...To die For at ShopScrapbook101.com.  In the new video, I show many different ways to use nested layering dies and on the front of this card I kept the layers attached when I die cut the black mirror card and red and gold glitter paper. Here is another way to use that Explosion Background die set: 


It is easier to see in the video here, but largest piece of the Explosion Background die set is on the left side of the card front and hold the card shut interlocking each together. When 3 different colors are used to create the explosion piece, you end up with enough to create 3 different cards or add some fun decorative pieces on the inside of the card. 


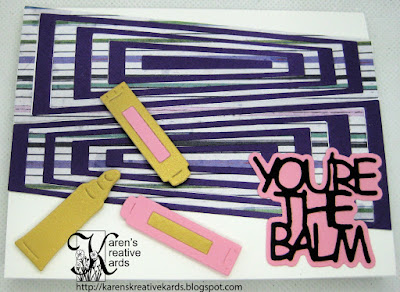
Another fun new die set in the January release here is the "You're The Balm" set. I created a fun background with the Basic Long Trapezoid Nesting die set cut twice before I cut the dies apart. Then I cut them apart to create this mini slimline card:


I used the Pantone Colors of the Year (yellow and grey) and some fun dp and a sentiment die from Dies...To Die For on this sweet little card that measures 3" x 6". 

I had so much fun coming up with more creative ways to use nesting layering dies and hope you will watch the video here and check out some of these awesome dies.

I am entering the first card in the Something New challenge at Simon Says Stamp Wednesday. All the dies are new as is the DT opportunity. 

Monday, January 11, 2021

Video - Cardmaking Ideas With Layered Nesting Dies from Dies...To Die For


I am having so much fun with all my new dies from Dies...To Die For at ShopScrapbook101.com and especially all the fun layered nesting dies that I created 9 cards for a new video that posted here today! 

My favorite of the new January release die sets at Dies...To Die For is the Slimline Long Hearts and I created a slimline z-fold card with it and some sentiment dies from Seasons- Add On Words dies to say Happy Heart Day. Here is a picture that shows the inside of this z-fold slimline card: 


This is a version of that z-fold slimline type of Valentine card I made for my husband whose favorite colors are orange and yellow. The seasonal word dies have a shadow you can choose to use or not. 


In the new video I show many ways to use nested shape dies and how I made a version of this slimline love card. The triangular pieces on the front of this card were created with the Basic Rectangle Die pieces that were not cut apart into individual rectangles. I cut it in red and black mirror card and silver glitter cardstock and put the pieces together, then cut them into triangles as I show in the video. This is the card I show how to make with the same colors but a celebration theme along with a bonus card I made with the negative pieces cut for this card:


I hope my cards inspire you to give some of these ideas and great dies a try. To see many more cards and tips for unique looks with nested layered dies from Dies...to Die For, watch the new video here.

I am entering the first card in the Something New challenge at Simon Says Stamp Wednesday. All the dies are new as is the DT opportunity.