Wednesday, July 28, 2021

Hero Arts Summer Stamp-Along Cards


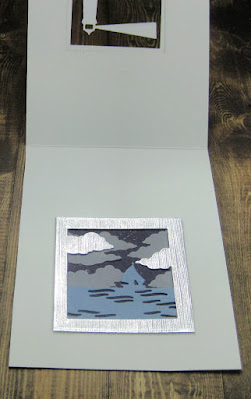
I recently participated in the Hero Arts Summer Stamp-Along and now have had a chance to finish my cards and share them here. I am loving on line classes because they are preserved to refer to later or watch completely later if the day of the classes is too busy to watch all or finish the classes. In my case, I had some super special family plans with grandkids and kids but when those were done, I went back and finished watching and made all my cards. I think my favorite new product I learned about in the Hero Arts classes was the Looking Glass Dies. We made two cards with them and I went out and bought 3 sets now and will share more cards with them soon. They are all three layer square dies and we did a class with an inlaid version and one with a frame on the front and on the inside. The Hero Arts classes were only $25 for 8 classes and all of us could choose what Hero Arts products to buy for the classes and after they were done. I did not have many of the stamps the instructors featured but subbed mine out or used different papers. Here are a couple more looks at the Looking Glass Window Card Nicole Spohr taught:


The layered "Thinking Of You" die is a new one from Dies...to Die For. I really liked Nicole's idea of combining dies from several Looking Glass sets and putting some on the front and some on a window on the inside that you see from the front when the card is closed. 


Another idea I learned and then made into a card with stamps and dies I already own was the Tri-Fold Stand Up card taught by Debi Adams. I had not seen this fun fold before but I adapted it to make a fun Christmas card with a Penny Black background stamp and a sentiment die from Stampendous. Here is a look at the fun fold from the side:


Daniel West taught a card with the spotlight technique and vellum and his card looked totally different from this one because I did not have the stamps he used and do not color like he did. However I did stamp the Stampendous butterfly stamps on the cardbase and on the card front which was cut smaller and raised over vellum like he did. I paper pieced my butterflies and added a couple punched butterflies and some gems and love how this card turned out. 


I did buy the Color Layering Orca stamp set and matching die from Hero Arts as well as the waves stencil so these cards are similar to what the instructors taught in the two Orca classes. I love how in each class I learn something new! I learned a great tip to color blend on a colored cardstock rather than white which allows us to achieve intense colors much quicker like on the top card. And I forget to use blender brushes and a stencil and to fade off leaving white space which is a great look. I had to add my favorite gems from Gina Marie Designs to each of these cards as I do to almost all of my cards. 

There is going to be another Hero Arts Stamp-Along in September with a Holiday theme and I highly recommend these reasonably priced classes and teachers.

Tuesday, July 27, 2021

More Gorgeous 3D Embossed Butterfly Cards From My Newest Video


I had so much fun designing with the new Sizzix 3D Butterfly Impresslits for my newest video here! In no time at all I created 5 unique cards for the video and my stash! I love the look of positives and negatives and Tonic Studios copper and light blue Pearlescent Paper embossed beautifully for this card. The background was embossed with a 3D embossing folder from Altenew and I added some of my favorite gems from Gina Marie Designs.


The 3D embossed butterflies are gorgeous when cut out of foil and holographic cardstocks and then layered over a rainbow glitter butterfly as I did on this card. I pleated the background and brushed on pastel inks before adding a clear sticker from Stamplorations to finish this slimline card. 

I am entering the 1st card in the challenge at Simon Says Stamp Wednesday. The new item is the Sizzix Butterfly Impresslits and the old item is the 3D embossing folder from Altenew.

I just love how all the cut and embossed butterfly cards turned out and hope you will watch the video here and try some of the ideas and products featured. 

Monday, July 26, 2021

Video - Cardmaking With Sizzix Tim Holtz 3D Impresslits Butterflies


Have you seen the new 3D Butterfly Impresslits Die from Tim Holtz and Sizzix? It is an embossing folder and die cut that creates gorgeous embossed butterflies as you can see in my newest video here.


This is the rainbow butterfly slimline bridge card I make in the new  video. I learned how to make this fold from the brilliant Jennifer McGuire here and I used Simon Says Stamps Holographic Rainbow Cardstock on the butterflies and on the back and sides of this slimline bridge card. Here is another view of this unique fun fold card that lays flat to mail and also a picture of the template I made for the video: 


Here is another favorite card I made with the new Sizzix 3D Butterflies Impresslits and a rainbow of colored vellum from Stampin' Up. The debossed background was created with Altenew's Dotted Starburst Debossing Die and I added a sentiment strip from Simon Says Stamp. 

I am entering the 2nd card in the challenge at Simon Says Stamp Wednesday. The new item is the Sizzix Butterfly Impresslits and the old item is the debossing background die which I have used many times.

To see how to make the rainbow butterfly bridge card and many more cards with this awesome new die, watch the new video here. I hope my cards encourage you to give some of these ideas and products a try!

Sunday, July 25, 2021

More Cards Made with New Dies and Designer Kits From Dies...to Die For


The Saluting Soldier and sentiment as well as the gems on this card are from the huge July release at Dies...To Die For at Shopscrapbook.com. I combined them with an awesome Flag Background die also from DTDF to make this patriotic cards perfect for a veteran like my twin brother. 

I love stitched shape dies and so was thrilled to see this set of stitched rectangle dies in Luisana Lowry's June Designer Kit which also includes red cardstock and the clear sequins. I also used Stamplorations Quick Card Fronts on both of these cards. Here is another look at the shaker card all shook up (the butterflies were also created with a die from DTDF):


You can check out all the dies and Designer Kits here on the DTDF website and note that you can buy the dies separate from the kit if you so choose. 

Saturday, July 24, 2021

Cards With New Dies And Designer Kits From Dies...to Die For


Today and tomorrow I am sharing new cards I made with brand new dies and Designer Kits from Dies...To Die For at Shopscrapbook101.com. This is a card I made with Bette Manning's June Roses Designer Kit. In each kit you get one large die set, tons of cardstock, envelopes, gems or sequins and other goodies. And there is an option to buy the die only if you wish. Here is a picture of this kit so you can see how much is included:


Just about everything I used on this card is in this Roses Designer Kit. I created the background by brushing ink through a die cut brick stencil in the kit and the sentiment strip and gems are also included. I die cut the vase and made it into a shaker with clear gems from the other June Designer Kit. Here is a look at the inside of this card where a bouquet of roses pops up to delight the recipient: 


I learned how to make this pop up bouquet from Sam of Mixed Up Crafts. The stitched rectangle to sign the card is from the other June Designer kit and I will post more cards with that one tomorrow.

This card was made with the new dies from the July Designer Kits and the new slimline Card Edge Borders die set just released as well as some new Mirror Back Fire Red gems. Here is a link to all the new July dies and here is a link to all the designer kits. The white flowers on the background of this card are from Bette Manning's July Designer Kit called Flowers and Greenery. All the cardstock is from Luisana Lowry's June Designer Kit.

Luisana Lowry's July kit includes a die with many handwritten words called Basic Words which I just love. Here is a look at the die cut out so you can see how many phrases you could come up with in a cool handwritten font:

And here is a picture of the inside of this slimline card with another handwritten die cut message:


See you tomorrow with more cards made with new dies from Dies...To Die For.

Tuesday, July 20, 2021

Salad Spun Cards Made with Dies From My Favorite Companies


All the die cuts on this slimline card were made with watercolor powders spun in a salad spinner for my newest video here. The greens and flowers all have a variety of colors and were cut with brand new dies from Dies...to Die For and Bette Manning. The "big happy hugs" is a new die from Picket Fence. 


This card is so much prettier IRL. The black hearts background (Birch Press Designs) has subtle changes of color from sparkly watercolor powders and the salad spinner. 


I made this card front with a rainbow of Brushos and then die cut out the Hero Arts Butterfly Confetti die over a glimmer vellum. Celebrate is a die from Karen Burniston. 

I have had so much fun with my salad spinner and watercolor powders for my newest video. I hope my cards inspire you to give these techniques and products a try!

Monday, July 19, 2021

Video- Salad Spinner Series - Spun Color With Dies and Specialty Papers


I am having so much fun playing with my salad spinner and different watercolor powders, and in my new video I share a bunch of cards made with both white and black watercolor and specialty papers and my dies from my favorite companies.

This is the card I make in the new video and it has a mix of the two techniques I shared in two earlier videos- watercolor powders on both white and black watercolor paper spun in the salad spinner. The cardfront is an ombre glitter paper from Stampin' Up with Birch Press Design's Vivid Bloom Stitched Layering Dies. The sentiment die is from Dies...to Die For and it and the butterflies were die cut out of salad spun beauty too. Here is another version of this card, this time on ombre blue glitter paper:


The new ombre' glitter paper from SU is so beautiful and I used it on this card with a heart created with a salad spun black piece layer of the Birch Press Design layered heart die set. The layered love die is from Honey Bee Stamps. 


I also used a layered Birch Press Designs die with a black salad spun layer and a gorgeous specialty paper from Stampin' Up on this card. The sentiment die is from Sue Wilson and Creative Expressions.

I had great fun playing with my salad spinner and watercolor powders on white and black watercolor paper and favorite dies as I show in the new video here. 

Friday, July 16, 2021

REMINDER: If you want my blogposts in your email box, you need to make a change (unless you already have.)

As most of you probably know, the Feedburner Subscription service is ending in July 2021 so if you are a subscriber to my blog you will not continue getting my blogposts in your email unless you make a change. By the end of this month, you will not receive blogposts through Feedburner.

Many of my blogging friends are now using FOLLOW.IT as their new subscription service and I have added that to my blog. It is in a large box on the right side of my blog now. Please add your email address there and click subscribe. You will get an email to confirm your new subscription-please do so.

**I have Bloglovin' too, so if you are one of the 116 using that subscription service, no change is necessary.**

If you were subscribing with Feedburner, you can choose to subscribe with Bloglovin' instead of Follow.It - simply scroll down on the right side of my blog and click on the BLUE BOX below the Bloglovin' name. 

I have changed to Follow.It on several blogs I am following and I get one newsletter in my email with all their blogposts and mine as well. You can unsubscribe to the Feedburner one once the new one is working, or do nothing and that one will stop working the end of this month.

I really do appreciate all my subscribers and followers on my blog all these years. I hope you stay with me through this change in subscription services.

Thursday, July 15, 2021

More Luster Wax and 3D Embossed Cards From My Newest Video


As I show in my newest video, the new Luster Waxes from Sizzix are pretty on dark colors of cardstock but also lovely on white. On this card I embossed with a 3D embossing folder from Memory Box and raised up the center (cut out with a Kat Scrappiness heart die). I lightly applied Rose Gold Luster Wax to highlight the pretty floral center and also added some to the edge to help the heart stand out.


On this card I embossed a black glossy cardstock piece with a Stampin' Up 3D embossing folder and added Lilac Rainbow, Silver and Rose Gold Luster Waxes. The perfect sentiment is from Poppystamps. 

One of my favorite older 3D embossing folders is this one from Crafter's Companion and I embossed a black piece and a purple mirror card. I applied the Lilac Rainbow Luster Wax on the black embossed cardstock and added a stamped sentiment from Honey Bee Stamps. 

I hope my cards inspire you give some of these ideas and products a try! 

I am entering the 2nd card in the Embossing challenge at Simon Says Stamp Wednesday.

Tuesday, July 13, 2021

More Easy and Gorgeous Cards with Sizzix Luster Waxes, 3D Embossing Folders and Favorite Dies


I showed in my newest video here many ways to use the new Luster Waxes from Sizzix on 3D embossing folders and this is one of my favorites of the cards I made. Isn't that vase just gorgeous? I embossed a piece of black cardstock with a 3D embossing folder from Sizzix and then I die cut the vase so the embossing flattened out before I added the silver Luster Wax. The vase, sentiment and greens were cut with dies from Dies...To Die For at ShopScrapbook101.com.


I made this masculine congrats card easily with silver Luster Wax on a white piece of cardstock embossed with a 3D Stampin' Up embossing folder. The keys were die cut with a new die from Dies...to Die For, embossed with the same Sizzix 3D embossing folder as above and then I applied silver Luster Wax. The layered "congratulations" is also from DTDF.


Here is an example that shows the Luster Waxes also look lovely on navy cardstock. I used the Rose Gold color (my favorite!) on a piece of navy cardstock embossed with another lovely 3D embossing folder from Simon Says Stamp. "Thankful" is a die from Sue Wilson on a vellum strip.

I was having way too much fun with the Sizzix Luster Waxes to stop so watch the new video here and come back in a couple days for some more cards.

Monday, July 12, 2021

Video - Cardmaking With Sizzix Effectz Luster Wax and 3D Embossing Folders


Have you seen the new Luster Waxes from the Sizzix Effectz line? They are a gorgeous way to add metallic shine to our cards especially on 3D embossed cardstock and in my newest video here I share many cards and tips on how to use the Luster Waxes.


I demo how I made this card so easily with a black piece of cardstock embossed with the Sizzix Mosaic Gems 3D embossing folder by simply applying the gold and silver Luster Wax with a small foam blending tool from Joy! Crafts. You can use your fingers but it is much neater to use a tool like that one. Then I simply attached the piece to a white card and added a layered celebrate from Dies...to Die For.


The Luster Waxes can be applied to either dark or light cardstock, but I do prefer them on dark as I show when I made this card in the video. The 3D embossing folder is from Simon Says Stamp and the sentiment is a die from Sue Wilson. 


When I created the 2nd card I had extra pieces of white and black cardstock embossed and cut in the diagonal so I created another card with those pieces and an awesome new Sizzix Tim Holtz 3D Floral Frame Impresslits. I cut it in brown cardstock and then I added some Rose Gold Luster Wax which makes it look like real bronze! 

I made the frame a shaker with leaves from Kat Scrappiness and some gold beads and added a die cut hello from Karen Burniston. 

I had so much fun designing with the Sizzix Luster Wax for my new video and hope my cards encourage you to give some of these ideas and products a try!