Tuesday, November 30, 2021

Two More Cards with 3D Embossing Folders and Favorite Stencils


I recently had a play with new 3D embossing folders and combined those with favorite stencils to make some cards I love and show in my newest video here. The two cards I am sharing today feature a new 3D embossing folder from Stampin' Up called Bark. On my first card above I simply stenciled Barley using a stencil from Artplorations over the embossed cream background, then moved it over and added a lighter colored shadow of the barley. "Thankful" is a die from Gina K Designs. The stenciling over the texture of the embossed background looks even more awesome IRL!

I love the look of 3D embossing folders on mirror card like this brass, and no matter what is added to the top, you have an easy gorgeous card. I used some layered stencils from Gina K Designs to make monochromatic aqua flowers and leaves and added a "hello" from the same Gina K Designs "A Little Hello" stencil, die and stamp kit. 

I hope you learn some new ideas in my video here about 3D embossing folders and stencils, and decide to give some of the ideas and products a try!

I am entering the first card in the Anything Goes challenge at Simon Says Stamp Wednesday.

Monday, November 29, 2021

Video - Cardmaking with Stencils and 3D Embossing Folders


Two of my favorite products to create cards with are 3D embossing folders and stencils, and in my newest video here I combine those two to make some gorgeous cards. 


This is one of my favorite cards I made combining 3D embossing folders and stencils and I even show a great way to spice up the insides of our cards in the video here. The 3D embossing folder used on this card is called Magnolia Branches and is from Simon Says Stamp. I used a Taylored Expressions Masking Stencil and Taylored Expressions Blending Brushes and Bitty Brushes to add ink inside the masked rectangle. As I show in the video, this look is so easy to achieve, and makes for a gorgeous card. 

I couldn't decide which of these two cards is my favorite, so I show in the new video how I made this one as well. I used another Taylored Expressions Masking Stencil, a new 3D embossing folder from Stampin Up called Painted Texture and distress inks to achieve this cool embossed background. The gold mirror card across the center strip was also embossed with that 3D embossing folder and "Paper Hugs" is a new die from Simon Says Stamp. 

To see all the cards I made with 3D embossing folders and stencils, watch the new video here. I hope my cards encourage you to give some of these ideas and products a try!

I am entering the first card in the Anything Goes challenge at Simon Says Stamp Wednesday.

Friday, November 26, 2021

Celebrate with Altenew's Get Wild With Washi Tape Contest


I have been playing with wide washi tapes and on this card I embossed the cardstock after attaching Altenew's Monochrome Wide Washi tape. The 3D embossing folder I chose is a pretty floral from Memory Box and I sponged on blue ink to highlight the flowers. I added an embossed punched butterfly and "celebrate" created with a die from Tonic Studios. I completed the card with a few gems from Gina Marie Designs. 

I am entering this card in the Altenew Get Wild With Washi contest and the Anything Goes challenge at Simon Says Stamp Wednesday.

Wednesday, November 24, 2021

Get Wild With Washi Bay Window Card


Altenew has a Wild With Washi contest going on and I love to play with their washi tapes so I designed this bay window card featuring the Painted Fantasy Wide Washi Tape. As you can see the washi tape looks different depending on what paper it is put on. The bay window right and left panels were created with the Painted Fantasy washi tape over pink checked cardstock and the other panels were over white cardstock. The stitched oval and slimline stitched dies used on the side where the bay window center is tucked under are from Kat Scrappiness as is the wavy wonky rectangle on the back. "Thinking of You" is a die from Simon Says Stamp part of which I die cut out of more floral washi tape paper. Here are views of the side and back of the bay window card:


I am entering this card in the Altenew Get Wild With Washi contest and the Anything Goes challenge at Simon Says Stamp Wednesday.

Tuesday, November 23, 2021

Cardmaking with Vellum and Stencils From My Newest Video


In my newest video I share many slimline and mini-slimline cards I made with vellum and all of today's cards also incorporate favorite stencils as well. I brushed on pink ink through a slimline stencil from Artplorations (a division of Stamplorations) called Floral Joy and turquoise ink through another new slimline stencil from Artplorations called Overlapping Leaves onto white cardstock below for the soft stenciled background on this mini-slimline card. I receive 3 new slimline stencils every other month from Stamplorations as part of their slimline subscription plan. The cost is only $18 (including shipping!) and you can choose monthly, bi-monthly or quarterly - such a great bargain! The see through sticker is also from Stamplorations and the Simple Stem die is from Simon Says Stamp.


I created both of these pet sympathy cards with two stencils from A Colorful Life Designs called Rainbow Pets and Layered Rainbow Bridge Set as well as a beautiful set of Rainbow Bridge sentiment stamps from Waffle Flower. The soft look was achieved by stenciling and stamping on vellum and also on the white cardstock below. 


I used a new layered stencil from Trinity Stamps to create the soft vellum background on this slimline card. The stitched frame was created with Kat Scrappiness dies and "You Shine" is a new layered sentiment die from Simon Says Stamp. 

As you can see I had great fun playing with vellum and making cards for my newest video here. I hope some of my cards inspire you to give some these ideas and products a try!

I am entering the first card in the Make Your Own Background challenge at Simon Says Stamp Wednesday.

Monday, November 22, 2021

Video - Cardmaking with Vellum Techniques, Stencils and Dies


Vellum is a cardmaking product that is often overlooked when making cards with more popular items like stencils and dies. In my newest video here I share many unique slimline and mini-slimline cards made with the soft look of vellum and also share several vellum techniques. One of my favorite vellum techniques is the spotlight technique and I show how to do it in the video on this beautiful wedding card:

The bride stamp is an older favorite from The Ton. Another technique I share in the video is how I "stretched" and raised the hummingbird on this card:


As I show in the video, this technique is most effective with black ink on vellum, but I did try adding some coloring on this slimline version of the card. The floral slimline frame on this card is from Trinity Stamps and  the sentiment die is from Karen Burniston. The hummingbird was stamped with a layered stamp set from Hero Arts. 


Here is another favorite card I shared in the video featuring the softness of see through vellum on a tri-fold mini-slimline card. The gorgeous layered roses were created with a die set from Altenew and the see through sentiment stickers are from Stamplorations.

I had so much fun playing with vellum for this new video, I made a bunch more cards and you can see them all by watching the video here. I hope my cards inspire you to give some of the ideas and products a try!

Thursday, November 18, 2021

Crafter's Companion Gemini Foiled Beauties


Christmas came early this year and Santa was a friend who gave me a Gemini Foilpress as well as many Gemini foil stamp dies and foils all from Crafter's Companion. One of my favorites of the stamp dies I received was this beautiful tree which I cut out with a square wavy wonky die from Kat Scrappiness. 

The background has tiny stars, hearts and dots which also sparkle with foiled beauty. I used Crafter's Companion Birthday Party Foil Transfers to easily achieve that fun foiled look. Using their application tool, I rubbed on the patterned transfer onto a blue plaid patterned cardstock and then applied regular foil. I cut a square to frame the tree and then cut "Thinking" from the same foiled background using a die from Simon Says Stamp. 


Some of the Gemini Foilpress images cut as well as "stamp" the image in foil in the Foilpress machine like the gorgeous butterfly on this card. I "stamped" some pretty foiled flowers on the card front and even cut the shadow of Gina K's "hello" out of a silver foiled piece. I die cut the front out of my favorite stitched rectangle dies from Kat Scrappiness and added some gems to complete the card. 

Wednesday, November 17, 2021

Crafter's Companion Coffee Hug In a Mug Card for the Coffee Lovers Blog Hop


This week is the 2021 Fall/Winter Coffee Lovers Hop and I thought it would be perfect to make a card with this beautiful new Crafter's Companion die cut stack of coffee or tea cups. I saved the triple diamond sketch idea from Sam of Mixed Up Crafts in my Pinterest board for a special card and decided it was perfect for my coffee lover's card. 

My idea was to cut the three cups and saucer out of a pretty patterned paper, but I didn't have the perfect one in my stash. So I decided to make my own with Vintage Artistry Rub-on Transfers from 49 and Market. I added the perfect sentiment strip to the rub-on decorated diamonds on the bottom from Simon Says Stamp. Here is a look at the card from another angle:


The three cups and saucer are actually part of a larger card front die with flowers and spirals from Crafter's Companion, but I chose to cut the three cups out of that background diecut. I also added some pretty rub-on butterflies to the sides of the front and the inside of the card: 

Here are the measurements of my card if you would like to make a card like this one:

The dark green card base was cut 5 1/4" wide and 12" inches long and scored at 6" for a top folding card. Then I trimmed off 1 1/2" from the front of the card. 

The diamonds were cut 1 1/4" square and layered on 1 3/8" green squares. 

The inside piece is 4 3/4" x 4". 

I am entering this card in the 2021 Fall/Winter Coffee Lovers Blog Hop.

Tuesday, November 16, 2021

More Ribbon Swirl Stenciled Cards From My Newest Video


The holidays are fast approaching and so I like to make quick but unique Christmas cards and I found just the stencil set from Trinity Stamps to do just that for my newest video. There are two layers in the Ribbon Swirl Tree stencil set and I did one in green and another in yellow. But to make the card even more interesting, I debossed the Trinity Stamps Starry Skies Coverplate first so the stars are a subtle textured background and show up in the inked swirls. "Believe" is a die from Sizzix and I added some iridescent stars from Trinity Stamps for some extra shimmer. 


This card is so much prettier in the video where you can see the starry shine of the ribbon on the tree over the debossed Memory Box Pinpoint Snowflake background. I applied Therm O Web Deco Foil Transfer Gel Duo through the 2nd stencil and when it was dry attached Gina K Designs Glimmering Gold Fancy Foil. Peace is a die from Quietfire Design and I added some gold gems. 

I think the cards I made for the new video with Trinity Stamps Ribbon Swirl Tree Stencil might be my favorite of the holiday cards I have made this year! I hope they inspire you to give some of the ideas and products a try


Monday, November 15, 2021

Christmas Countdown - Fast Cards With Ribbon Stencils and Debossed Backgrounds


With the holidays fast approaching, I share in my newest video how to make easy, quick and beautiful Christmas cards with a gorgeous Ribbon Swirl Tree Stencil from Trinity Stamps, different ways to add glimmer and debossed textured backgrounds. 


This is the card I show step by step how to make in my new video. The Trinity Stamps Ribbon Swirl Tree is a set of two stencils and on this card I brushed on light purple ink through the first layer onto a patterned paper background debossed with the Kat Scrappiness Stitched Winter Swirl Background. Then I applied a darker layer of purple ink through the second stencil and added Gina K Designs Iridescent Glitz Glitter Gel on top. After it dried, I attached "Sending" from Kat Scrappiness and punched iridescent snowflakes. Here is a look at the inside of this card:


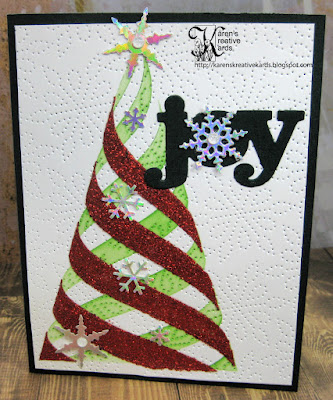
I also used Gina K Designs/Therm O Web Glitz Glitter Gel on the second layer of this Ribbon Swirl Tree, this time in Red Velvet. The debossed background on this card was created with a Memory Box Pinpoint Snowflake Plate. "Joy" is a die from Impression Obsesson and I added punched and die cut iridescent silver snowflakes to finish this card. 

I love how these cards where so easy and fast to make and how they are unique and beautiful with the different glimmery Ribbon Swirl Trees. To see even more cards made with these products, be sure to check out the new video here. 

Thursday, November 11, 2021

Foiled and Die Cut Christmas Cards with a Gemini Foilpress


A very generous friend just gave me a Gemini Foilpress, a bunch of the Gemini foil stamp dies and the transfer foils also from Crafter's Companion, and these are three of the first cards I created with the Christmas images I received. I believe that no matter what size of card I am creating, the cards are so much more appealing to the eye when the card fronts are cut with stitched dies from Kat Scrappiness as I did on all three of the cards in this blogpost. I die cut "Merry Christmas" using dies from Stampendous for the eclipse look. 


One of my favorites of the Gemini Stamp Dies for the Foilpress was the snowflake border I used on both this mini slimline and the slimline card below. On both cards I added a sticker sentiment from STAMPlorations and cut the card fronts with stitched dies from Kat Scrappiness.

Tuesday, November 9, 2021

More Interactive Fun Fold Cards for Special Kids From My Newest Video


Stairstep cards are so easy to make when we use a die set such as the Studio Light Essentials 3 Step Staircase Die Set I used for my first two cards I am sharing from my newest video. I love the adorable gnomes I made easily Karen Burniston and Simon Says Stamp dies and could not resist the Picket Fence stamp set with perfect gnome sayings for Christmas. Here is a side view of the stairsteps and the back of the card: 


The stitched rectangles highlighting those perfect sentiments and the stitched snowflakes behind the two tiny gnomes on the front of the card are from Kat Scrappiness. Here is another 3 step staircase card with punch out 5 Little Monkey art:


Isn't this wiper birthday card adorable? I just love the Animal Alphabet Die Set from Sizzix and here is a picture of what pops up when the wiper comes up:

I hope you will watch the new video with all of these fun interactive fun folds for special kids and give some of the ideas and products a try!